The Cozy Corgi Companion: A Free Knitting Pattern for a Textured, Chunky Yarn Dog Toy
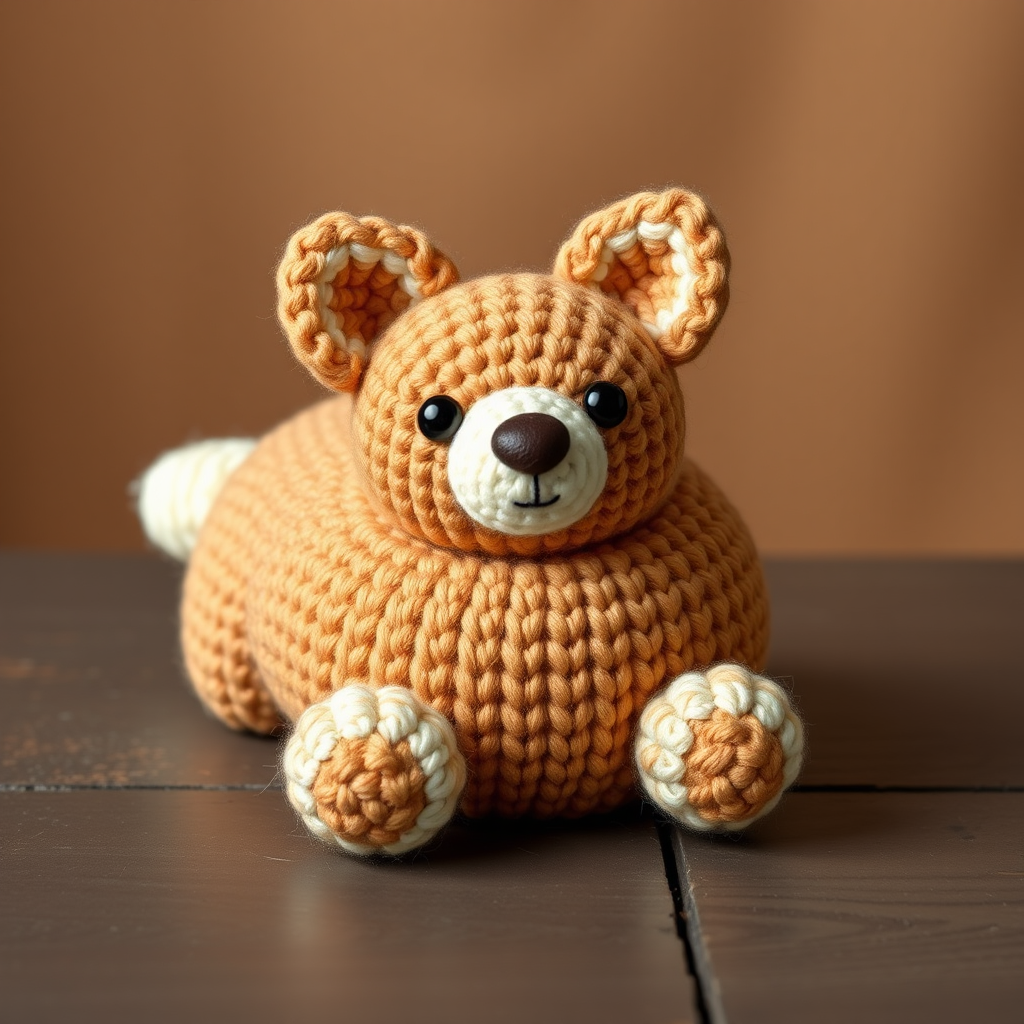
Introducing the Cozy Corgi Companion
Get ready to knit the most adorable, huggable companion you’ve ever made! The Cozy Corgi Companion is a free knitting pattern designed to create a charming, textured dog toy using super bulky yarn. This pattern features a unique, sculpted body and a sweet, expressive face, making it a perfect gift for dog lovers, a cozy decor piece, or a handmade treasure for your own home. The rich, plush stockinette stitch gives this corgi a soft, squishy feel that’s irresistible to cuddle. Whether you’re a seasoned knitter or a confident beginner, this pattern will guide you through every step to create a compact, huggable corgi with a warm tan coat, cream muzzle, and dark brown accents.
Materials Needed
To bring your Cozy Corgi to life, gather the following materials. All yarn is super bulky weight (Size 6), and the gauge is crucial for achieving the perfect size and texture.
- Yarn:
- Main Color (MC) - Warm Tan: approx. 150 yards
- Contrast Color (CC) - Cream: approx. 80 yards
- Accent Color (AC) - Dark Brown: approx. 20 yards
- Needles & Tools:
- US Size 11 (8.0 mm) knitting needles (or size to obtain gauge)
- Tapestry needle for weaving ends and embroidery
- Stitch markers (at least 2)
- Polyester fiberfill stuffing
- Gauge: 12 stitches and 16 rows = 4 inches in Stockinette stitch (knit on right side, purl on wrong side) with super bulky yarn. Take time to check your gauge for best results.
Step-by-Step Instructions
Important Notes: Work in the round using a magic ring or circular cast-on method unless otherwise stated. The body is worked from the bottom up. Use stitch markers to mark the beginning of rounds. “M1” means make one stitch (increase by picking up the bar between stitches and knitting it through the back loop). “K2tog” means knit two stitches together (decrease).
Body (Make 1)
This forms the main torso of your corgi. Work in the round from the bottom up.
- With MC, cast on 6 stitches. Join to work in the round, being careful not to twist. Place a stitch marker to mark the beginning of the round.
- Round 1: Knit all stitches. (6 sts)
- Round 2: *K1, M1* repeat around. (12 sts)
- Round 3: Knit all stitches.
- Round 4: *K2, M1* repeat around. (18 sts)
- Round 5: Knit all stitches.
- Round 6: *K3, M1* repeat around. (24 sts)
- Rounds 7-12: Knit all stitches. (24 sts) – This creates the body height.
- Round 13: *K2, K2tog* repeat around. (18 sts)
- Round 14: Knit all stitches.
- Round 15: *K1, K2tog* repeat around. (12 sts)
- Stuff firmly: Use small amounts of fiberfill at a time, shaping the body into a rounded oval. Ensure it’s firm but not overstuffed.
- Round 16: K2tog around. (6 sts)
- Cut yarn, leaving a 6-inch tail. Thread the tail through a tapestry needle, then pass it through the remaining 6 stitches. Pull tight to close the hole. Weave in the end securely inside the body.
Head (Make 1)
The head is worked similarly to the body but is slightly larger in proportion.
- With MC, cast on 6 stitches. Join to work in the round. Place marker.
- Round 1: Knit all stitches. (6 sts)
- Round 2: *K1, M1* repeat around. (12 sts)
- Round 3: Knit all stitches.
- Round 4: *K2, M1* repeat around. (18 sts)
- Rounds 5-8: Knit all stitches. (18 sts) – This creates the head height.
- Round 9: *K1, K2tog* repeat around. (12 sts)
- Stuff firmly: Shape into a rounded ball, slightly flatter on the front where the face will be.
- Round 10: K2tog around. (6 sts)
- Cut yarn, thread through remaining stitches, pull tight, and weave in end.
Ears (Make 2)
These are worked flat in rows to create a pointed shape.
- With MC, cast on 4 stitches. Work flat (back and forth).
- Row 1 (Right Side): Knit all stitches. (4 sts)
- Row 2 (Wrong Side): Purl all stitches.
- Row 3: K1, M1, K2, M1, K1. (6 sts) – Increases at both ends.
- Row 4: Purl all stitches.
- Row 5: Knit all stitches.
- Row 6: Purl all stitches.
- Row 7: K1, K2tog, K2, K2tog, K1. (4 sts) – Decreases at both ends.
- Row 8: Purl all stitches.
- Bind off all stitches. Leave a long tail (approx. 12 inches) for sewing. The ear will have a slight triangle shape.
Legs (Make 4)
These are simple tubes worked in the round.
- With MC, cast on 5 stitches. Join to work in the round. Place marker.
- Rounds 1-6: Knit all stitches. (5 sts) – This creates a short, stubby leg.
- Bind off loosely. Leave a long tail (approx. 10 inches) for sewing. Do not stuff; they will be flat.
Tail (Make 1)
A small, fluffy tail worked in the round.
- With MC, cast on 4 stitches. Join to work in the round. Place marker.
- Rounds 1-8: Knit all stitches. (4 sts) – This creates a short, rounded tail.
- Bind off loosely. Leave a long tail (approx. 8 inches) for sewing. Do not stuff.
Face Details
Embroider the face using CC and AC yarn. Use a tapestry needle and follow these steps for a sweet, expressive look.
- Muzzle: Using CC (cream), embroider a small oval on the front of the head, centered below the eyes. Use a satin stitch or a series of short straight stitches to fill the oval. The oval should be about 1 inch wide and 0.5 inches tall.
- Nose: Using AC (dark brown), embroider a small triangle at the top center of the muzzle. Use a satin stitch to fill it. The triangle should be about 0.25 inches wide at the base.
- Eyes: Using AC (dark brown), embroider two small circles on either side of the muzzle, about 0.5 inches apart. Use a French knot or a small satin stitch circle. Each eye should be about 0.2 inches in diameter.
- Smile: Using black yarn (or a small piece of AC), embroider a small curved line below the nose for a smile. Use a backstitch to create a gentle curve.
Assembly
Now it’s time to bring your corgi together. Use the long tails left from each piece and a tapestry needle.
- Attach Head to Body: Position the head on top of the body, centered. Sew around the base of the head using a whip stitch, securing it firmly to the body. Ensure the head is upright and slightly forward-facing.
- Attach Ears: Sew the ears to the sides of the head, slightly angled backward. Position them about 1 inch down from the top of the head. Use the long tail to sew securely, then weave in the end.
- Attach Legs: Sew the legs to the bottom of the body, spacing them evenly. Position two legs at the front (under the head) and two at the back (near the tail). Use the long tail to sew each leg securely, then weave in the end.
- Attach Tail: Sew the tail to the back of the body, centered. Use the long tail to sew securely, then weave in the end.
- Final Touches: Weave in all remaining ends using a tapestry needle. Gently shape the corgi by adjusting the stuffing if needed. Your Cozy Corgi Companion is now ready to be hugged and loved!



