The Frostlight Snow Sprite Free Pattern – A Crocheted Glowing Snowman Motif with Aurora Accents
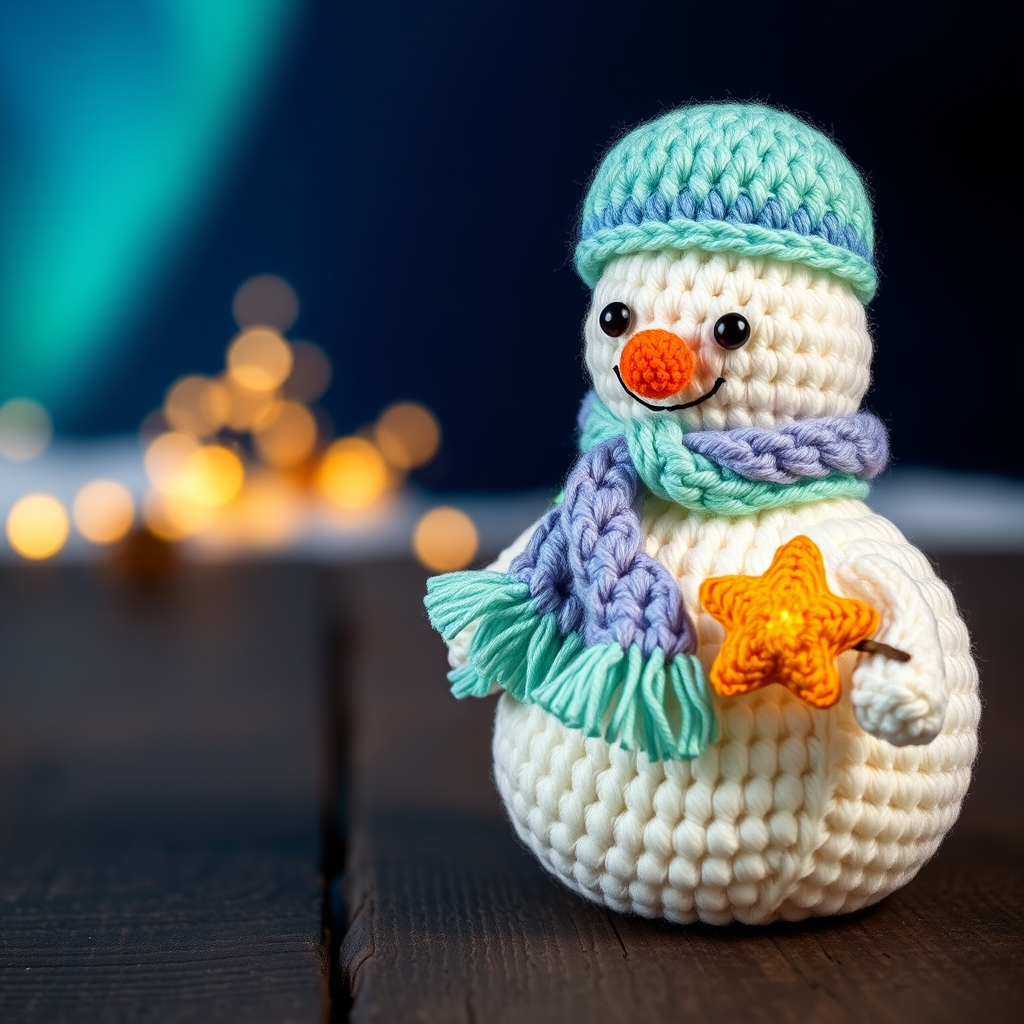
The Frostlight Snow Sprite: A Free Crochet Pattern for a Glowing Winter Companion
Bring the magic of a winter night indoors with this enchanting crocheted snowman, wrapped in a shimmering aurora scarf and holding a softly glowing star. This amigurumi motif is a cozy, whimsical addition to your holiday decor or a heartfelt handmade gift. Whether you're a seasoned crocheter or a curious beginner, this pattern is designed to be approachable and rewarding, resulting in a charming 6-inch-tall companion that captures the serene beauty of a snowy evening.
Why You'll Love This Pattern
This isn't just any snowman—it's a "Snow Sprite" with a personality. The combination of a plush, three-sphere body, a gradient scarf in cool winter hues, and a star that seems to glow (especially if you use glow-in-the-dark yarn!) makes it a standout piece. It's perfect for holiday decorating, gift-giving, or as a unique ornament for your tree. The pattern is also a fantastic way to practice basic amigurumi techniques like increases, decreases, and working in the round.
Materials Needed
Before you begin, gather your supplies. This project uses simple, readily available materials.
- Yarn: Worsted weight yarn in the following colors:
- White (main body)
- Soft blue (scarf)
- Lavender (scarf fringe)
- Mint green (scarf fringe)
- Warm yellow (star)
- Black (eyes and mouth)
- Orange (carrot nose)
- Hook: 3.5mm (E) crochet hook
- Stuffing: Polyester fiberfill stuffing
- Notions: Yarn needle, stitch marker
- Optional: Small amount of glow-in-the-dark yarn for the star
Note on Gauge: Gauge is not critical for this project, but for reference, 4 rounds of single crochet equals approximately 1 inch. Just keep your tension consistent for a neat finish.
Abbreviations
Familiarize yourself with these standard crochet abbreviations before starting:
- mr: magic ring
- sc: single crochet
- inc: increase (2 sc in same stitch)
- dec: decrease (sc 2 stitches together)
- sl st: slip stitch
- ch: chain
- st(s): stitch(es)
- rnd: round
Step-by-Step Instructions
Follow these detailed instructions carefully. We'll build the snowman piece by piece, from the bottom up.
Part 1: The Body (Make 2 Pieces – Bottom and Top)
The snowman's body is made of two crocheted spheres that are sewn together. This creates a stable, plump base.
Bottom Body:
- Rnd 1: Make a magic ring, work 6 sc into the ring. (6 sts)
- Rnd 2: Increase in each stitch around. (12 sts)
- Rnd 3: (Sc in next st, inc) around. (18 sts)
- Rnd 4: (Sc in next 2 sts, inc) around. (24 sts)
- Rnd 5: (Sc in next 3 sts, inc) around. (30 sts)
- Rnd 6: (Sc in next 4 sts, inc) around. (36 sts)
- Rnd 7-12: Sc in each stitch around for 6 rounds. (36 sts) This creates the straight sides of the sphere.
- Rnd 13: (Sc in next 4 sts, dec) around. (30 sts)
- Rnd 14: (Sc in next 3 sts, dec) around. (24 sts)
- Rnd 15: (Sc in next 2 sts, dec) around. (18 sts)
- Stuff firmly with polyester fiberfill. Make sure it's packed well to hold its shape.
- Rnd 16: (Sc in next st, dec) around. (12 sts)
- Rnd 17: Decrease around. (6 sts)
- Fasten off, leaving a tail. Weave the tail through the front loops of the remaining 6 stitches and pull tight to close the hole. Weave in the end securely.
Top Body:
- Rnd 1: Make a magic ring, work 6 sc into the ring. (6 sts)
- Rnd 2: Increase in each stitch around. (12 sts)
- Rnd 3: (Sc in next st, inc) around. (18 sts)
- Rnd 4: (Sc in next 2 sts, inc) around. (24 sts)
- Rnd 5: (Sc in next 3 sts, inc) around. (30 sts)
- Rnd 6-10: Sc in each stitch around for 5 rounds. (30 sts)
- Rnd 11: (Sc in next 3 sts, dec) around. (24 sts)
- Rnd 12: (Sc in next 2 sts, dec) around. (18 sts)
- Stuff firmly.
- Rnd 13: (Sc in next st, dec) around. (12 sts)
- Rnd 14: Decrease around. (6 sts)
- Fasten off, weave in the end as you did for the bottom body.
Part 2: The Head
The head is slightly smaller than the top body, giving the snowman a charming, proportionate look.
- Rnd 1: Make a magic ring, work 6 sc into the ring. (6 sts)
- Rnd 2: Increase in each stitch around. (12 sts)
- Rnd 3: (Sc in next st, inc) around. (18 sts)
- Rnd 4: (Sc in next 2 sts, inc) around. (24 sts)
- Rnd 5: (Sc in next 3 sts, inc) around. (30 sts)
- Rnd 6-10: Sc in each stitch around for 5 rounds. (30 sts)
- Rnd 11: (Sc in next 3 sts, dec) around. (24 sts)
- Rnd 12: (Sc in next 2 sts, dec) around. (18 sts)
- Stuff firmly.
- Rnd 13: (Sc in next st, dec) around. (12 sts)
- Rnd 14: Decrease around. (6 sts)
- Fasten off, but leave a long tail (about 12 inches) for sewing the head to the body.
Part 3: Assembly
Now it's time to bring your snowman together.
- Attach Top Body to Bottom Body: Align the flat edges of the top and bottom body pieces. Using the yarn tail from the top body, sew the two pieces together with a whip stitch, going through the outside loops of both pieces. Sew securely all the way around, then weave in the end.
- Attach Head to Top Body: Position the head on top of the top body, slightly tilted forward for a cute, inquisitive look. Using the long tail from the head, sew it securely to the top body, again using a whip stitch. Weave in the end.
Part 4: The Face
Embroidering the face gives your Snow Sprite its personality. Use the yarn needle and small, careful stitches.
- Eyes: Using black yarn, embroider two eyes. Position them between rounds 6 and 7 of the head, spacing them about 4 stitches apart. Each eye can be a simple cross-stitch or a few small vertical stitches.
- Nose: With orange yarn, embroider a small carrot nose. Center it between the eyes and work a few diagonal stitches downward to create a triangular shape.
- Mouth: Using black yarn, embroider a smile. Start from one side of the nose and work small, curving stitches downward and then back up to the other side, creating a gentle "U" shape.
Part 5: The Aurora Scarf
This scarf adds a pop of color and a touch of winter magic.
- With soft blue yarn, chain 40.
- Row 1: Sc in the 2nd ch from the hook and in each ch across. (39 sts). Turn.
- Row 2: Ch 1, sc in each st across. (39 sts). Fasten off, leaving a tail for sewing.
- Wrap the scarf around the snowman's neck, overlapping the ends at the front or side. Sew it in place or tie a secure knot.
- Optional Fringe: Cut several 4-inch strands of lavender and mint green yarn. Fold each strand in half, insert the folded end through a stitch at the end of the scarf, and pull the tails through the loop. Repeat to add fringe to both ends of the scarf.
Part 6: The Glowing Star
This star is a simple sphere that you'll shape into a star form. It's the perfect finishing touch.
- Rnd 1: With warm yellow yarn, ch 2. Work 5 sc in the 2nd ch from the hook. (5 sts)
- Rnd 2: Inc in each st around. (10 sts)
- Rnd 3: (Sc in next st, inc) around. (15 sts)
- Rnd 4: (Sc in next 2 sts, inc) around. (20 sts)
- Rnd 5: (Sc in next 3 sts, inc) around. (25 sts)
- Rnd 6: (Sc in next 4 sts, inc) around. (30 sts)
- Rnd 7: Sc in each st around. (30 sts)
- Rnd 8: (Sc in next 4 sts, dec) around. (25 sts)
- Rnd 9: (Sc in next 3 sts, dec) around. (20 sts)
- Stuff lightly—you want it to be soft and malleable.
- Rnd 10: (Sc in next 2 sts, dec) around. (15 sts)
- Rnd 11: (Sc in next st, dec) around. (10 sts)
- Rnd 12: Dec around. (5 sts)
- Fasten off, leaving a long tail for sewing.
- Shaping the Star: Pinch the top of the sphere between your thumb and forefinger. Using the yarn tail, sew a few stitches through the pinched area to create a point. Repeat on the opposite side to create a second point. You can also create two more points on the sides for a classic 5-point star look, or keep it as a simple 4-point star. Sew the star to the snowman's side, positioning it as if he's holding it.
Finishing Touches
- Weave in all remaining yarn ends with your yarn needle.
- Optional: To turn your Snow Sprite into an ornament, create a small loop of yarn and sew it to the top of the head.
And there you have it—your very own Frostlight Snow Sprite! This little guy is sure to bring a smile to anyone's face. Enjoy your creation, and happy crocheting!



