The Honeycomb Hearth Amigurumi Beehive Free Pattern – A Knitted Hexagon Honey Pot with Embroidered Bees
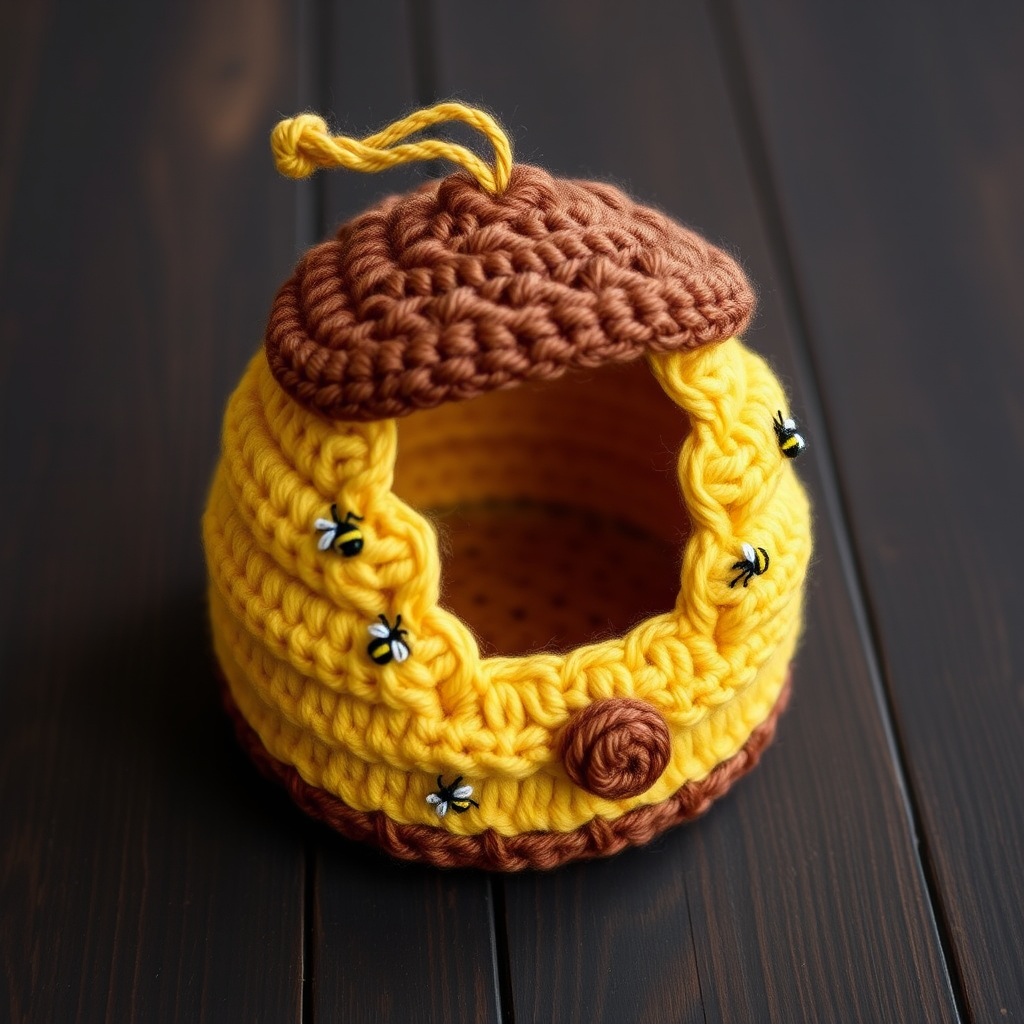
The Honeycomb Hearth Amigurumi Beehive Free Pattern – A Knitted Hexagon Honey Pot with Embroidered Bees
Bring the cozy charm of a buzzing meadow into your home with this knitted beehive honey pot, complete with a removable lid and tiny embroidered bees. This delightful project adds a touch of whimsy to any shelf or table, making it a perfect handmade gift for nature lovers, tea enthusiasts, or anyone who appreciates warm, rustic home decor. The honeycomb texture, created by clever hexagon construction, gives this amigurumi piece a realistic, cozy look that will brighten any room.
Whether you're a seasoned knitter looking for a unique project or a beginner eager to try something new, this pattern is designed to be approachable and rewarding. The finished beehive measures approximately 5 inches tall and 4 inches wide, making it an ideal size for a decorative accent or a small storage container for trinkets, tea bags, or even a tiny treasure.
Materials Needed
Before you begin, gather the following materials to ensure a smooth and enjoyable knitting experience:
- Yarn: Worsted weight cotton yarn in the following colors:
- Golden yellow (Yarn A) – for the main body
- Warm brown (Yarn B) – for the lid and base
- Cream (Yarn C) – for accents (optional)
- Small amounts of black and white yarn – for embroidering the bees
- Needles: US 6 (4.0 mm) knitting needles
- Notions: Tapestry needle for sewing and weaving in ends
- Filling: Polyester fiberfill for stuffing
- Optional: Crochet hook (same size or slightly smaller) for the lid handle
Gauge: 20 stitches and 28 rows = 4 inches in stockinette stitch. While gauge is not critical for this project, matching it will ensure your beehive turns out the intended size.
Step-by-Step Instructions
This knitted beehive is worked in the round from the bottom up, using a simple hexagon motif that creates a honeycomb texture. The lid is knitted separately and can be lifted off to reveal a small storage space inside. Follow these detailed instructions carefully, and you'll have a beautiful beehive in no time.
Hexagon Base (Make 2)
Using Yarn A (golden yellow), cast on 6 stitches. You will be working flat, increasing each row to create a hexagonal shape.
- Row 1: Knit all stitches. (6 stitches)
- Row 2: (K1, M1) repeat to end – 12 stitches. To make an M1 (make one), pick up the horizontal strand between the stitch you just worked and the next stitch, place it on the left needle, and knit it through the back loop.
- Row 3: Knit all stitches. (12 stitches)
- Row 4: (K1, M1, K1) repeat to end – 18 stitches. This means: knit 1, make 1, knit 1, then repeat this sequence across the row.
- Row 5: Knit all stitches. (18 stitches)
- Row 6: (K1, M1, K2) repeat to end – 24 stitches.
- Row 7: Knit all stitches. (24 stitches)
- Row 8: (K1, M1, K3) repeat to end – 30 stitches.
- Row 9: Knit all stitches. (30 stitches)
- Row 10: (K1, M1, K4) repeat to end – 36 stitches.
- Row 11: Knit all stitches. (36 stitches)
- Row 12: (K1, M1, K5) repeat to end – 42 stitches.
- Row 13: Knit all stitches. (42 stitches)
- Row 14: (K1, M1, K6) repeat to end – 48 stitches.
- Row 15: Knit all stitches. (48 stitches)
- Row 16: (K1, M1, K7) repeat to end – 54 stitches.
- Row 17: Knit all stitches. (54 stitches)
- Row 18: (K1, M1, K8) repeat to end – 60 stitches.
- Row 19: Knit all stitches. (60 stitches)
- Row 20: (K1, M1, K9) repeat to end – 66 stitches.
- Row 21: Knit all stitches. (66 stitches)
- Row 22: (K1, M1, K10) repeat to end – 72 stitches.
- Row 23: Knit all stitches. (72 stitches)
- Row 24: (K1, M1, K11) repeat to end – 78 stitches.
- Row 25: Knit all stitches. (78 stitches)
- Row 26: (K1, M1, K12) repeat to end – 84 stitches.
- Row 27: Knit all stitches. (84 stitches)
Bind off loosely. Make a second identical hexagon. These will form the top and bottom of your beehive.
Side Panels (Make 6)
Using Yarn A, cast on 14 stitches. Work in stockinette stitch (knit on right side, purl on wrong side) for 40 rows, or until the panel measures 5 inches in length. Bind off loosely. Make 6 panels total. These panels will form the cylindrical body of the beehive.
Tip: To ensure your panels are uniform, count your rows carefully. Each panel should be exactly the same length so they sew together neatly.
Assembly
Now it's time to bring your beehive together. This step requires patience and careful stitching.
- Sew the side panels together: Using a tapestry needle and Yarn A, sew the side panels together along their long edges, forming a tube. Use a mattress stitch or whip stitch, matching the edges carefully. You should have a cylinder with six distinct panels.
- Attach the bottom hexagon: Sew the bottom hexagon to one end of the tube, matching the edges. The hexagon should fit perfectly into the opening of the tube. Use a whip stitch, going through both layers to secure them firmly.
- Attach the top hexagon: Sew the top hexagon to the other end of the tube, but leave a 2-inch opening for turning and stuffing. This opening will allow you to turn the piece right side out and add the filling.
Stuffing
Turn the beehive right side out through the opening you left. Now, stuff firmly with polyester fiberfill, shaping it into a rounded hive form. Make sure the filling is distributed evenly, especially in the corners and edges, so the beehive holds its shape. Once you're satisfied with the firmness, sew the opening closed with a whip stitch, using Yarn A.
Lid
The lid is knitted separately and sits on top of the beehive, creating a removable cover.
- Knit the lid: Using Yarn B (warm brown), cast on 6 stitches. Work in the round as for the base hexagon, but only through Row 14 (48 stitches). Bind off loosely. This forms the lid.
- Create the handle: To create a small handle, crochet a chain of 10 stitches with Yarn B. If you don't have a crochet hook, you can knit an i-cord instead: cast on 3 stitches, knit across, slide stitches to the other end of the needle, and repeat until the cord is 2 inches long. Bind off.
- Attach the handle: Sew the ends of the chain or i-cord to the center of the lid, forming a small loop. Make sure it's securely attached so it can support the weight of the lid.
Embroidered Bees
Now for the fun part – adding the bees! These little details bring the beehive to life.
- Bee bodies: Using black yarn, embroider small oval shapes (about 1 inch long) onto the beehive in a scattered pattern. Use a satin stitch or a series of small straight stitches to create a solid oval.
- Bee wings: Using white yarn, add tiny wings by making two small straight stitches on each side of the black oval. These should be small, delicate stitches that suggest the shape of wings.
- Bee stripes: Using yellow yarn (Yarn A), add a few small stitches on the bee's body to suggest stripes. These should be short horizontal lines across the black oval, creating the classic bee pattern.
Tip: Space the bees evenly around the beehive for a balanced look. You can add 3-5 bees depending on your preference.
Finishing
Weave in all ends using your tapestry needle, making sure to hide them securely within the knitting. Trim any excess yarn. Place the lid on top of the beehive. The honeycomb texture is created by the hexagon panels, giving the hive a realistic, cozy look.
Final Thoughts
Your Honeycomb Hearth Amigurumi Beehive is now complete! This charming piece makes a wonderful addition to any home, whether displayed on a shelf, used as a decorative storage container, or given as a heartfelt handmade gift. The warm golden yellow and rich brown colors evoke the golden glow of honey and the rustic charm of a countryside apiary.
The soft, slightly nubby texture of the cotton yarn and the visible knit stitches give it a cozy, handmade feel that store-bought decorations simply can't replicate. Each embroidered bee adds a playful touch, making this beehive truly unique.
We hope you enjoyed this pattern and feel proud of your creation. Happy knitting!



