The Moonlit Meadow Fawn: A Free Crochet Pattern for a Textured, Woodland Amigurumi
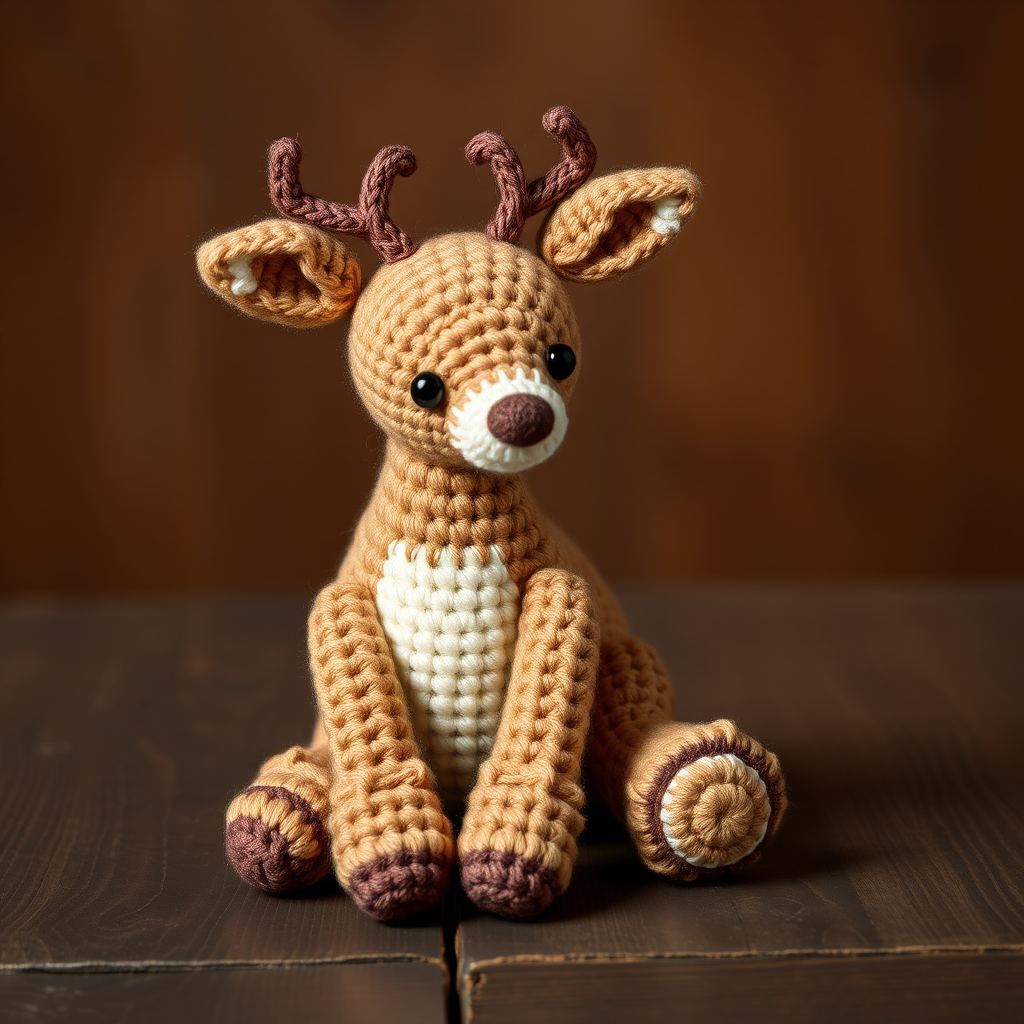
Bring a Touch of Whimsy to Your Home: The Moonlit Meadow Fawn
There's something truly magical about creating a soft, woodland creature with your own hands. This free crochet pattern for the Moonlit Meadow Fawn is designed to be both inspiring and accessible, even for beginners. With its textured, hand-dyed look and simple single crochet stitches, this charming fawn makes a perfect gift for a little one or a delightful addition to your nursery decor. The finished fawn is poseable, huggable, and full of gentle personality—a true labor of love that you'll be proud to say you made yourself.
Materials Needed
Before you begin, gather the following supplies. The gauge is not critical for amigurumi, but aim for tight, even stitches to prevent the stuffing from showing through.
- Yarn: Worsted weight (#4) yarn in three colors:
- Color A (Warm Taupe): Main body and head
- Color B (Cream): Belly and ears
- Color C (Dark Brown): Hooves and antlers
- Small amounts of black yarn for eyes and nose
- Hook: 3.5mm (E) crochet hook
- Other: Yarn needle, scissors, stuffing (polyfill), stitch marker (optional)
Step-by-Step Instructions
Abbreviations: MR = magic ring, sc = single crochet, inc = increase (2 sc in one stitch), dec = decrease (sc 2 together), sl st = slip stitch, ch = chain, FO = fasten off.
Head (Make 1)
With Color A (warm taupe):
- Round 1: Make a magic ring, work 6 sc into the ring. (6 stitches)
- Round 2: Increase in each stitch around. (12 stitches)
- Round 3: (sc in next stitch, inc) repeat around. (18 stitches)
- Round 4: (2 sc, inc) repeat around. (24 stitches)
- Round 5: (3 sc, inc) repeat around. (30 stitches)
- Rounds 6-10: Sc in each stitch around. (30 stitches each round)
- Round 11: (3 sc, dec) repeat around. (24 stitches)
- Round 12: (2 sc, dec) repeat around. (18 stitches)
- Round 13: (sc, dec) repeat around. (12 stitches)
- Stuff the head firmly with polyfill. Fasten off, leaving a long tail (about 12 inches) for sewing.
Body (Make 1)
With Color A (warm taupe):
- Round 1: Magic ring, 6 sc into ring. (6 stitches)
- Round 2: Inc in each stitch around. (12 stitches)
- Round 3: (sc, inc) repeat around. (18 stitches)
- Round 4: (2 sc, inc) repeat around. (24 stitches)
- Round 5: (3 sc, inc) repeat around. (30 stitches)
- Rounds 6-12: Sc in each stitch around. (30 stitches each round)
- Round 13: (3 sc, dec) repeat around. (24 stitches)
- Round 14: (2 sc, dec) repeat around. (18 stitches)
- Round 15: (sc, dec) repeat around. (12 stitches)
- Stuff the body firmly. Fasten off, leaving a long tail for sewing.
Ears (Make 2)
With Color A (warm taupe):
- Round 1: Magic ring, 4 sc into ring. (4 stitches)
- Round 2: Inc in each stitch around. (8 stitches)
- Round 3: (sc, inc) repeat around. (12 stitches)
- Rounds 4-5: Sc in each stitch around. (12 stitches each round)
- Fold the ear flat so the opening is at the bottom. Sc across the opening to close it (you will work through both layers). Fasten off, leaving a tail for sewing.
Front Legs (Make 2)
With Color C (dark brown):
- Round 1: Magic ring, 6 sc into ring. (6 stitches)
- Round 2: Inc in each stitch around. (12 stitches)
- Rounds 3-4: Sc in each stitch around. (12 stitches each round)
- Switch to Color A (warm taupe):
- Rounds 5-10: Sc in each stitch around. (12 stitches each round)
- Stuff the leg lightly (not too firm, so it remains poseable). Fasten off, leaving a tail for sewing.
Back Legs (Make 2)
With Color C (dark brown):
- Round 1: Magic ring, 6 sc into ring. (6 stitches)
- Round 2: Inc in each stitch around. (12 stitches)
- Rounds 3-4: Sc in each stitch around. (12 stitches each round)
- Switch to Color A (warm taupe):
- Rounds 5-12: Sc in each stitch around. (12 stitches each round)
- Stuff the leg lightly. Fasten off, leaving a tail for sewing.
Tail (Make 1)
With Color B (cream):
- Round 1: Magic ring, 4 sc into ring. (4 stitches)
- Round 2: Inc in each stitch around. (8 stitches)
- Round 3: Sc in each stitch around. (8 stitches)
- Fasten off, leaving a tail for sewing.
Antlers (Make 2)
With Color C (dark brown):
- Chain 6. Sc in the 2nd chain from the hook and in each of the next 4 chains. (5 sc)
- Now create the first branch: Chain 3. Sc in the 2nd chain from the hook and in the next chain. (2 sc) Slip stitch into the base of the first branch (the stitch you just came from on the main branch).
- Continue along the main branch: Sc in the next 2 stitches of the main branch.
- Create the second branch: Chain 3. Sc in the 2nd chain from the hook and in the next chain. (2 sc) Slip stitch into the base of the second branch.
- Sc in the last stitch of the main branch. Fasten off, leaving a tail for sewing.
Assembly
- Attach head to body: Using the long tail from the head, sew the head to the top of the body. Position it slightly angled for a cute, curious look. Weave in the end securely.
- Sew on ears: Sew the ears to the top sides of the head, about 2-3 rows down from the top. They should point outward and slightly upward.
- Attach front legs: Sew the front legs to the front of the body, about 2 rows below the neck. Position them so the fawn appears to be sitting upright with legs slightly forward.
- Attach back legs: Sew the back legs to the bottom of the body, spaced evenly apart. They should tuck under the body.
- Sew on tail: Sew the tail to the back of the body, just above the back legs.
- Attach antlers: Sew the antlers to the top of the head, between the ears. Position them so they branch outward.
- Embroider the face: With black yarn, embroider two small eyes using French knots or satin stitches. Place them about 4-5 stitches apart. With a small piece of brown yarn, embroider a tiny nose (a small triangle or oval) just below the eyes. Add a small smile with brown yarn if desired.
Finishing
Weave in all remaining ends using a yarn needle. Gently shape the fawn by positioning the legs, ears, and antlers. Your Moonlit Meadow Fawn is now complete—a soft, whimsical friend ready to bring woodland charm to any space!



