The Peppermint Pals Reindeer Free Pattern – A Crocheted Candy Cane Amigurumi with Cozy Holiday Stripes
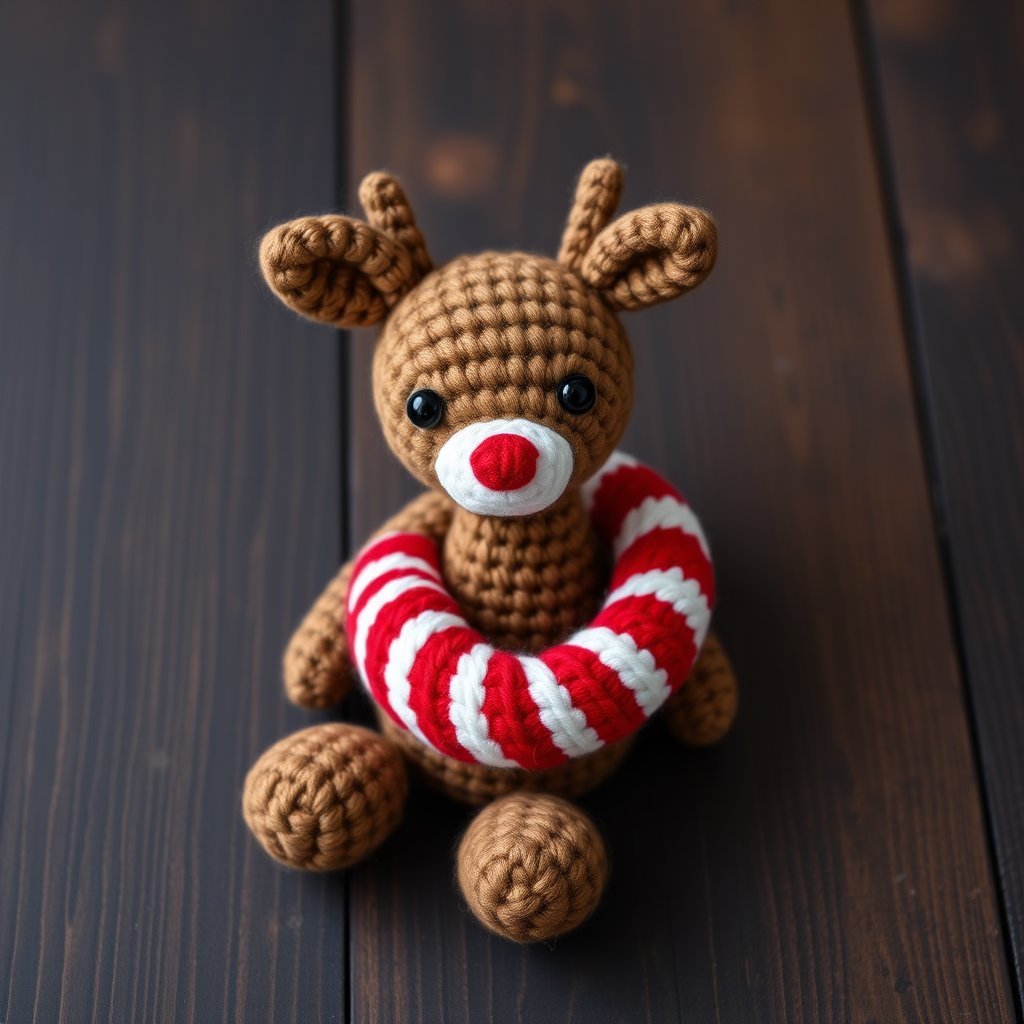
The Peppermint Pals Reindeer Free Pattern – A Crocheted Candy Cane Amigurumi with Cozy Holiday Stripes
Get ready to fall in love with the most adorable holiday crochet project yet! This Peppermint Pals Reindeer is a charming amigurumi wrapped in a candy cane-inspired spiral, making it a festive and cuddly addition to your Christmas decor. Whether you're looking for a heartfelt handmade gift or a whimsical shelf companion to brighten your winter days, this pattern is designed for crocheters of all skill levels. With its plump, huggable body, sweet embroidered face, and vibrant red-and-white stripes, this little reindeer is sure to become a cherished holiday tradition.
This free pattern is perfect for beginners and experienced crafters alike. The step-by-step instructions are detailed and easy to follow, using basic crochet stitches like single crochet (sc), increases (inc), and decreases (dec). The result is a cozy, handmade treasure that captures the magic of Christmas in every stitch. Let's dive in and create your very own Peppermint Pal!
Materials Needed
Before you begin, gather the following materials. All items are readily available at your local craft store or online.
- Yarn: Worsted weight yarn in three colors:
- Red (e.g., Lion Brand Vanna's Choice in Cranberry)
- White (e.g., Lion Brand Vanna's Choice in White)
- Brown (e.g., Lion Brand Vanna's Choice in Chocolate)
- Crochet Hook: 3.5mm hook (E-4)
- Stitch Marker: To keep track of your rounds
- Yarn Needle: For sewing pieces together and weaving in ends
- Stuffing: Polyester fiberfill or any soft stuffing of your choice
- Safety Eyes (optional): 6mm black safety eyes, or black yarn for embroidered eyes
- Embroidery Floss or Yarn: Black for eyes (if not using safety eyes) and red for the nose
- Scissors: For cutting yarn
Gauge: Not critical for amigurumi; aim for a tight tension to prevent stuffing showing through. Approx. 4 sc = 1 inch.
Step-by-Step Instructions
This pattern is worked in continuous rounds unless otherwise stated. Always use a stitch marker to keep track of your rounds. Let's start with the head!
Head (in Brown)
- Round 1: Create a magic ring and work 6 single crochet (sc) into the ring. (6 stitches)
- Round 2: Increase (inc) in each stitch around. (12 stitches)
- Round 3: (Sc in next stitch, inc) around. (18 stitches)
- Round 4: (Sc in next 2 stitches, inc) around. (24 stitches)
- Rounds 5-8: Sc in each stitch around. (24 stitches)
- Round 9: (Sc in next 2 stitches, decrease (dec)) around. (18 stitches)
- Round 10: (Sc in next stitch, dec) around. (12 stitches)
- Stuff the head firmly with fiberfill. Fasten off, leaving a long tail for sewing.
Body (in Red and White Stripes)
- Round 1: With red yarn, create a magic ring and work 6 sc into the ring. (6 stitches)
- Round 2: Inc in each stitch around. (12 stitches)
- Round 3: (Sc in next stitch, inc) around. (18 stitches)
- Round 4: (Sc in next 2 stitches, inc) around. (24 stitches)
- Rounds 5-6: Sc in each stitch around. (24 stitches)
- Round 7: Switch to white yarn, sc in each stitch around. (24 stitches)
- Round 8: With white yarn, sc in each stitch around. (24 stitches)
- Round 9: Switch to red yarn, sc in each stitch around. (24 stitches)
- Round 10: With red yarn, sc in each stitch around. (24 stitches)
- Round 11: Switch to white yarn, sc in each stitch around. (24 stitches)
- Round 12: With white yarn, sc in each stitch around. (24 stitches)
- Round 13: Switch to red yarn, sc in each stitch around. (24 stitches)
- Round 14: With red yarn, (sc in next 2 stitches, dec) around. (18 stitches)
- Round 15: Switch to white yarn, sc in each stitch around. (18 stitches)
- Round 16: With white yarn, (sc in next stitch, dec) around. (12 stitches)
- Stuff the body firmly with fiberfill. Fasten off, leaving a long tail for sewing.
Legs (Make 4, in Brown)
- Round 1: Create a magic ring and work 6 sc into the ring. (6 stitches)
- Rounds 2-4: Sc in each stitch around. (6 stitches)
- Fasten off, leaving a long tail for sewing. Stuff lightly with fiberfill.
Antlers (Make 2, in Brown)
- Round 1: Create a magic ring and work 6 sc into the ring. (6 stitches)
- Rounds 2-3: Sc in each stitch around. (6 stitches)
- Round 4: (Sc in next stitch, inc) around. (9 stitches)
- Rounds 5-6: Sc in each stitch around. (9 stitches)
- Fasten off, leaving a long tail for sewing. Do not stuff.
Ears (Make 2, in Brown)
- Round 1: Create a magic ring and work 4 sc into the ring. (4 stitches)
- Round 2: (Sc in next stitch, inc) around. (6 stitches)
- Round 3: Sc in each stitch around. (6 stitches)
- Fasten off, leaving a long tail for sewing. Do not stuff.
Candy Cane Wrap (in Red and White)
This is a long strip that will be wrapped around the body to create the iconic candy cane look.
- Chain 30.
- Row 1: Sc in the 2nd chain from the hook and in each chain across. (29 stitches)
- Fasten off. Sew the strip around the body in a spiral, alternating red and white sections to mimic a candy cane. You can also crochet a separate strip in red and white stripes for a more defined look.
Assembly
Now it's time to bring your reindeer to life! Follow these steps carefully to assemble all the pieces.
- Sew the head to the body: Use the long tail from the head to sew it securely onto the top of the body. Make sure it's centered and firmly attached.
- Sew the legs to the bottom of the body: Position the four legs evenly on the bottom of the body. Use the long tails to sew them securely, ensuring the reindeer sits upright.
- Sew the antlers to the top of the head: Attach the antlers slightly to the sides of the top of the head, using the long tails. Make sure they are symmetrical.
- Sew the ears to the sides of the head: Position the ears just below the antlers on each side of the head. Sew them securely.
- Embroider the eyes and nose: If using safety eyes, attach them between rounds 5 and 6 of the head, about 4 stitches apart. If embroidering, use black yarn or floss to create small French knots or satin stitches for the eyes. Use red yarn to embroider a small nose in the center of the face, just below the eyes.
- Wrap the candy cane strip around the body: Take the crocheted strip and wrap it around the body in a spiral, starting from the bottom and working your way up. Secure it with a few stitches at the top and bottom to keep it in place.
And there you have it—your very own Peppermint Pals Reindeer! This festive little friend is perfect for gifting, decorating, or simply adding a touch of handmade warmth to your holiday season. The combination of rich brown, bright red, and crisp white creates a classic Christmas palette that will delight everyone who sees it.
Happy crocheting, and may your holidays be filled with cozy stitches and sweet memories!



