The Serene Sakura Kokeshi Cat Doll: A Free Knitting Pattern for a Japanese-Inspired Amigurumi
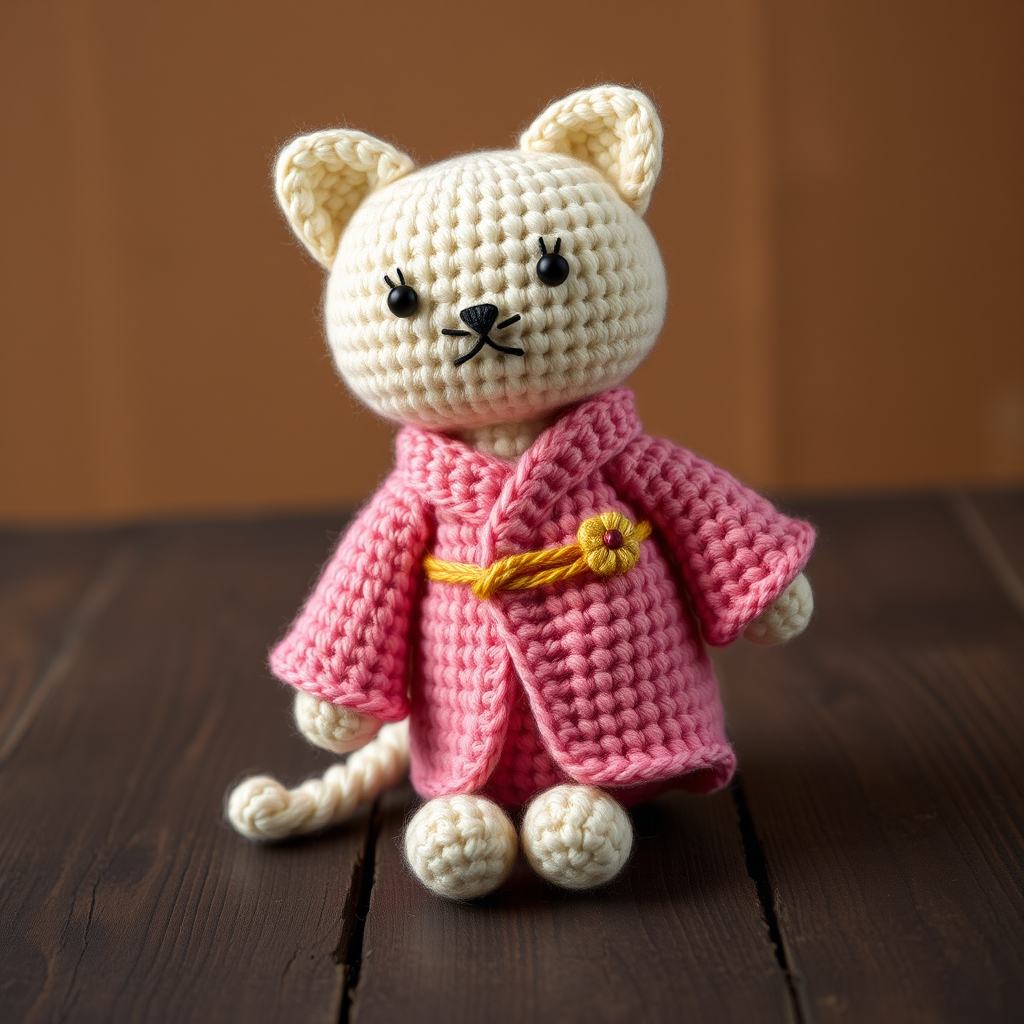
Introduction: Meet the Serene Sakura Kokeshi Cat Doll
Step into a world of kawaii charm and Japanese-inspired artistry with this free knitting pattern for the Serene Sakura Kokeshi Cat Doll. This amigurumi project blends the elegant, minimalist silhouette of a traditional wooden kokeshi doll with the irresistible cuteness of a kimono-clad cat. Using simple knitting stitches worked in the round and flat, you will create a soft, posable doll that is as delightful to make as it is to display. The pattern features a textured, cream-colored head with pointed ears, a blush pink kimono with a gold obi sash, and a single embroidered cherry blossom for a touch of serene beauty. Perfect for intermediate beginners, this project will teach you increases, decreases, and seamless assembly while yielding a truly unique handmade treasure.
Materials Needed
Before you begin, gather the following materials. Using the exact specifications will ensure your doll matches the intended size and gauge.
Yarn
- Cream: Approximately 50 grams of worsted weight yarn (for head, ears, and tail)
- Blush Pink: Approximately 20 grams of worsted weight yarn (for body, kimono, and sleeves)
- Soft Charcoal: Approximately 10 grams of worsted weight yarn (for optional details or contrast, though not used in main pieces)
- Gold: Approximately 5 grams of worsted weight yarn (for obi sash and embroidery)
- Black Embroidery Floss: Small amount for eyes
Needles & Tools
- Knitting Needles: US 4 (3.5mm) double-pointed needles (DPNs) or a circular needle suitable for the magic loop method.
- Tapestry Needle: For weaving in ends and sewing pieces together.
- Stitch Markers: To mark the beginning of rounds.
- Polyfill Stuffing: For firm stuffing of head and body.
- Scissors: For cutting yarn.
Gauge
6 stitches and 8 rows = 1 inch in stockinette stitch worked in the round. Achieving this gauge is crucial for the correct size and proportions of your doll.
Step-by-Step Instructions
Follow these detailed instructions carefully. The pattern is broken down into individual pieces, followed by assembly. Work each piece as described, and do not skip any steps.
Abbreviations
- CO: Cast on
- k: Knit
- p: Purl
- k2tog: Knit two together (decrease)
- m1: Make one (increase) – use your preferred method (e.g., backward loop or lifted increase)
- st(s): Stitch(es)
- rnd(s): Round(s)
- BO: Bind off
- RS: Right side
- WS: Wrong side
Head (Knit in the Round, Starting at Top)
The head is worked from the top down, increasing to form a sphere, then decreasing to close.
- With cream yarn, CO 6 stitches. Join in the round, being careful not to twist. Place a stitch marker to mark the beginning of the round.
- Rnd 1: Knit all stitches. (6 sts)
- Rnd 2: *K1, m1* repeat around. (12 sts)
- Rnd 3: Knit all stitches. (12 sts)
- Rnd 4: *K2, m1* repeat around. (18 sts)
- Rnd 5: Knit all stitches. (18 sts)
- Rnd 6: *K3, m1* repeat around. (24 sts)
- Rnd 7: Knit all stitches. (24 sts)
- Rnd 8: *K4, m1* repeat around. (30 sts)
- Rnds 9-16: Knit all stitches for 8 rounds even. (30 sts)
- Rnd 17: *K3, k2tog* repeat around. (24 sts)
- Rnd 18: *K2, k2tog* repeat around. (18 sts)
- Stuff head firmly with polyfill, ensuring it is evenly distributed and the shape is round.
- Rnd 19: *K1, k2tog* repeat around. (12 sts)
- Rnd 20: *K2tog* repeat around. (6 sts)
- Cut yarn, leaving a 6-inch tail. Thread the tail through a tapestry needle, then pass it through the remaining 6 stitches. Pull tight to close the hole. Secure the yarn by weaving it into the head.
Body (Knit in the Round, Starting at Bottom)
The body is worked from the bottom up, increasing to form a cylinder, then decreasing to close.
- With blush pink yarn, CO 6 stitches. Join in the round, being careful not to twist. Place a stitch marker.
- Rnd 1: Knit all stitches. (6 sts)
- Rnd 2: *K1, m1* repeat around. (12 sts)
- Rnd 3: Knit all stitches. (12 sts)
- Rnd 4: *K2, m1* repeat around. (18 sts)
- Rnd 5: Knit all stitches. (18 sts)
- Rnd 6: *K3, m1* repeat around. (24 sts)
- Rnd 7: Knit all stitches. (24 sts)
- Rnd 8: *K4, m1* repeat around. (30 sts)
- Rnds 9-14: Knit all stitches for 6 rounds even. (30 sts)
- Rnd 15: *K3, k2tog* repeat around. (24 sts)
- Rnd 16: *K2, k2tog* repeat around. (18 sts)
- Stuff body firmly with polyfill, making sure it is evenly filled.
- Rnd 17: *K1, k2tog* repeat around. (12 sts)
- Rnd 18: *K2tog* repeat around. (6 sts)
- Cut yarn, leaving a 6-inch tail. Thread through remaining stitches, pull tight, and secure.
Kimono (Knit Flat, Then Seamed)
The kimono is a rectangular piece knit flat in stockinette stitch, then folded and seamed.
- With blush pink yarn, CO 24 stitches.
- Row 1 (RS): Knit all stitches.
- Row 2 (WS): Purl all stitches.
- Rows 3-24: Repeat Rows 1 and 2 for a total of 24 rows (12 knit rows, 12 purl rows). The piece should measure approximately 4 inches in length.
- Row 25: Knit all stitches.
- BO all stitches knitwise. Cut yarn, leaving a 12-inch tail for seaming.
Sleeves (Make 2, Knit Flat)
Each sleeve is a small rectangle knit flat.
- With blush pink yarn, CO 12 stitches.
- Row 1 (RS): Knit all stitches.
- Row 2 (WS): Purl all stitches.
- Rows 3-10: Repeat Rows 1 and 2 for a total of 10 rows (5 knit rows, 5 purl rows).
- BO all stitches knitwise. Cut yarn, leaving a 6-inch tail for seaming.
Obi (Sash, Knit Flat)
The obi is a long, narrow strip knit in garter stitch.
- With gold yarn, CO 6 stitches.
- Row 1: Knit all stitches.
- Row 2: Knit all stitches.
- Repeat Rows 1-2 until the piece measures 6 inches in length. BO all stitches knitwise. Cut yarn, leaving a 6-inch tail.
Ears (Make 2, Knit Flat)
Each ear is a triangle shape worked flat with increases.
- With cream yarn, CO 4 stitches.
- Row 1: Knit all stitches. (4 sts)
- Row 2: Knit all stitches. (4 sts)
- Row 3: K1, m1, knit to last stitch, m1, k1. (6 sts)
- Row 4: Knit all stitches. (6 sts)
- Row 5: K1, m1, knit to last stitch, m1, k1. (8 sts)
- Row 6: Knit all stitches. (8 sts)
- Row 7: K1, m1, knit to last stitch, m1, k1. (10 sts)
- Row 8: Knit all stitches. (10 sts)
- Row 9: K1, m1, knit to last stitch, m1, k1. (12 sts)
- Row 10: Knit all stitches. (12 sts)
- BO all stitches knitwise. Cut yarn, leaving a 6-inch tail for sewing.
Tail (Knit in the Round)
The tail is a simple tube worked in the round.
- With cream yarn, CO 6 stitches. Join in the round, being careful not to twist. Place a stitch marker.
- Rnds 1-12: Knit all stitches for 12 rounds. (6 sts)
- BO all stitches loosely. Cut yarn, leaving a 6-inch tail for sewing.
Assembly
Take your time with assembly to ensure a neat and professional finish.
- Sew head to body: Using the tail from the body, sew the top of the body to the bottom of the head, matching the edges. Use a whip stitch and ensure the seam is secure and invisible.
- Prepare the kimono: Fold the kimono piece in half lengthwise (with the right sides together). Sew the side seam using the long tail, leaving a 1-inch opening at the top for the armholes. Turn the kimono right side out.
- Attach the kimono: Place the kimono over the body, with the seam at the back. Align the top edge of the kimono just below the head. Sew the top edge of the kimono to the body using a whip stitch, securing it evenly around.
- Attach sleeves: Fold each sleeve in half lengthwise (right sides together). Sew the side seam using the tail. Turn right side out. Insert the sleeve into the armhole opening of the kimono. Sew the sleeve edge to the armhole edge using a whip stitch. Repeat for the second sleeve.
- Attach the obi: Wrap the obi strip around the waist of the doll, over the kimono. Position it so the ends meet at the back. Sew the ends together securely. Trim excess yarn.
- Sew ears: Position the ears on top of the head, slightly angled outward. Sew each ear to the head using the tail, making sure they are securely attached and stand upright.
- Sew tail: Sew the tail to the back of the body, just below the kimono. Position it so it curves naturally.
- Embroider face: With black embroidery floss, make two small French knots for eyes, about 1/2 inch apart on the face. Position them slightly above the center of the head. For the nose, make a small vertical stitch with the black floss, or leave it plain for a minimalist look.
- Embroider cherry blossom: With gold yarn, embroider a small flower or cherry blossom on the front of the kimono. Use lazy daisy stitches for the petals and a French knot for the center. Position it slightly off-center for a natural look.
- Optional hanging loop: Cut a 6-inch piece of cream yarn. Fold it in half and sew the ends to the top of the head, creating a small loop for hanging.
Finishing
Weave in all remaining ends using a tapestry needle. Gently shape the doll by adjusting the stuffing and smoothing the fabric. Your Serene Sakura Kokeshi Cat Doll is now complete!



