The Sugarplum Gnome Trio Free Pattern – Crochet a Whimsical Holiday Shelf Family
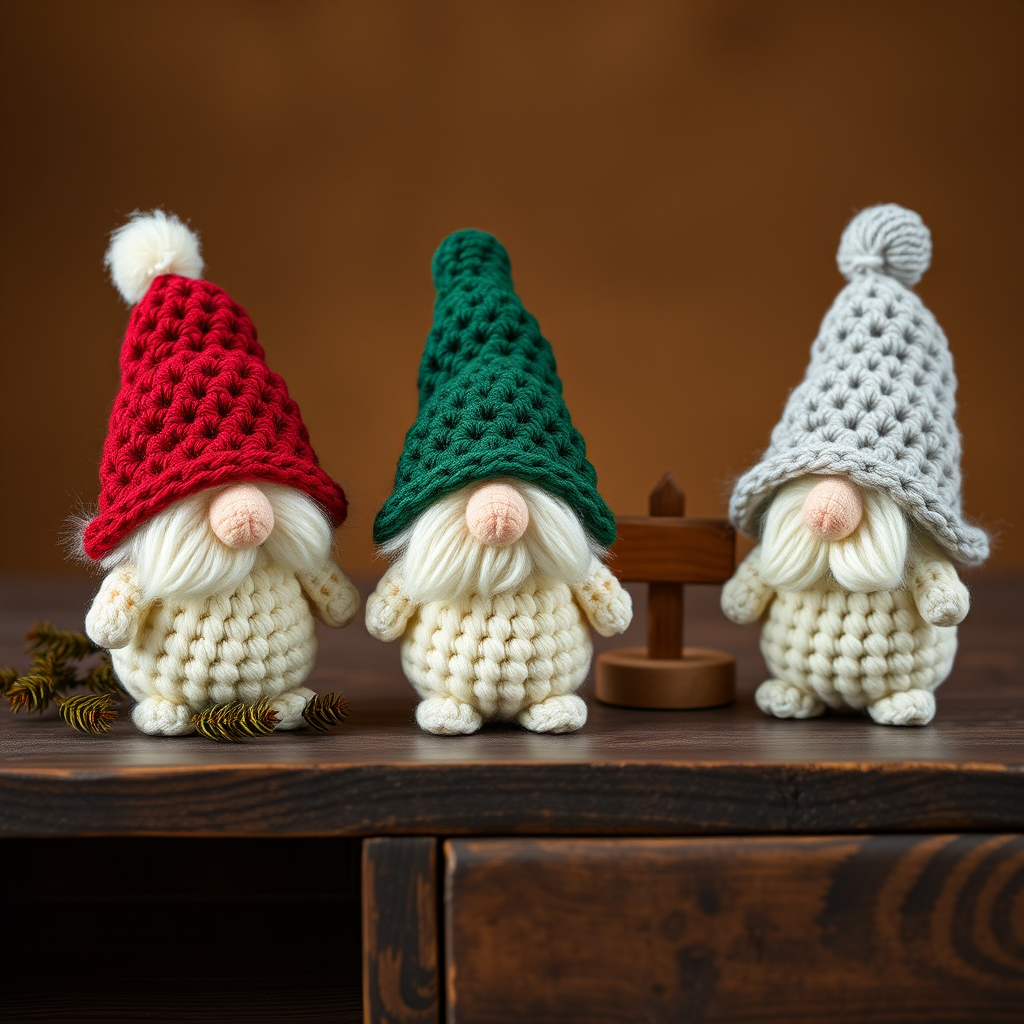
The Sugarplum Gnome Trio Free Pattern – Crochet a Whimsical Holiday Shelf Family
Bring a touch of Nordic folklore to your holiday décor with this trio of pocket-sized crochet gnomes, each with a unique textured beard and cozy felted hat. Perfect for gifting or as a charming tabletop display, these little fellows are quick to make and endlessly customizable. Whether you're a seasoned crocheter or a beginner looking for a fun weekend project, this pattern will guide you through every step to create a whimsical shelf family that will spread holiday cheer for years to come.
Materials Needed
Before you begin, gather the following materials. Having everything ready will make the process smooth and enjoyable.
- Yarn: Worsted weight cotton or acrylic yarn in the following colors:
- Cream (for the bodies – you'll need enough for 3 gnomes)
- Rust red (for one hat)
- Forest green (for one hat)
- Soft gray (for one hat)
- Small amounts of black yarn for embroidering eyes
- Faux fur or brushed yarn: For the beards (alternatively, you can use a loop stitch technique with cream yarn)
- Crochet hook: 3.5 mm (E) crochet hook
- Polyester fiberfill stuffing: For filling the bodies and noses
- Yarn needle: For sewing pieces together and weaving in ends
- Scissors: For cutting yarn and trimming beards
- Stitch marker: To keep track of rounds
- Optional: Small wooden beads or bells for hat tips
Gauge: 4 sc x 4 rows = 1 inch. Gauge is not critical for this project, but consistent tension is key to ensure all three gnomes are the same size.
Step-by-Step Instructions
Follow these detailed instructions carefully. Each gnome is made individually, then assembled. The pattern uses standard amigurumi techniques, so let's start with the abbreviations you'll need.
Abbreviations
- MR: Magic ring
- sc: Single crochet
- inc: Increase (2 sc in same stitch)
- dec: Decrease (sc 2 together)
- sl st: Slip stitch
- ch: Chain
- FO: Fasten off
Body (Make 3 – all in cream yarn)
The body forms the base of each gnome. Work in continuous rounds without joining unless specified.
- Round 1: Make a magic ring, work 6 sc into the ring. (6 stitches)
- Round 2: Inc in each stitch around. (12 stitches)
- Round 3: (Sc in next stitch, inc) repeat around. (18 stitches)
- Round 4: (Sc in next 2 stitches, inc) repeat around. (24 stitches)
- Rounds 5-8: Sc in each stitch around for 4 rounds. (24 stitches each round)
- Round 9: (Sc in next 2 stitches, dec) repeat around. (18 stitches)
- Round 10: (Sc in next stitch, dec) repeat around. (12 stitches)
- Round 11: Stuff the body firmly with polyester fiberfill. Make sure it's well-packed but not so tight that it distorts the shape.
- Round 12: Dec around. (6 stitches)
- Finish: FO and weave in the end securely. The body is complete.
Nose (Make 3 – all in cream or a slightly rosy pink yarn)
The nose is a small, round ball that gives the gnome its characteristic face.
- Round 1: Make a magic ring, work 6 sc into the ring. (6 stitches)
- Round 2: (Sc in next stitch, inc) repeat around. (9 stitches)
- Round 3: Sc in each stitch around. (9 stitches)
- Finish: FO, leaving a long tail for sewing. Stuff the nose lightly with a tiny amount of fiberfill.
Hat (Make 3 – one in rust red, one in forest green, one in soft gray)
Each hat is worked from the top down, starting at the point and widening toward the brim. The slight fold at the bottom is created during assembly.
- Round 1: Make a magic ring, work 6 sc into the ring. (6 stitches)
- Round 2: Inc in each stitch around. (12 stitches)
- Round 3: (Sc in next stitch, inc) repeat around. (18 stitches)
- Rounds 4-6: Sc in each stitch around for 3 rounds. (18 stitches each round)
- Round 7: (Sc in next stitch, dec) repeat around. (12 stitches)
- Rounds 8-9: Sc in each stitch around for 2 rounds. (12 stitches each round)
- Round 10: (Sc in next stitch, dec) repeat around. (8 stitches)
- Rounds 11-12: Sc in each stitch around for 2 rounds. (8 stitches each round)
- Round 13: (Sc in next stitch, dec) repeat around. (6 stitches)
- Rounds 14-15: Sc in each stitch around for 2 rounds. (6 stitches each round)
- Round 16: (Sc in next stitch, dec) repeat around. (4 stitches)
- Round 17: Sc in each stitch around. (4 stitches)
- Finish: FO, leaving a long tail for sewing. Do not stuff the hat – it should remain flat and slightly floppy.
Beard (Attach to each gnome)
The beard is what gives these gnomes their whimsical, fluffy appearance. You can use faux fur yarn or create a loop stitch beard with cream yarn for a more textured look.
- Cut several strands of faux fur or brushed yarn, each about 4 inches long. You'll need roughly 15-20 strands per gnome, depending on how full you want the beard.
- Using a yarn needle, thread each strand through the stitches around the lower half of the face area (below where the nose will be). Loop the strand through and pull it halfway to create a fringe effect.
- Continue attaching strands in a fan shape, working from the center outward, to create a rounded beard that covers the lower portion of the face.
- Once all strands are attached, trim them to shape a neat, rounded beard. The beard should extend slightly below the body's bottom edge for a natural look.
Assembly
Now it's time to bring your gnome to life. Follow these steps for each of the three gnomes.
- Attach the nose: Position the nose in the center of the face, just above the beard area. Sew it securely using the long tail left from the nose. Make sure it's firmly attached and centered.
- Attach the hat: Place the hat on top of the head, slightly angled for a playful look. The bottom edge of the hat should sit just above the eyes. Sew it in place using the long tail from the hat. Fold the bottom brim up slightly (about 1/4 inch) and tack it down with a few stitches to create the characteristic gnome hat fold.
- Embroider the eyes: Using black yarn and a yarn needle, make two small horizontal stitches on either side of the nose, about 1/4 inch away. These should be small and neat – just enough to suggest closed, happy eyes. Alternatively, you can make small French knots for a rounder eye shape.
- Optional decoration: Attach a small bell or wooden bead to the tip of the hat using a length of yarn. Sew it securely so it dangles slightly.
Finishing
- Weave in all remaining ends using the yarn needle. Make sure to hide them well inside the body or hat so they're not visible.
- Give your gnome a final once-over – adjust the beard shape, straighten the hat, and ensure the eyes are even.
- Repeat the entire process for the remaining two gnomes, using the different hat colors.
Your Sugarplum Gnome Trio is now complete! These charming little fellows are perfect for displaying on a shelf, mantelpiece, or as part of a festive tablescape. They also make wonderful handmade gifts for friends and family. Feel free to experiment with different hat colors, add tiny accessories like scarves or mittens, or even create a whole gnome village. Happy crocheting, and may your holidays be filled with whimsy and warmth!



