The Sun-Kissed Watermelon Slice Bag Free Crochet Pattern – A Juicy Summer Tote
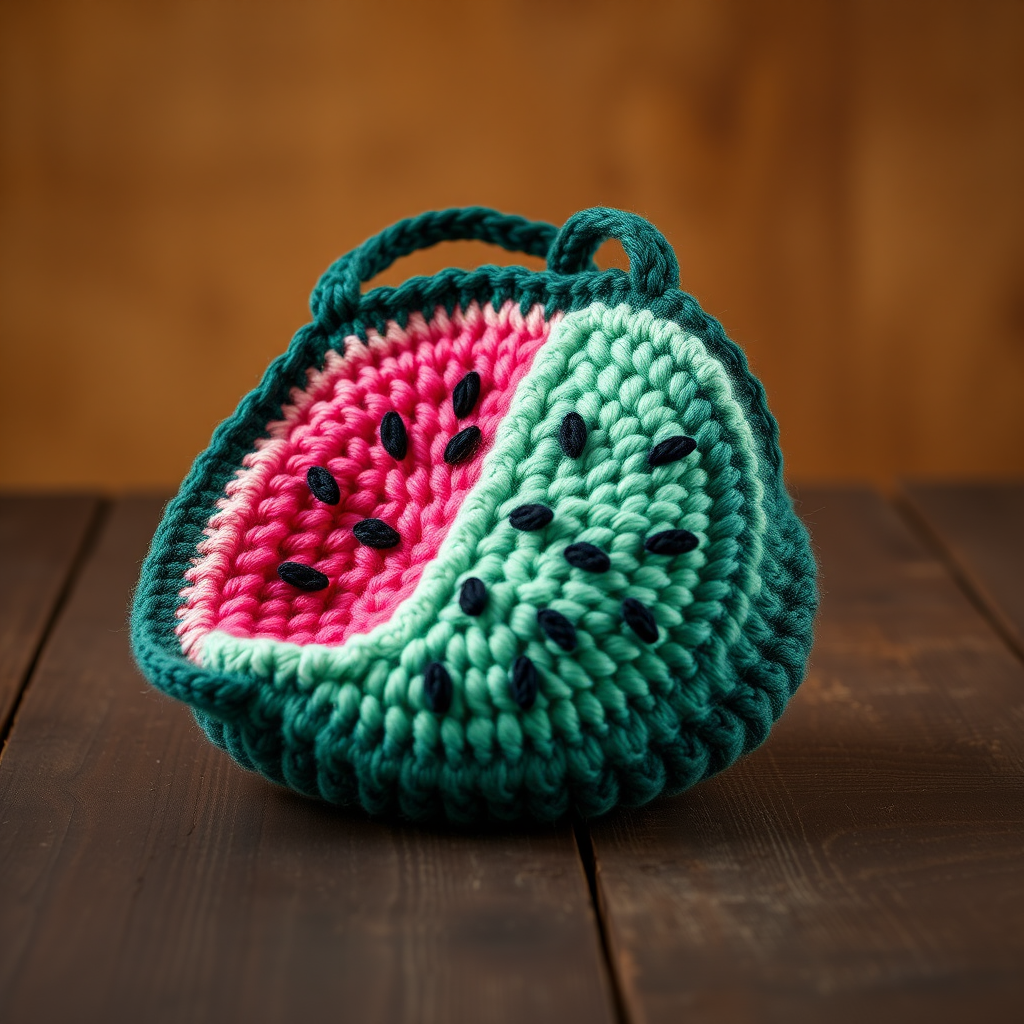
The Sun-Kissed Watermelon Slice Bag: A Juicy Summer Crochet Tote Pattern
Imagine strolling through a sun-drenched farmers' market or lounging on a sandy beach, carrying a bag that looks good enough to eat. This Watermelon Slice Bag is the perfect summer accessory—a playful, eye-catching tote that combines the charm of amigurumi with the practicality of a handbag. With its textured rind, sweet seed details, and sturdy handles, this bag is as functional as it is adorable. Whether you're a seasoned crocheter or a confident beginner, this pattern will guide you through creating a one-of-a-kind piece that's sure to spark conversations and brighten any outfit. Let's dive into this juicy project!
Materials Needed
Before we start, gather all your supplies. Having everything ready will make the process smooth and enjoyable.
- Yarn: Worsted weight cotton yarn in the following colors:
- Watermelon pink (200g) – for the main body
- Mint green (100g) – for the inner rind
- Dark green (50g) – for the outer rind and handles
- Black (small amount) – for the seeds
- Crochet Hook: 5.0 mm (US H-8)
- Stitch markers – to keep track of rounds
- Yarn needle – for sewing and weaving in ends
- Scissors
- Optional but recommended: Fabric lining (for durability) and a magnetic snap closure (for a secure top)
Gauge: 16 single crochet (sc) x 18 rows = 4 x 4 inches (10 x 10 cm). Always check your gauge to ensure the bag turns out the right size. If your gauge is off, adjust your hook size accordingly.
Abbreviations
Familiarize yourself with these standard crochet abbreviations before you begin:
- ch = chain
- sc = single crochet
- hdc = half double crochet
- dc = double crochet
- sl st = slip stitch
- inc = increase (2 sc in the same stitch)
- dec = decrease (sc 2 stitches together)
- Rnd = round
Step-by-Step Instructions
Follow these detailed instructions carefully. The bag is worked in two identical flat pieces, which are then crocheted together to form the bag shape. Take your time, and don't hesitate to use stitch markers to keep your place.
Bag Body (Make 2 Identical Pieces)
Start with the watermelon pink yarn. This piece is worked in continuous rounds (spiral), so do not join at the end of each round unless specified. Use a stitch marker to mark the beginning of each round.
Rnd 1: Make a magic ring. Work 6 sc into the ring. Pull the tail to close the ring tightly. (6 stitches)
Rnd 2: Inc in each stitch around. (12 stitches)
Rnd 3: *Sc in the next stitch, inc* — repeat from * to * around. (18 stitches)
Rnd 4: *Sc in the next 2 stitches, inc* — repeat from * to * around. (24 stitches)
Rnd 5: *Sc in the next 3 stitches, inc* — repeat from * to * around. (30 stitches)
Rnd 6: *Sc in the next 4 stitches, inc* — repeat from * to * around. (36 stitches)
Rnd 7: *Sc in the next 5 stitches, inc* — repeat from * to * around. (42 stitches)
Rnd 8: *Sc in the next 6 stitches, inc* — repeat from * to * around. (48 stitches)
Rnd 9: *Sc in the next 7 stitches, inc* — repeat from * to * around. (54 stitches)
Rnd 10: *Sc in the next 8 stitches, inc* — repeat from * to * around. (60 stitches)
You should now have a flat circle. If it's curling, don't worry—this is normal. The next rounds will build the height of the bag.
Rnd 11-20: Sc in each stitch around. (60 stitches each round)
Continue working in a spiral, placing one sc in each stitch from the previous round. This creates the straight sides of the bag. Count your stitches at the end of each round to ensure you still have 60.
Switch to mint green yarn. To change colors neatly, work the last yarn-over of the final pink stitch with the mint green yarn, then pull through to complete the stitch.
Rnd 21-22: Sc in each stitch around. (60 stitches each round)
Switch to dark green yarn. Use the same color-change technique as above.
Rnd 23-24: Sc in each stitch around. (60 stitches each round)
Fasten off, leaving a long tail (about 8 inches) for sewing. Weave in the other ends. Repeat this entire process to make a second identical piece.
Seeds (Make 8)
These small seed motifs add the classic watermelon detail. Using the black yarn:
Rnd 1: Make a magic ring. Work 4 sc into the ring. Pull tight to close.
Sl st to the first sc to join. Fasten off, leaving a long tail (about 6 inches) for sewing.
Repeat to make a total of 8 seeds.
Attaching the Seeds: Take one of the bag pieces (this will be the front). Using the yarn needle and the long tails, sew the seeds onto the pink section. Arrange them in a scattered, natural pattern—some near the top, some in the middle, and a few near the rind. Weave in the ends securely on the inside of the piece.
Assembly
Now it's time to join the two pieces to form the bag.
Place the two bag pieces together with wrong sides facing (the right sides, where the seeds are, should be on the outside). Align the edges carefully.
Using the dark green yarn and your 5.0 mm hook, start at one corner of the straight top edge. Work a single crochet through both layers around the curved edge. This seam will create the outer rind of the watermelon.
- Work 1 sc in each stitch around the curved edge.
- When you reach the two corners where the curve meets the straight top edge, work 3 sc in each corner stitch to give the bag a nice, rounded shape.
- Stop when you reach the opposite corner of the top edge. Do not crochet across the top—this is the bag opening.
Fasten off and weave in the ends securely.
Handles (Make 2)
These sturdy handles are simple chains that you'll sew onto the bag.
With dark green yarn, chain 60.
Row 1: Sc in the second ch from the hook and in each ch across. (59 stitches)
Fasten off, leaving long tails (about 10 inches) on both ends for sewing.
Repeat to make a second handle.
Attaching the Handles: Position the handles on the inside of the bag's top edge. Space them about 4 inches apart. Using the yarn needle and the long tails, sew each end of a handle securely to the inside of the bag. Make sure the handles are evenly placed and the bag hangs straight. Weave in all ends.
Finishing Touches
Your watermelon bag is almost complete! Here are a few optional steps to make it even better:
- Fabric Lining: For extra durability and to prevent small items from slipping through the stitches, sew a fabric lining to the inside of the bag. Cut a piece of fabric slightly larger than the bag's interior, fold over the top edge, and hand-stitch it in place.
- Magnetic Snap Closure: Attach a magnetic snap to the top center of the bag opening for a secure closure. Follow the manufacturer's instructions for installation.
- Final Check: Weave in any remaining loose ends and trim excess yarn. Give your bag a gentle steam block if desired to even out the stitches.
Congratulations! You've just created a stunning, one-of-a-kind Watermelon Slice Bag. This project is perfect for summer, and it makes a wonderful gift for friends and family. The combination of the juicy pink, fresh mint, and deep green colors is sure to bring a smile to anyone's face. Carry it with pride, and enjoy the compliments that are sure to come your way. Happy crocheting!



