The Sunburst Meadow Cardi Free Pattern – A Crocheted Granny Square Sweater with Floral Motifs
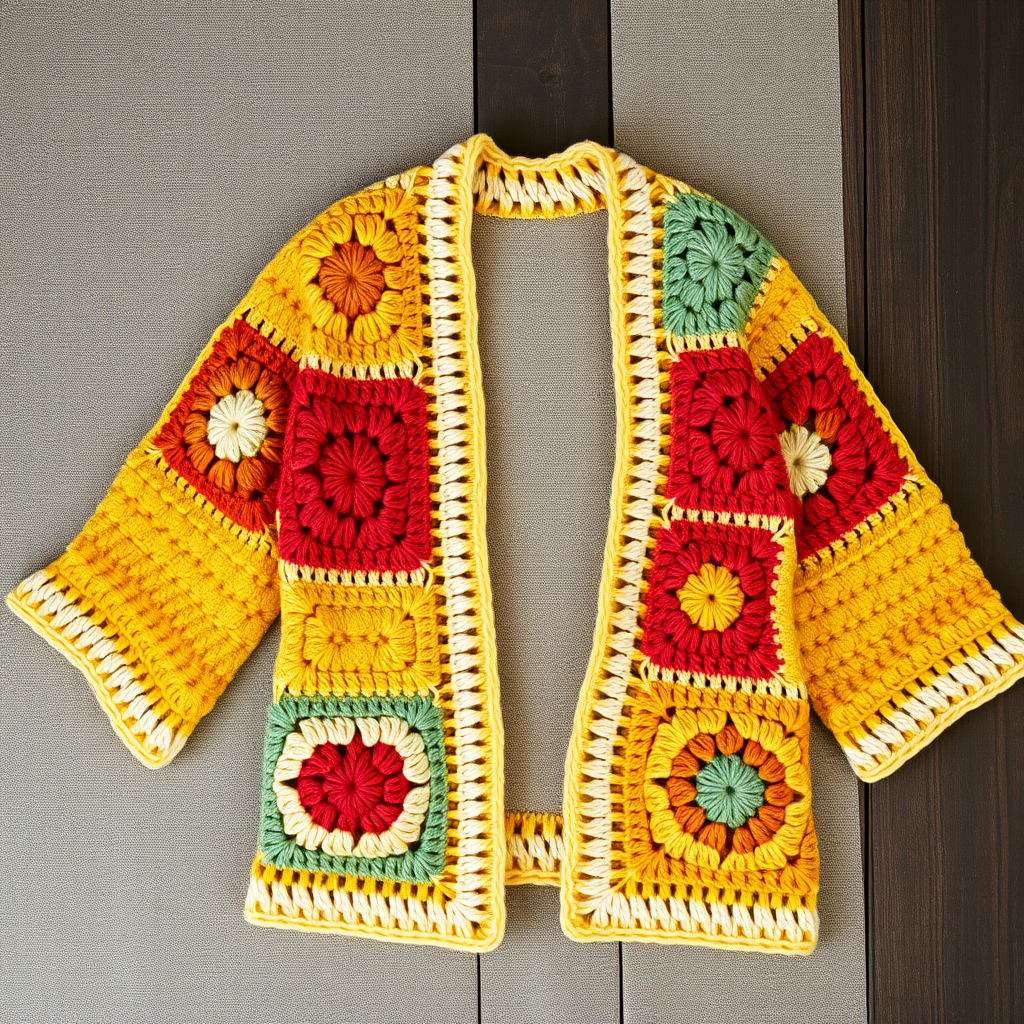
The Sunburst Meadow Cardi: A Free Crochet Granny Square Sweater Pattern
Wrap yourself in the warmth of a sunlit meadow with this bohemian-inspired crochet cardigan. Featuring vibrant granny square florals in sunflower yellow, coral pink, sage green, cream, and terracotta, this relaxed, flowing cardigan is the perfect statement piece for layering over dresses, jeans, or simple tees. The open-front design, drop shoulders, and wide elbow-length sleeves create a flattering, boxy silhouette that feels both cozy and chic. This free pattern is ideal for intermediate crocheters who want to expand their skills while creating a truly unique, handmade garment. Let's dive into this colorful project!
Materials Needed
Before you begin, gather the following supplies. Having everything ready will make your crochet session smooth and enjoyable.
- Yarn: Worsted weight cotton or acrylic blend (e.g., Lion Brand Cotton-Ease) in 5 colors:
- Color A: Sunflower Yellow (approx. 300-400 yards)
- Color B: Coral Pink (approx. 300-400 yards)
- Color C: Sage Green (approx. 300-400 yards)
- Color D: Cream (approx. 300-400 yards)
- Color E: Terracotta (approx. 300-400 yards)
- Crochet Hook: 5.5 mm (I-9) crochet hook
- Yarn Needle: For weaving in ends and sewing pieces together
- Scissors: For cutting yarn
Gauge: One granny square motif = 4 inches x 4 inches (10 cm x 10 cm) after blocking. Gauge is not critical for this project, but consistency in your tension will ensure a proper fit.
Step-by-Step Instructions
This cardigan is constructed from 12 large granny square motifs (each 8 inches x 8 inches) and 4 half-square motifs for the front edges. The squares are joined in a specific layout to create the body and sleeves, then a ribbed border is added. Follow these detailed instructions carefully, and you'll have a beautiful cardigan in no time.
Granny Square Motif (Make 12 Full Squares)
Each full square is worked in the round, starting from the center and building outward. The color changes create the floral effect.
Round 1: With color A (Sunflower Yellow), make a magic ring. Ch 3 (counts as first double crochet), 2 dc in ring, ch 2, (3 dc, ch 2) 3 times in ring. Join with a slip stitch to the top of the beginning ch-3. Fasten off color A. (You should have 12 dc and 4 ch-2 corner spaces)
Round 2: Join color B (Coral Pink) in any ch-2 corner space. Ch 3, (2 dc, ch 2, 3 dc) in the same space (this creates a corner). *Ch 1, (3 dc, ch 2, 3 dc) in next ch-2 space.* Repeat from * around, ending with ch 1. Join with a slip stitch to the top of the beginning ch-3. Fasten off color B. (You should have 24 dc, 4 corners, and 4 ch-1 spaces)
Round 3: Join color C (Sage Green) in any corner space. Ch 3, (2 dc, ch 2, 3 dc) in the same space. *Ch 1, 3 dc in next ch-1 space, ch 1, (3 dc, ch 2, 3 dc) in next corner space.* Repeat from * around, ending with ch 1, 3 dc in the last ch-1 space, ch 1. Join with a slip stitch to the top of the beginning ch-3. Fasten off color C. (You should have 36 dc, 4 corners, and 8 ch-1 spaces)
Round 4: Join color D (Cream) in any corner space. Ch 3, (2 dc, ch 2, 3 dc) in the same space. *Ch 1, 3 dc in next ch-1 space, ch 1, 3 dc in next ch-1 space, ch 1, (3 dc, ch 2, 3 dc) in next corner space.* Repeat from * around, ending with ch 1, 3 dc in each of the last two ch-1 spaces, ch 1. Join with a slip stitch to the top of the beginning ch-3. Fasten off color D. (You should have 48 dc, 4 corners, and 12 ch-1 spaces)
Round 5: Join color E (Terracotta) in any corner space. Ch 3, (2 dc, ch 2, 3 dc) in the same space. *Ch 1, (3 dc in next ch-1 space, ch 1) across to next corner, (3 dc, ch 2, 3 dc) in corner space.* Repeat from * around, ending with (3 dc in next ch-1 space, ch 1) across to the last corner. Join with a slip stitch to the top of the beginning ch-3. Fasten off color E. (You should have 60 dc, 4 corners, and 16 ch-1 spaces)
Repeat this process to create 12 full squares total.
Half-Square Motif (Make 4)
These half-squares are worked in rows, not rounds, and will be used to create the sloped neckline of the front panels.
Row 1: With color A (Sunflower Yellow), ch 5. 3 dc in the 5th ch from the hook, ch 2, 3 dc in the same ch. Turn. (You should have 6 dc and 1 ch-2 space)
Row 2: Ch 3, (3 dc, ch 2, 3 dc) in the ch-2 space, ch 1, (3 dc, ch 2, 3 dc) in the same ch-2 space. Turn. (You should have 12 dc and 2 ch-2 spaces)
Row 3: Ch 3, (3 dc, ch 2, 3 dc) in the first ch-2 space, ch 1, 3 dc in the next ch-1 space, ch 1, (3 dc, ch 2, 3 dc) in the next ch-2 space. Turn. (You should have 18 dc and 2 ch-2 spaces)
Row 4: Ch 3, (3 dc, ch 2, 3 dc) in the first ch-2 space, ch 1, (3 dc in next ch-1 space, ch 1) twice, (3 dc, ch 2, 3 dc) in the next ch-2 space. Turn. (You should have 24 dc and 2 ch-2 spaces)
Row 5: Ch 3, (3 dc, ch 2, 3 dc) in the first ch-2 space, ch 1, (3 dc in next ch-1 space, ch 1) three times, (3 dc, ch 2, 3 dc) in the next ch-2 space. Fasten off. (You should have 30 dc and 2 ch-2 spaces)
Repeat this process to create 4 half-square motifs total.
Assembly
Now it's time to bring your cardigan together. Lay out your squares on a flat surface with the right side facing up, following this layout:
- Back Panel: Arrange 4 full squares in a 2x2 grid.
- Front Panels: For each side, stack 2 full squares vertically. Place a half-square on the top outer edge of each front panel (this creates the neckline slope).
- Sleeves: For each sleeve, take 2 full squares and fold them to form a tube.
Joining: With color D (Cream) and a tapestry needle, whip stitch the squares together through the back loops only, carefully matching the ch-1 spaces and corners. Join the back panel to the front panels at the shoulders and sides, leaving armhole openings. For the sleeves, fold each sleeve square in half and sew the underarm seam, then attach the sleeve to the armhole opening using the same whip stitch method.
Border
The border gives your cardigan a polished, finished look.
Round 1: Join color D (Cream) at the bottom right corner of the cardigan. Ch 1, work single crochet (sc) evenly around the entire bottom edge, front edges, and neckline. Work 3 sc in each corner. Join with a slip stitch to the first sc.
Round 2: Ch 1, sc in each sc around, working 3 sc in each corner. Join with a slip stitch to the first sc. Fasten off.
Sleeve Cuffs
Finish the sleeves with a simple, clean edge.
Round 1: Join color D (Cream) at the underarm seam of one sleeve. Ch 1, work sc evenly around the sleeve opening. Join with a slip stitch to the first sc.
Round 2: Ch 1, sc in each sc around. Join with a slip stitch to the first sc. Fasten off. Repeat for the other sleeve.
Finishing Touches
Weave in all loose ends with your yarn needle. Block the cardigan to shape, gently stretching the squares to even out the stitches and ensure a professional, polished finish. Lay it flat to dry.
Your Sunburst Meadow Cardi is now complete! This vibrant, boho-inspired piece is sure to become a favorite in your wardrobe. The combination of warm, earthy tones and the classic granny square pattern makes it a timeless yet trendy addition to any handmade collection. Enjoy wearing your one-of-a-kind creation!


