The Whimsical Woodland Acorn Gnome: A Free Knitting Pattern for a Tiny, Textured Forest Friend
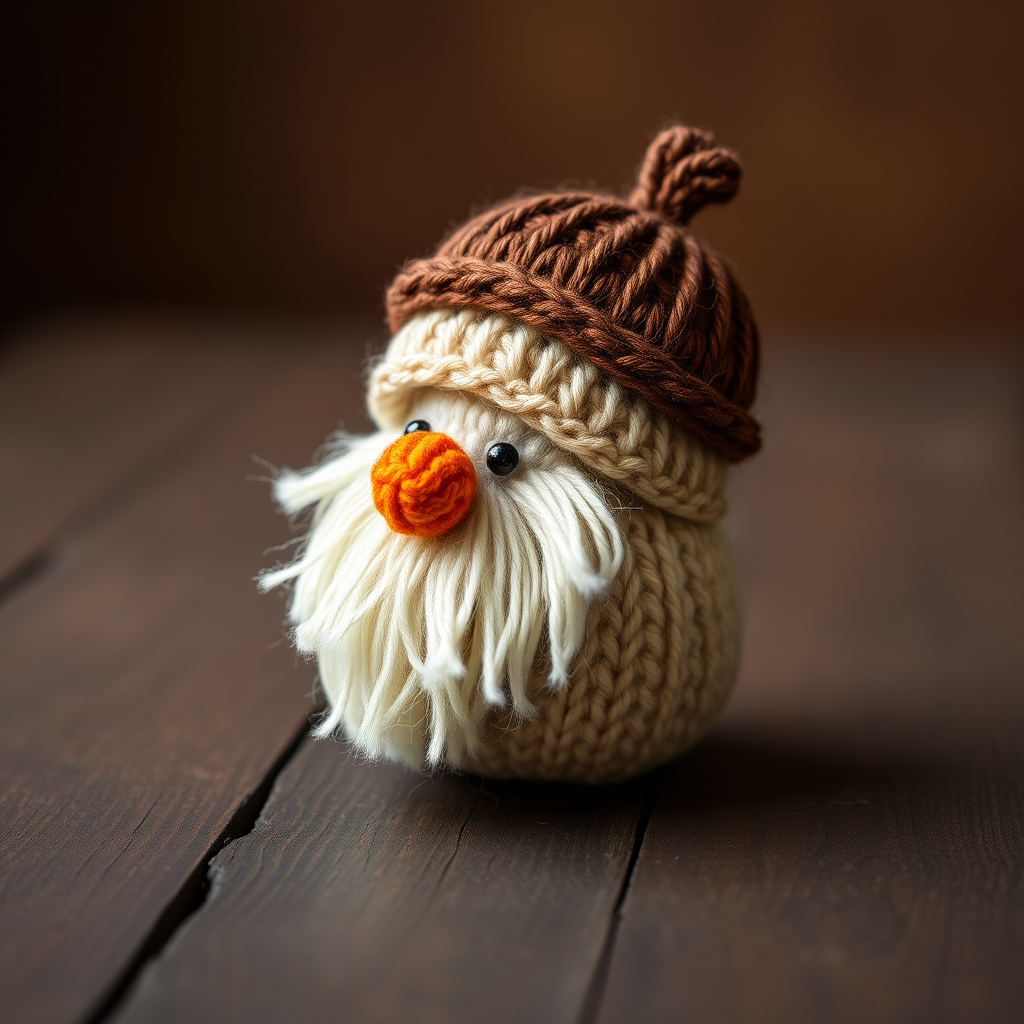
Introducing the Whimsical Woodland Acorn Gnome
Bring a touch of forest magic into your home with this charming miniature gnome, nestled inside a textured acorn cap. This free knitting pattern guides you through creating a soft, huggable friend with a cozy beard and a tiny carrot nose. Perfect for adding woodland whimsy to your decor or gifting to a nature lover, this detailed pattern is designed for knitters who enjoy working in the round with double-pointed needles. The finished gnome stands approximately 3 inches tall, made entirely from worsted weight yarn, with no hard or shiny materials—just pure, cozy texture.
Materials Needed
To create your own Whimsical Woodland Acorn Gnome, gather the following materials:
- Yarn: Worsted weight yarn in earthy tones:
- Brown (acorn cap)
- Beige (gnome body)
- White (beard)
- Orange (carrot nose)
- Small amounts of green (carrot top)
- Knitting Needles: US size 4 (3.5mm) double-pointed needles (DPNs) or size to obtain gauge. You may also use the magic loop method with a circular needle.
- Crochet Hook: US size E/4 (3.5mm) for the beard.
- Gauge: 22 stitches and 30 rows = 4 inches in stockinette stitch (knitting).
- Other: Fiberfill stuffing, tapestry needle, stitch markers (optional), small black beads or embroidery floss for eyes (optional), wire brush or comb for fluffing beard.
Step-by-Step Instructions
This pattern is worked in the round using double-pointed needles (DPNs) or the magic loop method. The gnome is knit from the bottom up. Read through all instructions before beginning.
Abbreviations
- CO: Cast on
- K: Knit
- P: Purl
- K2tog: Knit two together
- M1: Make one (increase)
- St(s): Stitch(es)
- Rnd(s): Round(s)
- Sc: Single crochet (for beard)
- Sl st: Slip stitch
Gnome Body (Beige Yarn)
- CO 6 sts. Distribute evenly on 3 DPNs (2 sts per needle). Join in the round, being careful not to twist. Place a stitch marker to indicate the beginning of the round.
- Rnd 1: K all sts.
- Rnd 2: *K1, M1* repeat around (12 sts).
- Rnd 3: K all sts.
- Rnd 4: *K2, M1* repeat around (18 sts).
- Rnd 5: K all sts.
- Rnd 6: *K3, M1* repeat around (24 sts).
- Rnds 7-12: K all sts (6 rounds even).
- Rnd 13: *K2, K2tog* repeat around (18 sts).
- Rnd 14: K all sts.
- Rnd 15: *K1, K2tog* repeat around (12 sts).
- Rnd 16: K all sts.
- Stuff the body firmly with fiberfill. Use a blunt tool like a chopstick to push stuffing into the corners. The body should be plump but not overstuffed.
- Rnd 17: K2tog around (6 sts). Cut yarn, leaving a 6-inch tail. Thread the tail through a tapestry needle, then pass the needle through the remaining 6 stitches. Pull tight to close the opening, and secure with a knot. Weave in the end.
Acorn Cap (Brown Yarn)
- CO 6 sts. Distribute on DPNs (2 sts per needle). Join in the round, being careful not to twist. Place a marker.
- Rnd 1: K all sts.
- Rnd 2: *K1, M1* repeat around (12 sts).
- Rnd 3: K all sts.
- Rnd 4: *K2, M1* repeat around (18 sts).
- Rnd 5: K all sts.
- Rnd 6: *K3, M1* repeat around (24 sts).
- Rnds 7-9: K all sts (3 rounds even).
- Rnd 10: *K2, K2tog* repeat around (18 sts).
- Rnd 11: *K1, K2tog* repeat around (12 sts).
- Rnd 12: K2tog around (6 sts). Cut yarn, leaving a 6-inch tail. Thread through remaining stitches, pull tight, and secure. Weave in ends.
Carrot Nose (Orange Yarn)
- CO 4 sts. Distribute on DPNs (2 sts on first needle, 1 on each of the other two, or use magic loop). Join in the round. Place marker.
- Rnds 1-3: K all sts (3 rounds).
- Rnd 4: K2tog around (2 sts). Cut yarn, leaving a 6-inch tail. Thread through remaining stitches, pull tight, and secure. Leave the tail for sewing.
Carrot Top (Green Yarn)
- Cut 3 strands of green yarn, each about 4 inches long.
- Fold each strand in half. Using a crochet hook, insert the hook through the top of the carrot nose (the closed end), catch the folded loop of one strand, and pull it through the knit fabric. Then pull the two ends of the strand through the loop and tighten. Repeat for the other two strands, spacing them evenly.
- Trim the ends to desired length (about 1/2 to 1 inch).
Beard (White Yarn, Crochet)
- Using the crochet hook, attach white yarn to the front of the gnome body, just below where the acorn cap will sit. Insert the hook into a stitch, pull a loop of yarn through, and chain 1 to secure.
- Work a row of single crochet stitches across the front of the body, about 8-10 stitches wide. To do this, insert the hook into the next knit stitch, yarn over, pull up a loop, yarn over, and pull through both loops on the hook. Repeat across.
- Turn your work (the beard will be worked back and forth). Chain 1, then work sc in each stitch across. Repeat for 3-4 rows, or until the beard is the desired length (about 1/2 to 3/4 inch).
- Fasten off by cutting the yarn and pulling it through the last loop. Weave in the ends.
- For a fluffy, fuzzy look, gently brush the beard with a wire brush or a fine-toothed comb. Brush in the direction of the stitches to separate the fibers.
Assembly
- Attach the Acorn Cap: Position the acorn cap on top of the gnome body, covering the top opening. Using the tapestry needle and the yarn tail from the cap, sew the cap to the body. Use small, even stitches around the edge of the cap, catching the knit fabric of the body. Secure with a knot and weave in the end.
- Attach the Carrot Nose: Position the carrot nose in the center of the face, just above the beard. Using the yarn tail from the nose, sew it securely to the body. Make a few stitches through the base of the nose and the body, then weave in the end.
- Add Eyes (Optional): For a sweet, minimalist look, you can leave the gnome without eyes. If you prefer, sew on small black beads or use black embroidery floss to create French knots for eyes. Place them slightly above and to the sides of the nose.
- Final Weaving: Weave in all remaining ends securely. Trim any excess yarn.
Your Whimsical Woodland Acorn Gnome is now complete! Display it on a shelf, desk, or give it as a heartfelt handmade gift. Enjoy your tiny forest friend!



