The Whimsical Woodland Fox Hat Free Pattern – Knit a Cozy Faux-Fur Forest Crown
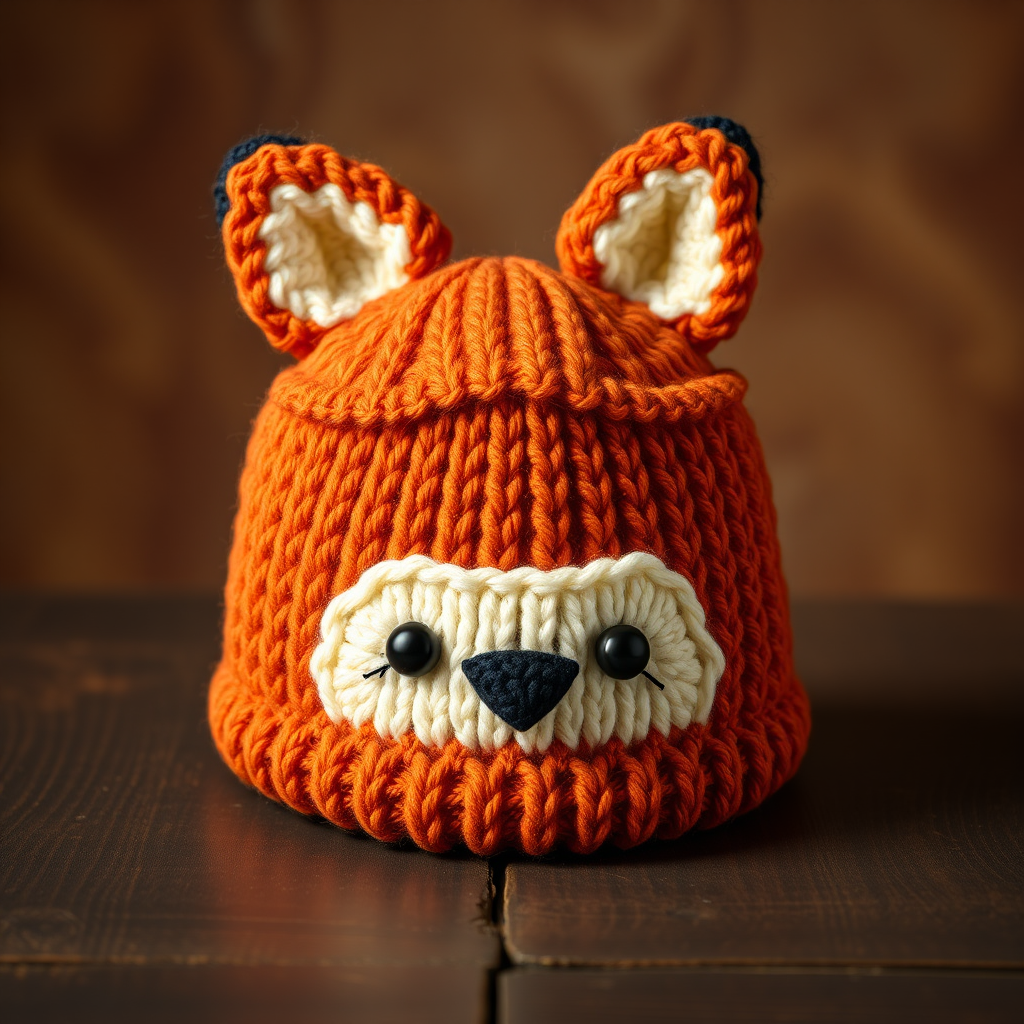
The Whimsical Woodland Fox Hat Free Pattern – Knit a Cozy Faux-Fur Forest Crown
Embrace the enchanting allure of the forest with this knitted fox hat, featuring plush faux-fur accents and a sculpted snout that brings woodland charm to life. Perfect for crisp autumn strolls or cozy winter gatherings, this pattern transforms simple stitches into a statement piece that's both playful and sophisticated. Whether you're a seasoned knitter or a brave beginner looking for a fun project, this fox hat is sure to become a beloved addition to your handmade wardrobe.
This pattern is designed to be approachable, using basic knit and purl stitches, simple decreases, and easy seaming. The result is a thick, plush, and utterly adorable hat that fits snugly and keeps you warm. Let's dive into the magical world of woodland knitting!
Materials Needed
Before you begin, gather the following supplies. Having everything ready will make your knitting experience smooth and enjoyable.
- Yarn: Worsted weight yarn in three colors:
- MC (Main Color): Burnt orange – approximately 200 yards
- CC1 (Contrast Color 1): Cream – approximately 50 yards
- CC2 (Contrast Color 2): Charcoal – small amount for the nose
- Optional Faux Fur Yarn: A small amount for ear and cheek accents (any color that complements your fox, such as white or cream).
- Needles: US 7 (4.5 mm) 16-inch circular needles for the hat body, and a set of US 7 (4.5 mm) double-pointed needles (DPNs) for the crown shaping.
- Notions: Stitch markers, tapestry needle for weaving in ends and seaming, scissors, and a crochet hook (for adding faux fur tufts).
Gauge: 20 stitches and 26 rows = 4 inches in stockinette stitch (knit every round). Always take time to check your gauge to ensure your hat fits perfectly.
Step-by-Step Instructions
Follow these detailed instructions carefully. The pattern is broken down into sections: the Hat Body, the Fox Face Panel, the Ears, and the Assembly. Take your time, and don't hesitate to refer back to the materials list if you need to.
Hat Body (Worked in the Round)
- Cast On & Join: With your MC (burnt orange) yarn and your 16-inch circular needle, cast on 96 stitches. Place a stitch marker to mark the beginning of the round, and join in the round, being extremely careful not to twist your stitches. The cast-on edge should lie flat and face the same direction all the way around.
- Ribbed Brim: Work in a K2, P2 ribbing pattern (knit 2 stitches, purl 2 stitches, repeat to end of round) for 2 inches. This creates a snug, stretchy brim that will keep the hat securely on your head.
- Stockinette Body: Switch to stockinette stitch, which means you will knit every round. Continue knitting in the round until your hat measures 6 inches from the cast-on edge. This is the main body of the hat.
- Begin Crown Decreases: This is where we shape the top of the hat. You will be decreasing stitches every other round.
- Round 1 (Decrease): *Knit 10 stitches, knit 2 stitches together (k2tog)*. Repeat from * to * around. You will now have 88 stitches on your needles.
- Round 2 (Even): Knit all stitches around.
- Round 3 (Decrease): *Knit 9 stitches, k2tog*. Repeat from * to * around. You will now have 80 stitches.
- Round 4 (Even): Knit all stitches around.
- Continue Decreasing: Keep decreasing in this manner on every odd-numbered round, reducing the number of knit stitches before the k2tog by 1 each time (K8, then K7, then K6, and so on). Knit all even-numbered rounds. Continue this pattern until you have only 8 stitches remaining on your needles.
- Finish Crown: Cut your yarn, leaving a long tail (about 8 inches). Thread the tail onto a tapestry needle, and slide the needle through the remaining 8 stitches on your knitting needle. Remove the knitting needle, pull the yarn tight to close the hole at the top of the hat, and secure the yarn with a knot on the inside. Weave in the end.
Fox Face Panel (Worked Flat)
This piece forms the cream-colored face of your fox. It is worked back and forth in rows.
- Cast On: With your CC1 (cream) yarn, cast on 20 stitches onto your circular needle (or straight needles if you have them).
- Knit the Base: Work in stockinette stitch for 10 rows. Stockinette flat means you knit one row, then purl the next row. So, Row 1 is a knit row, Row 2 is a purl row, and so on.
- Shape the Snout (Decreases): Now we will narrow the panel to create the pointed snout.
- Row 11 (Right Side): Knit 1, knit 2 together (k2tog), knit to the last 3 stitches on your needle, k2tog, knit 1. You will have 18 stitches.
- Row 12 (Wrong Side): Purl all stitches.
- Repeat Rows 11 and 12: Continue repeating these two rows, decreasing 2 stitches every knit row, until you have 10 stitches remaining on your needle.
- Bind Off: Bind off all 10 stitches loosely. Cut your yarn and pull it through the last loop to secure. Weave in the ends.
- Embroider the Nose: Using your CC2 (charcoal) yarn and a tapestry needle, embroider a small triangle nose at the tip of the snout (the pointed end of the panel). Use a satin stitch, which means making straight, parallel stitches close together to fill in the shape. Place the triangle so its base is at the very tip of the point.
Ears (Make 2)
These triangular ears are worked flat and then folded to create a pointed shape.
- Cast On: With your MC (burnt orange) yarn, cast on 12 stitches.
- Knit the Base: Work in stockinette stitch (knit one row, purl one row) for 6 rows.
- Shape the Ear (Decreases): Similar to the face panel, we will decrease to form a triangle.
- Row 7 (Right Side): Knit 1, k2tog, knit to the last 3 stitches, k2tog, knit 1. You will have 10 stitches.
- Row 8 (Wrong Side): Purl all stitches.
- Repeat Rows 7 and 8: Continue repeating these two rows until you have only 4 stitches remaining on your needle.
- Bind Off: Bind off the remaining 4 stitches. Cut your yarn and pull through the last loop.
- Shape the Ear: Fold the knitted triangle in half lengthwise, with the right sides together. Using a tapestry needle and the yarn tail from your bind-off, sew the two side edges together. This will create a 3D, pointed ear shape. Turn the ear right side out. Repeat for the second ear.
Assembly
This is where your fox comes to life! Take your time with the placement to ensure a balanced, adorable look.
- Attach the Ears: Position the two ears on the top of the hat. They should be about 2 inches apart from each other and about 1 inch down from the crown (the very top of the hat). Use a tapestry needle and the MC yarn tail from the ears to sew them securely to the hat. Make sure they are firmly attached and stand upright.
- Attach the Face Panel: Place the fox face panel onto the front of the hat. It should be centered between the two ears. The pointed snout should be pointing downward, towards the brim. The top of the panel should sit just below the ears. Using a tapestry needle and CC1 yarn, sew the panel to the hat using a whip stitch or mattress stitch, securing it all the way around the edge. Weave in all ends.
- Add Faux Fur Tufts (Optional): For that extra whimsical, fuzzy texture, add faux fur tufts to the inner ears and cheeks.
- Using a crochet hook, insert it from the inside of the ear to the outside, pull a loop of faux fur yarn through.
- Repeat this several times to create a fluffy cluster. Trim the loops to your desired fluffiness.
- Do the same on the cheeks of the face panel, just below and to the sides of the snout.
- Final Weave-In: Carefully weave in any remaining loose ends on the inside of the hat with your tapestry needle. Give your hat a gentle steam block or a light mist with water and let it dry flat to even out the stitches.
Congratulations! You've just completed your very own Whimsical Woodland Fox Hat. This cozy, character-filled accessory is perfect for adding a touch of playful sophistication to any cold-weather outfit. Wear it with pride, gift it to a loved one, or make a whole family of forest friends. Happy knitting!


