Tidal Turtles Shell Coaster Free Crochet Pattern
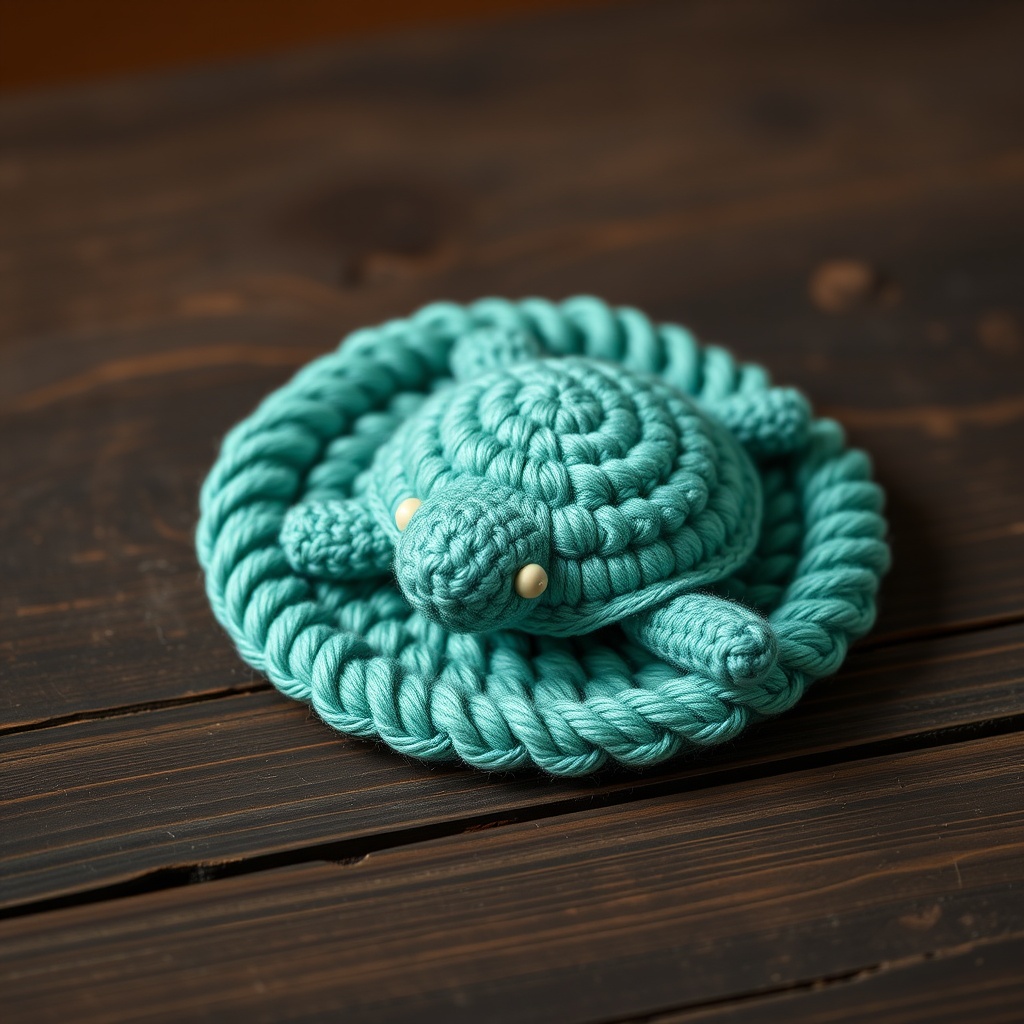
Tidal Turtles Shell Coaster: A Free Crochet Pattern for Coastal Charm
Dive into a sea of texture with this charming turtle-shaped coaster, blending coastal vibes with cozy handmade charm. This delightful project is perfect for adding a splash of ocean-inspired whimsy to your table setting, creating a thoughtful handmade gift for a beach lover, or simply enjoying a relaxing and rewarding crochet session. The finished piece is a three-dimensional turtle with a vibrant sea-green shell and a soft teal body, complete with tiny embroidered eyes and a sweet little tail. It's a fantastic beginner-friendly project that works up quickly and uses simple stitches to create a stunning, tactile result.
This pattern is designed to be accessible, using basic crochet techniques like the magic ring, single crochet, and increases. The result is a sturdy, functional coaster that also doubles as a cute decorative piece. Whether you're a seasoned crocheter looking for a quick weekend project or a beginner eager to learn, this Tidal Turtles Shell Coaster is sure to bring a smile to your face. Let's get started!
Materials Needed
Before you begin, gather the following materials to ensure a smooth and enjoyable crocheting experience. The quality of your yarn will greatly affect the final look and durability of your coaster, so choose a soft, absorbent cotton for best results.
- Yarn: Worsted weight cotton yarn in three colors:
- Sea Green (for the shell) - approximately 30 yards
- Soft Teal (for the body, head, legs, and tail) - approximately 40 yards
- Cream (for the eyes) - a small amount for embroidery
- Crochet Hook: US G/6 (4.0 mm) crochet hook
- Fiberfill: A small amount of polyester stuffing for the head, legs, and to lightly stuff the shell.
- Yarn Needle: A tapestry needle for sewing pieces together and weaving in ends.
- Scissors: For cutting yarn.
- Stitch Marker (optional): To help keep track of your rounds.
Gauge: 4 rounds = 2 inches in single crochet. While gauge is not critical for this project, maintaining a consistent tension will ensure your coaster lies flat and has a professional finish.
Step-by-Step Instructions
This pattern is worked in continuous rounds (spiral) unless otherwise stated. Do not join at the end of rounds unless specified. Use a stitch marker to keep track of the beginning of each round. Let's break down the project into manageable parts.
Part 1: The Turtle Shell (Make 1)
The shell is the most prominent part of the coaster, forming a perfect circle with a slightly domed top. We'll use Sea Green yarn for this section.
- Round 1: With Sea Green, make a magic ring. Work 6 single crochet (sc) into the ring. Pull the tail to close the ring tightly. (6 stitches)
- Round 2: Work 2 sc in each stitch around. This is an increase round. (12 stitches)
- Round 3: *Sc in the next stitch, 2 sc in the next stitch*; repeat from * to * around. (18 stitches)
- Round 4: *Sc in the next 2 stitches, 2 sc in the next stitch*; repeat from * to * around. (24 stitches)
- Round 5: *Sc in the next 3 stitches, 2 sc in the next stitch*; repeat from * to * around. (30 stitches)
- Round 6: *Sc in the next 4 stitches, 2 sc in the next stitch*; repeat from * to * around. (36 stitches)
- Round 7: *Sc in the next 5 stitches, 2 sc in the next stitch*; repeat from * to * around. (42 stitches)
- Round 8: *Sc in the next 6 stitches, 2 sc in the next stitch*; repeat from * to * around. (48 stitches)
- Round 9: *Sc in the next 7 stitches, 2 sc in the next stitch*; repeat from * to * around. (54 stitches)
- Round 10: *Sc in the next 8 stitches, 2 sc in the next stitch*; repeat from * to * around. (60 stitches)
- Round 11: Sc in each stitch around. This round creates a flat edge. (60 stitches)
- Finish: Fasten off, leaving a long tail (about 12 inches) for sewing the shell to the body. Weave in the starting tail from the magic ring.
Part 2: The Turtle Body (Make 1)
The body forms the base of the coaster and will be the same size as the shell. We'll use Soft Teal yarn for this section.
- Round 1: With Soft Teal, make a magic ring. Work 6 sc into the ring. (6 stitches)
- Round 2: 2 sc in each stitch around. (12 stitches)
- Round 3: *Sc in the next stitch, 2 sc in the next stitch*; repeat around. (18 stitches)
- Round 4: *Sc in the next 2 stitches, 2 sc in the next stitch*; repeat around. (24 stitches)
- Round 5: *Sc in the next 3 stitches, 2 sc in the next stitch*; repeat around. (30 stitches)
- Round 6: *Sc in the next 4 stitches, 2 sc in the next stitch*; repeat around. (36 stitches)
- Round 7: *Sc in the next 5 stitches, 2 sc in the next stitch*; repeat around. (42 stitches)
- Round 8: *Sc in the next 6 stitches, 2 sc in the next stitch*; repeat around. (48 stitches)
- Round 9: *Sc in the next 7 stitches, 2 sc in the next stitch*; repeat around. (54 stitches)
- Round 10: *Sc in the next 8 stitches, 2 sc in the next stitch*; repeat around. (60 stitches)
- Round 11: Sc in each stitch around. (60 stitches)
- Finish: Fasten off and weave in the ends securely.
Part 3: The Turtle Head (Make 1)
The head is a small, rounded piece that is lightly stuffed to give it shape. We'll use Soft Teal yarn.
- Round 1: With Soft Teal, make a magic ring. Work 6 sc into the ring. (6 stitches)
- Round 2: 2 sc in each stitch around. (12 stitches)
- Round 3: *Sc in the next stitch, 2 sc in the next stitch*; repeat around. (18 stitches)
- Rounds 4-6: Sc in each stitch around. (18 stitches) - This creates the height of the head.
- Round 7: *Sc in the next 4 stitches, single crochet 2 together (sc2tog)*; repeat around. (15 stitches) - This begins the shaping of the top of the head.
- Round 8: *Sc in the next 3 stitches, sc2tog*; repeat around. (12 stitches)
- Stuff lightly: Stuff the head with a small amount of fiberfill. Do not overstuff; you want it to be soft and squishy.
- Round 9: *Sc in the next 2 stitches, sc2tog*; repeat around. (9 stitches)
- Round 10: *Sc in the next stitch, sc2tog*; repeat around. (6 stitches)
- Finish: Fasten off, leaving a long tail (about 10 inches) for sewing the head to the body.
Part 4: The Turtle Legs (Make 4)
These small, stubby legs are quick to make and add to the turtle's charm. We'll use Soft Teal yarn.
- Round 1: With Soft Teal, make a magic ring. Work 6 sc into the ring. (6 stitches)
- Round 2: 2 sc in each stitch around. (12 stitches)
- Rounds 3-4: Sc in each stitch around. (12 stitches)
- Round 5: *Sc in the next 2 stitches, sc2tog*; repeat around. (9 stitches)
- Finish: Fasten off, leaving a long tail (about 8 inches) for sewing. Stuff each leg lightly with fiberfill.
Part 5: The Turtle Tail (Make 1)
The tail is a tiny, pointed nub that completes the turtle's silhouette. We'll use Soft Teal yarn.
- Round 1: With Soft Teal, make a magic ring. Work 4 sc into the ring. (4 stitches)
- Round 2: Sc in each stitch around. (4 stitches)
- Round 3: *Sc in the next stitch, 2 sc in the next stitch*; repeat around. (6 stitches)
- Finish: Fasten off, leaving a long tail (about 6 inches) for sewing. Do not stuff the tail.
Part 6: Assembly
Now comes the fun part—bringing all the pieces together to create your adorable turtle coaster. Take your time and use the long tails you left on each piece for sewing.
- Attach the Shell to the Body: Place the shell (Sea Green) on top of the body (Soft Teal), aligning the edges. Using the long tail from the shell and a yarn needle, whip stitch the shell to the body. Important: Leave a small opening (about 2 inches) to stuff the shell lightly with fiberfill for a plush, domed feel. Once stuffed, continue the whip stitch to close the opening completely. Weave in the end securely.
- Position the Head: Place the head at the front of the body, centered. It should sit between where the two front legs will be. Using the long tail from the head, sew it securely to the body with a few firm stitches. Weave in the end.
- Attach the Legs: Position the four legs on the sides of the body, two on each side, evenly spaced. Using the long tails, sew each leg securely to the body. Weave in all ends.
- Attach the Tail: Sew the tail to the back of the body, directly opposite the head. Using the long tail, sew it securely and weave in the end.
- Embroider the Eyes: With the Cream yarn and a yarn needle, embroider two small eyes on the head. You can use a French knot for a classic, round eye, or a satin stitch for a flatter, oval shape. Place them about 2-3 stitches apart, centered on the front of the head.
- Final Weave-In: Carefully weave in any remaining loose ends on the underside of the coaster to ensure a clean, professional finish.
Congratulations! You've completed your very own Tidal Turtles Shell Coaster. This charming piece is not only functional but also a wonderful conversation starter. Place it on your coffee table, use it as a trivet for your favorite mug, or gift it to someone special. The combination of the vibrant sea green and soft teal, along with the plush, three-dimensional design, makes this coaster a true treasure. Happy crocheting!



