Toadstool Cottage Crochet Afghan Square Free Pattern
Toadstool Cottage Crochet Afghan Square – Free Beginner Pattern
Introduction
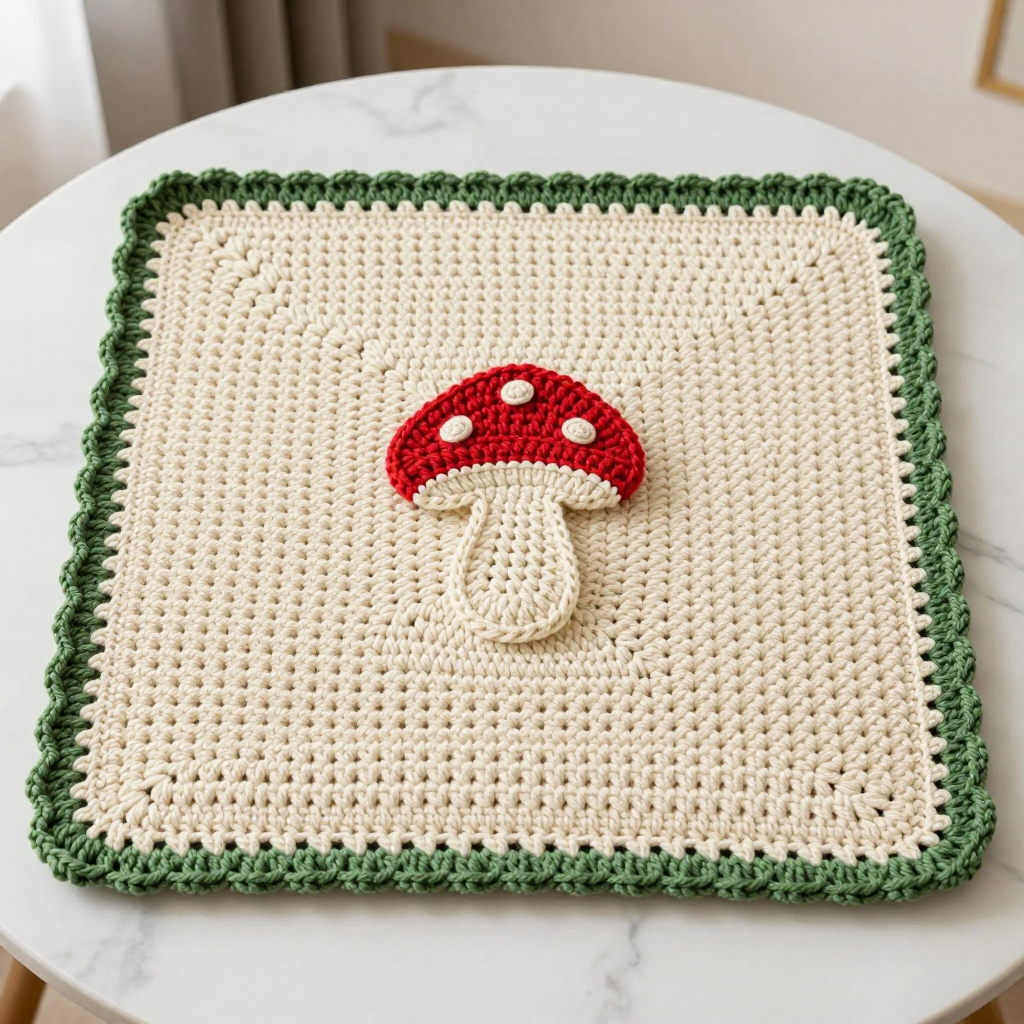
Welcome to the Toadstool Cottage Square — a sweet, mossy little patch of fairy-tale woodland that you can make with your very own hands, even if you have never held a crochet hook before. This project is perfect for absolute beginners who want to learn the core crochet stitches while making something genuinely adorable, and it is equally lovely for experienced makers who want a quick, satisfying project between bigger ones. The finished square is a soft cream six-inch granny-style block with a gently raised texture, framed by a moss-green border dotted with tiny picot loops at each corner. Nestled right in the center sits a tiny red-capped toadstool with an ivory stem and three little white dots, sewn on flat so it feels smooth and snuggly. It looks like a storybook illustration come to life, and it feels soft, light, and cozy in the hand — the perfect building block for a blanket, a pillow, or a patchwork gift.
Materials Needed
- Yarn: DK weight yarn (also called weight 3 or "light"). You will need approximately 25 yards cream (MC), 8 yards moss green (CC1), 6 yards soft red (CC2), and 2 yards ivory/white (CC3). The sample used a smooth acrylic-cotton blend DK yarn.
- Crochet hook: Size E/4 (3.5 mm).
- Stitch markers: At least 4 (or use scrap yarn loops) to mark corners and your first stitch.
- Tapestry needle: A blunt-tipped yarn needle for sewing the mushroom on and weaving in ends.
- Scissors: Any small sharp pair for cutting yarn.
- Pins: A few sewing pins for holding the mushroom in place while you sew.
- Finished size: The square measures approximately 6 x 6 inches (15 x 15 cm), with a mushroom appliqué about 2 inches (5 cm) tall centered on top.
Abbreviations and Beginner Glossary
Every pattern is written in shorthand. Here is every abbreviation used in this pattern, explained in plain English as if you have never crocheted before.
- ch – chain: wrap the yarn over your hook and pull it through the loop already on your hook. This makes a small link. Chains are the foundation of most crochet.
- sl st – slip stitch: insert your hook into the stitch, wrap yarn over, and pull it straight through both the stitch and the loop on your hook at the same time. It makes a nearly invisible joining stitch.
- sc – single crochet: insert hook into stitch, yarn over, pull up a loop (2 loops on hook), yarn over again, pull through both loops. The shortest, tightest basic stitch.
- hdc – half double crochet: yarn over first, insert hook into stitch, yarn over, pull up a loop (3 loops on hook), yarn over, pull through all 3 loops at once. A medium-height stitch.
- dc – double crochet: yarn over, insert hook into stitch, yarn over, pull up a loop (3 loops on hook), yarn over, pull through 2 loops, yarn over, pull through last 2 loops. A taller stitch.
- tr – treble crochet: yarn over twice, insert hook into stitch, yarn over, pull up a loop (4 loops on hook), then yarn over and pull through 2 loops three separate times. The tallest stitch in this pattern.
- sp – space: the gap between stitches, usually created by a chain (for example, a "ch-2 sp" is the little hole made by two chains).
- st(s) – stitch(es): one completed loop or unit of crochet.
- beg – beginning: the start of a round or row.
- rep – repeat: do the same thing again.
- MR – magic ring: an adjustable loop you pull tight to close a hole in the center. If you have never made one, you can substitute: chain 4 and join with a sl st into a ring, then work your stitches into that ring.
- picot – a tiny decorative bump: chain 3, then slip stitch into the third chain from your hook. It makes a little loop on the edge.
- whipstitch – a simple sewing stitch: pass the needle over the edge and back through, over and back, like a spiral of small stitches, to join two pieces.
- fasten off – cut the yarn a few inches from your work and pull the tail through the last loop to lock it.
- weave in ends – thread a yarn tail onto a tapestry needle and sew it back and forth through the back of your work so it disappears.
Gauge
Gauge: 5 double crochet stitches x 2.5 rows = 1 inch (2.5 cm) with the 3.5 mm hook in DK yarn. In other words, about 4 rows of double crochet measure 1.6 inches.
Why gauge matters: Gauge is how big your stitches turn out. If your stitches are bigger than the pattern expects, your square will be larger than 6 inches; if smaller, it will be too small to match other squares in a blanket. Matching gauge means your finished square will line up neatly with the others.
How to make a gauge swatch: With your cream yarn and 3.5 mm hook, chain 16. Work 1 double crochet into the third chain from the hook and into each chain across (14 dc). Work 5 more rows of double crochet. Lay the swatch flat and measure a 1-inch section in the middle: count how many stitches fit across 1 inch and how many rows fit in 1 inch. If you have more stitches than 5 per inch, your tension is tight — try a slightly larger hook. If you have fewer, try a smaller hook. It is fine to be a little off; just aim to be close.
Beginner Tips Before You Start
- Use a stitch marker in your first stitch of every round. Because this square is worked in joined rounds, it is easy to lose track of where a round began. Slip a marker into the very first stitch you make, and move it up each round.
- Do not pull your yarn too tight. Beginners often tug hard, which makes stiff, tiny stitches. Keep a relaxed, even tension so your hook slides easily.
- Count your stitches at the end of every round. The stitch counts in parentheses tell you exactly how many you should have. If the number is off, fix it before moving on — it is much easier now than later.
- Remember: chain 3 at the start of a round counts as your first double crochet. So when a round says "ch 3, dc in same st," you are making two double crochets in that spot (the chain plus one real stitch).
- Keep your mushroom pieces separate until the square is finished. Sewing the toadstool on last keeps the square flat and easy to block.
- Work in good light and take breaks. Your hands will learn the motions quickly, and short sessions keep your tension even.
Step-by-Step Instructions
All instructions use US crochet terms. The square is worked in joined rounds — you do not turn your work between rounds. Each round is joined with a slip stitch to the first stitch, and the next round begins in the same stitch unless stated otherwise. Chain 3 at the start of a round counts as the first double crochet; chain 4 counts as the first treble crochet; chain 1 does not count as a stitch.
Part 1: The Square (make 1)
With cream yarn (MC), make a magic ring (or chain 4 and join with a sl st into a ring).
Round 1: Ch 3 (counts as first dc), work 11 dc into the ring. Join with sl st to top of beg ch-3. (12 dc)
Round 2: Ch 3, dc in same st. 2 dc in each st around. Join with sl st to top of beg ch-3. (24 dc)
Round 3: Ch 3, dc in same st, dc in next st, *2 dc in next st, dc in next st; rep from * around. Join with sl st to top of beg ch-3. (36 dc)
Round 4 (corner round): Ch 4 (counts as first tr), tr in same st, ch 2, 2 tr in same st (first corner made), *dc in next 2 sts, hdc in next 2 sts, sc in next 4 sts, hdc in next 2 sts, dc in next 2 sts, (2 tr, ch 2, 2 tr) in next st for corner; rep from * 2 more times, then dc in next 2 sts, hdc in next 2 sts, sc in next 4 sts, hdc in next 2 sts, dc in next 2 sts. Join with sl st to top of beg ch-4. (4 corners, 12 sts per side between corners)
Round 5: Ch 1, sc in each st around, working (sc, ch 2, sc) in each ch-2 corner sp. Join with sl st to first sc. Fasten off cream. (4 corners, 16 sc per side between corners)
Part 2: Moss Green Border
Join moss green (CC1) with a sl st in any corner ch-2 sp.
Round 6: Ch 1, (sc, ch 2, sc) in same corner sp, *sc in each st to next corner ch-2 sp, (sc, ch 2, sc) in corner sp; rep from * around. Join with sl st to first sc. Do not fasten off. (4 corners, 18 sc per side between corners)
Round 7 (picot edging): Ch 1, sc in each st around, working (sc, ch 2, sc) in each corner ch-2 sp, and at each corner after the ch-2 work a picot (ch 3, sl st in third ch from hook) before continuing. Join with sl st to first sc. Fasten off CC1 and weave in all ends. (4 corners, 20 sc per side between corners)
Part 3: Mushroom Cap (make 1, in soft red CC2)
With soft red (CC2), make a magic ring.
Round 1: Ch 2 (does not count as a st), work 8 hdc into the ring. Join with sl st to first hdc. (8 hdc)
Round 2: Ch 2, 2 hdc in each st around. Join with sl st to first hdc. (16 hdc)
Round 3: Ch 1, sc in each st around. Join with sl st to first sc. Fasten off CC2, leaving a 10 in (25 cm) tail for sewing. (16 sc)
Part 4: Mushroom Stem (make 1, in ivory CC3)
With ivory (CC3), ch 6.
Row 1: Sc in second ch from hook and in each ch across. Turn. (5 sc)
Row 2: Ch 1, sc in each st across. Fasten off CC3, leaving a 10 in (25 cm) tail. (5 sc)
Part 5: Dots (make 3, in ivory CC3)
With ivory (CC3), make a magic ring, ch 1, work 5 sc into the ring, join with sl st to first sc. Fasten off, leaving a 4 in (10 cm) tail. (5 sc each)
Assembly and Finishing
Step 1 – Block the square. Lightly mist the cream square with water and pin it to a towel or blocking mat, stretching it gently to exactly 6 x 6 inches (15 x 15 cm). Let it dry completely. This makes the square flat and even before you attach the mushroom.
Step 2 – Attach the cap. Center the red mushroom cap on the square, about 1 inch (2.5 cm) below the top edge. Pin it in place. Thread the long red tail onto your tapestry needle and whipstitch the cap to the square, catching only the back loops of the final single crochet round so the cap sits flat and the front stays smooth. Sew all the way around, then secure the tail underneath.
Step 3 – Attach the stem. Position the ivory stem directly below the cap, overlapping the lower edge of the cap by about 1/4 inch (6 mm). Pin it, then sew it in place with the ivory tail using small whipstitches.
Step 4 – Attach the dots. Arrange the three ivory dots on the cap in a small triangle. Pin each one, then sew it down with its tail using tiny stitches, hiding the tails under the cap as you go.
Step 5 – Weave in and finish. Thread any remaining tails onto the tapestry needle and weave them back and forth through the back of the work for about an inch, then trim. Finally, steam-block the finished square lightly, pressing the mushroom flat with your fingers or a cloth — but do not press the picot edging, so those little loops stay raised and pretty.
Pro Tips and Variations
- Change the colors: Try a pale blue or lavender square with a yellow cap for a different fairy-tale feel, or make the border a soft brown for a woodland look. Simply swap MC, CC1, CC2, and CC3.
- Make it bigger or smaller: To enlarge the square, add one more double crochet round before the corner round (Round 4), working 2 dc in every third stitch. To shrink it, stop after Round 3 and go straight to the border.
- Substitute yarn: Any DK weight yarn works. If you use worsted weight (weight 4), go up to a 4.0 mm (G/6) hook and check your gauge again — the square will come out slightly larger.
- Build a blanket: Make many squares and join them with a simple single crochet seam in moss green, or alternate with plain cream squares for a cottage-garden patchwork look.