Whimsical Woodland Gnome Amigurumi Free Pattern
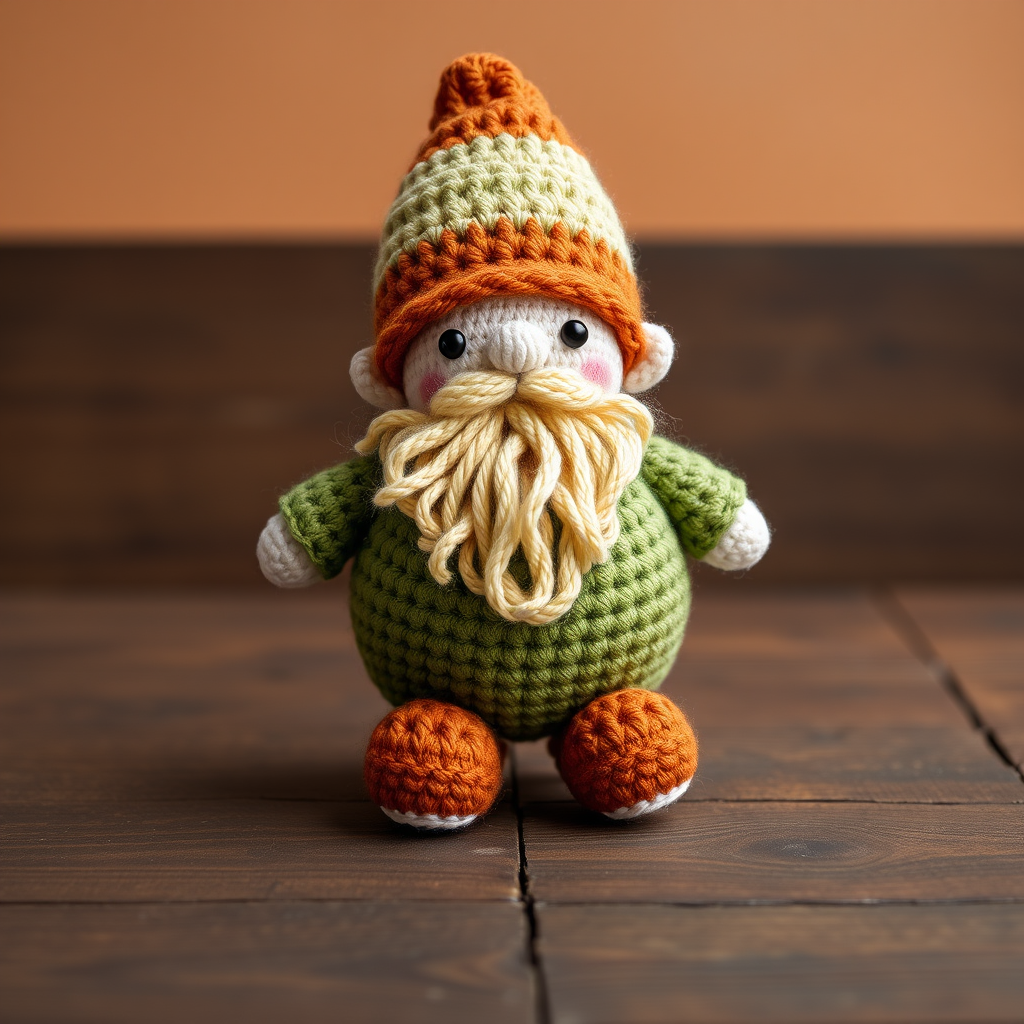
Whimsical Woodland Gnome Amigurumi Free Pattern
Bring a touch of magic to your home with this charming Whimsical Woodland Gnome! This adorable amigurumi project features a soft, plump body, a fluffy cream beard, and a pointed rust-orange hat that gives it a playful, storybook personality. Whether you're an experienced crocheter or just starting your amigurumi journey, this pattern is designed to be accessible and enjoyable for all skill levels. The result is a delightful handmade companion that adds warmth and whimsy to any shelf, desk, or gift box.
Materials Needed
Before you begin, gather the following materials to ensure a smooth and enjoyable crochet experience:
- Yarn: Worsted weight cotton or acrylic yarn in earthy tones:
- Color A: Moss green (for body)
- Color B: Warm brown (for shoes)
- Color C: Cream (for beard)
- Color D: Rust orange (for hat)
- Color E: Skin tone (for face)
- Hook: 3.5mm (E) crochet hook
- Stuffing: Polyester fiberfill stuffing
- Notions: Yarn needle, scissors
- Optional: Small amount of black yarn for embroidered eyes (or 6mm safety eyes)
Gauge note: 4 sc x 4 rows = 1 inch. Gauge is not critical for this project, but maintaining consistent tension throughout will ensure your gnome looks neat and proportional.
Abbreviations
- mr: magic ring
- sc: single crochet
- inc: increase (2 sc in same stitch)
- dec: decrease (sc 2 together)
- st(s): stitch(es)
- rnd: round
- FO: fasten off
Step-by-Step Instructions
This pattern is worked in continuous rounds unless otherwise stated. Use a stitch marker to keep track of your rounds.
Body (in Color A - Moss Green)
Start with a magic ring and work in continuous rounds:
- Rnd 1: mr, 6 sc in ring. (6 sts)
- Rnd 2: inc in each st around. (12 sts)
- Rnd 3: (sc in next st, inc) around. (18 sts)
- Rnd 4: (sc in next 2 sts, inc) around. (24 sts)
- Rnd 5: (sc in next 3 sts, inc) around. (30 sts)
- Rnd 6-10: sc in each st around. (30 sts) — This creates the straight sides of the body.
- Rnd 11: (sc in next 3 sts, dec) around. (24 sts)
- Rnd 12: (sc in next 2 sts, dec) around. (18 sts)
Stuff the body firmly with polyester fiberfill, shaping it into a plump, rounded form.
- Rnd 13: (sc in next st, dec) around. (12 sts)
- Rnd 14: dec around. (6 sts)
FO, leaving a long tail. Thread the tail through a yarn needle, weave through the front loops of the remaining 6 stitches, pull tight to close the opening, and secure with a knot. Set the body aside.
Legs (Make 2, in Color B - Warm Brown)
These form the cute little shoes peeking out from the bottom:
- Rnd 1: mr, 6 sc in ring. (6 sts)
- Rnd 2: inc in each st around. (12 sts)
- Rnd 3-5: sc in each st around. (12 sts) — Work 3 rounds straight.
Stuff lightly — just enough to give the legs shape without making them bulky.
- Rnd 6: (sc in next st, dec) around. (8 sts)
FO, leaving a tail for sewing. Repeat for the second leg. Position the legs at the bottom of the body, spacing them evenly so the gnome can sit or stand upright. Sew securely using the yarn needle and the tails.
Arms (Make 2, in Color A - Moss Green)
- Rnd 1: mr, 5 sc in ring. (5 sts)
- Rnd 2: inc in each st around. (10 sts)
- Rnd 3-6: sc in each st around. (10 sts) — Work 4 rounds straight.
Stuff lightly — the arms should be soft and flexible, not rigid.
- Rnd 7: (sc in next st, dec) around. (6 sts)
FO, leaving a tail. Sew the arms to the sides of the body, positioning them about 2 rounds below the neck opening. Make sure they are symmetrical.
Head (in Color E - Skin Tone)
- Rnd 1: mr, 6 sc in ring. (6 sts)
- Rnd 2: inc in each st around. (12 sts)
- Rnd 3: (sc in next st, inc) around. (18 sts)
- Rnd 4: (sc in next 2 sts, inc) around. (24 sts)
- Rnd 5-8: sc in each st around. (24 sts) — Work 4 rounds straight to form the face.
- Rnd 9: (sc in next 2 sts, dec) around. (18 sts)
Stuff the head firmly to create a round, smooth shape.
- Rnd 10: (sc in next st, dec) around. (12 sts)
- Rnd 11: dec around. (6 sts)
FO, leaving a long tail. Sew the head to the top of the body, aligning it centrally. Use the tail to stitch securely around the neck opening, making sure the head is firmly attached.
Beard (in Color C - Cream)
The beard is worked in rows, not rounds. This creates a flat, triangular shape that will be sewn onto the face.
- Row 1: Ch 12, sc in 2nd ch from hook and in each ch across. (11 sts)
- Row 2: Ch 1, turn, sc in next 2 sts, dec, sc in next 3 sts, dec, sc in next 2 sts. (9 sts)
- Row 3: Ch 1, turn, sc in next st, dec, sc in next 3 sts, dec, sc in next st. (7 sts)
- Row 4: Ch 1, turn, sc in next st, dec, sc in next st, dec, sc in next st. (5 sts)
- Row 5: Ch 1, turn, sc in next st, dec, sc in next st. (3 sts)
- Row 6: Ch 1, turn, dec, sc in next st. (2 sts)
FO, leaving a tail. Position the beard on the lower half of the face, covering the area below where the eyes will be. Sew it in place along the edges, making sure it lies flat and covers the chin area.
Hat (in Color D - Rust Orange)
Start with a magic ring and work in continuous rounds:
- Rnd 1: mr, 6 sc in ring. (6 sts)
- Rnd 2: inc in each st around. (12 sts)
- Rnd 3: (sc in next st, inc) around. (18 sts)
- Rnd 4: (sc in next 2 sts, inc) around. (24 sts)
- Rnd 5-8: sc in each st around. (24 sts) — Work 4 rounds straight.
- Rnd 9: (sc in next 3 sts, inc) around. (30 sts)
- Rnd 10-12: sc in each st around. (30 sts) — Work 3 rounds straight.
- Rnd 13: (sc in next 4 sts, inc) around. (36 sts)
- Rnd 14-16: sc in each st around. (36 sts) — Work 3 rounds straight. This creates the wide brim of the hat.
Now shape the point of the hat:
- Rnd 17: (sc in next 4 sts, dec) around. (30 sts)
- Rnd 18: (sc in next 3 sts, dec) around. (24 sts)
- Rnd 19: (sc in next 2 sts, dec) around. (18 sts)
- Rnd 20: (sc in next st, dec) around. (12 sts)
- Rnd 21: dec around. (6 sts)
- Rnd 22: dec around. (3 sts)
FO, leaving a tail. Thread the tail through the remaining 3 stitches, pull tight to close the point, and secure. Fold the brim of the hat up slightly for a whimsical look, then sew the hat to the top of the head, making sure it covers the top of the beard and sits at a jaunty angle.
Finishing Touches
- Eyes: Using black yarn, embroider simple French knots or small straight stitches for the eyes. Position them between rounds 5 and 6 of the head, about 4 stitches apart. Alternatively, attach 6mm safety eyes at this point before sewing the head to the body.
- Smile: Using black yarn, embroider a small, gentle smile just below the eyes, centered on the face.
- Weave in ends: Use your yarn needle to weave in all loose ends securely, trimming any excess yarn.
Congratulations! Your Whimsical Woodland Gnome is complete. This little fellow is sure to bring a smile to anyone who sees it. Enjoy your new handmade friend, and don't be surprised if you find yourself making a whole family of gnomes to brighten up your home!



