Whimsical Woodland Gnome Home Free Pattern – Cozy Crochet Cottage
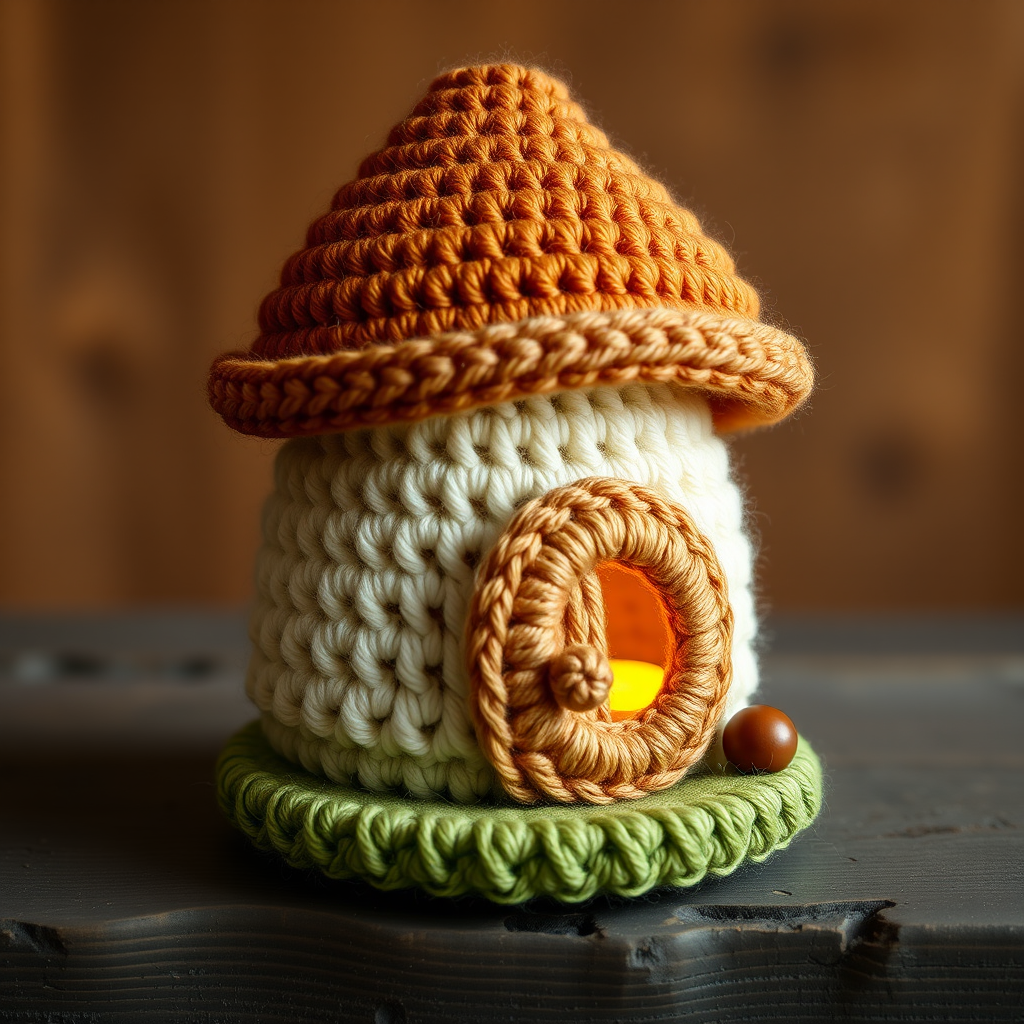
Whimsical Woodland Gnome Home Free Pattern – Cozy Crochet Cottage
Bring a touch of enchanted forest charm to your shelf with this adorable crochet gnome home, complete with a mushroom roof and tiny door. Perfect for yarn lovers seeking a whimsical, handmade decor piece. This pattern is designed with beginners in mind, using simple single crochet stitches worked in continuous spirals. The result is a soft, plush, storybook cottage that measures about 5 inches tall—just right for a shelf, mantel, or fairy garden display.
Whether you're new to amigurumi or a seasoned maker looking for a quick weekend project, this gnome home is a delightful way to practice shaping, color changes, and assembly. The earthy palette—terracotta, cream, moss green, warm brown, and soft yellow—creates a cozy, inviting piece that feels straight out of a fairy tale. Let's gather our materials and get started!
Materials Needed
Before you begin, make sure you have all the supplies on hand. This project uses basic amigurumi tools and materials, most of which you may already own.
Yarn
- Worsted weight yarn in the following colors:
- Terracotta (for the roof) – approximately 50 yards
- Cream (for the walls) – approximately 60 yards
- Moss green (for the base) – approximately 20 yards
- Warm brown (for the door) – small amount (about 5 yards)
- Soft yellow (for the window) – small amount (about 3 yards)
Hook and Notions
- 3.5mm (E) crochet hook – This size works perfectly with worsted weight yarn to create tight, firm stitches that hold their shape.
- Polyester fiberfill stuffing – Enough to firmly stuff the walls and roof.
- Yarn needle – For sewing pieces together and weaving in ends.
- Stitch markers – Essential for tracking rounds in continuous spiral work.
- Optional: A small piece of cardboard or plastic canvas to stiffen the base if you want extra stability.
Gauge
4” x 4” = 16 sc x 18 rows – Gauge is not critical for this project, but consistent tension is recommended to ensure your gnome home stands upright and looks neat. If your stitches are very loose, consider using a smaller hook.
Step-by-Step Instructions
This pattern is worked in continuous spirals unless otherwise noted. Always use a stitch marker to keep track of your rounds—it's easy to lose count when working in the round! Read through the entire pattern before starting, and refer to the abbreviations list as needed.
Abbreviations
- mr: magic ring
- sc: single crochet
- inc: increase (2 sc in same stitch)
- dec: decrease (invisible decrease – insert hook in front loop of next 2 stitches, yarn over, pull through, yarn over, pull through both loops)
- sl st: slip stitch
- ch: chain
- FO: fasten off
Base (Moss Green)
The base forms the flat, sturdy bottom of your gnome home. Work it in a spiral, increasing evenly to create a circle.
- Round 1: Make a magic ring, work 6 sc into the ring. (6 stitches)
- Round 2: Inc in each stitch around. (12 stitches)
- Round 3: (Sc in next st, inc) around. (18 stitches)
- Round 4: (Sc in next 2 sts, inc) around. (24 stitches)
- Round 5: (Sc in next 3 sts, inc) around. (30 stitches)
- Round 6: (Sc in next 4 sts, inc) around. (36 stitches)
- Round 7: (Sc in next 5 sts, inc) around. (42 stitches)
- Round 8: (Sc in next 6 sts, inc) around. (48 stitches)
- Round 9: (Sc in next 7 sts, inc) around. (54 stitches)
- Round 10: (Sc in next 8 sts, inc) around. (60 stitches)
- Round 11-12: Sc in each stitch around. (60 stitches)
FO and weave in the end. Your base should be a flat, circular disc about 3.5 inches in diameter. If it curls, gently block it by pressing with a warm iron (on low, no steam) or simply flatten it with your hands.
Walls (Cream)
The walls are worked directly on top of the base, continuing in the same spiral. This creates a seamless, cylindrical home.
- Round 1: Attach cream yarn to any stitch on the last round of the base with a sl st. Ch 1, sc in the same st and in each stitch around. (60 stitches) – Make sure your ch 1 does not count as a stitch; work your first sc into the same stitch as the sl st.
- Round 2-15: Sc in each stitch around. (60 stitches) – Work even for 14 rounds to create the cylindrical walls. The walls should be about 2.5 inches tall.
- Round 16: (Sc in next 8 sts, dec) around. (54 stitches)
- Round 17: (Sc in next 7 sts, dec) around. (48 stitches)
- Round 18: (Sc in next 6 sts, dec) around. (42 stitches)
- Round 19: (Sc in next 5 sts, dec) around. (36 stitches)
- Round 20: (Sc in next 4 sts, dec) around. (30 stitches)
Stuff the home firmly with fiberfill before closing. Use small handfuls and push them down with your fingers or the blunt end of your hook. The walls should feel firm but not stretched.
- Round 21: (Sc in next 3 sts, dec) around. (24 stitches)
- Round 22: (Sc in next 2 sts, dec) around. (18 stitches)
- Round 23: (Sc in next st, dec) around. (12 stitches)
- Round 24: Dec around. (6 stitches)
FO, leaving a long tail (about 12 inches). Thread the tail through a yarn needle, then weave it through the front loops of the remaining 6 stitches. Pull tight to close the opening, then weave the end securely into the piece.
Roof (Terracotta)
The roof is a slightly flattened dome that sits on top of the walls. It's worked separately and sewn on later.
- Round 1: Magic ring, 6 sc in ring. (6 stitches)
- Round 2: Inc in each stitch around. (12 stitches)
- Round 3: (Sc in next st, inc) around. (18 stitches)
- Round 4: (Sc in next 2 sts, inc) around. (24 stitches)
- Round 5: (Sc in next 3 sts, inc) around. (30 stitches)
- Round 6: (Sc in next 4 sts, inc) around. (36 stitches)
- Round 7: (Sc in next 5 sts, inc) around. (42 stitches)
- Round 8: (Sc in next 6 sts, inc) around. (48 stitches)
- Round 9: (Sc in next 7 sts, inc) around. (54 stitches)
- Round 10: (Sc in next 8 sts, inc) around. (60 stitches)
- Round 11: (Sc in next 9 sts, inc) around. (66 stitches)
- Round 12: (Sc in next 10 sts, inc) around. (72 stitches)
- Round 13-20: Sc in each stitch around. (72 stitches) – Work even for 8 rounds to create the dome shape.
- Round 21: (Sc in next 10 sts, dec) around. (66 stitches)
- Round 22: (Sc in next 9 sts, dec) around. (60 stitches)
- Round 23: (Sc in next 8 sts, dec) around. (54 stitches)
- Round 24: (Sc in next 7 sts, dec) around. (48 stitches)
- Round 25: (Sc in next 6 sts, dec) around. (42 stitches)
- Round 26: (Sc in next 5 sts, dec) around. (36 stitches)
- Round 27: (Sc in next 4 sts, dec) around. (30 stitches)
- Round 28: (Sc in next 3 sts, dec) around. (24 stitches)
- Round 29: (Sc in next 2 sts, dec) around. (18 stitches)
- Round 30: (Sc in next st, dec) around. (12 stitches)
- Round 31: Dec around. (6 stitches)
FO, leaving a long tail. Weave the tail through the front loops of the remaining 6 stitches and pull tight to close. Weave in the end. The roof should be a slightly flattened dome that sits nicely on top of the walls. If it looks too pointy, gently shape it with your hands while it's still soft.
Door (Warm Brown)
The door is worked in rows, not rounds, to create a flat, arched shape.
- Row 1: Ch 6, sc in 2nd ch from hook and in next 4 chs. (5 stitches) – Your first sc goes into the 2nd chain from the hook, then 4 more sc across.
- Row 2-8: Ch 1, turn, sc in each stitch across. (5 stitches) – Work 7 rows even to create the rectangular body of the door.
- Row 9: Ch 1, turn, sc in next 2 sts, dec, sc in next st. (4 stitches)
- Row 10: Ch 1, turn, sc in next st, dec, sc in next st. (3 stitches)
- Row 11: Ch 1, turn, sc in next st, dec. (2 stitches)
- Row 12: Ch 1, turn, dec. (1 stitch)
FO, leaving a long tail for sewing. The door should be a rounded arch shape, about 1.5 inches tall and 1 inch wide. If you prefer a taller door, add a few more even rows before starting the decreases.
Window (Soft Yellow)
The window is a simple circle that will glow like a lantern on the side of the home.
- Round 1: Magic ring, 6 sc in ring. (6 stitches)
- Round 2: Inc in each stitch around. (12 stitches)
- Round 3: (Sc in next st, inc) around. (18 stitches)
FO, leaving a long tail for sewing. This creates a circular window about 1 inch in diameter. If you want a larger window, add one more round of increases (sc in next 2 sts, inc) to make 24 stitches.
Assembly
Now comes the fun part—putting your gnome home together! Take your time with the sewing to ensure a neat, professional finish.
- Attach the roof: Position the roof on top of the walls, aligning the edges. The roof should sit evenly, with the dome facing upward. Use the terracotta yarn tail and a whip stitch to sew around the circumference. Insert your needle through the edge of the roof and the corresponding edge of the walls, pulling snugly but not too tight. Continue around until the roof is securely attached. Weave in the end.
- Attach the door: Position the door on the front of the home, about 2 rounds above the base. The flat bottom of the door should align with the curve of the walls. Use the brown yarn tail to sew it in place with small, invisible stitches along the edges. Weave in the end.
- Attach the window: Position the window to the side of the door, slightly higher—about 4 rounds above the base. Use the yellow yarn tail to sew it in place, working around the circle. Weave in the end.
- Optional chimney: To add a small chimney, crochet a tiny cylinder: make a magic ring with 6 sc, inc to 12 stitches, then work even for 4 rounds. FO, leaving a tail. Sew it to the roof at a slight angle, about 1 inch from the edge. This adds extra whimsy!
- Weave in all ends: Use your yarn needle to hide any remaining tails inside the piece. Trim any excess yarn.
Your whimsical gnome home is complete! Display it on a shelf, mantel, or in a fairy garden. For extra charm, place a few tiny acorns or moss around the base. This pattern is quick to make and endlessly customizable—try different color combinations or add a tiny wreath to the door for seasonal flair.
Happy crocheting, and may your home be filled with woodland magic!



