Whimsical Woodland Gnome Norbin Nibbleweed Free Crochet Pattern
Whimsical Woodland Gnome Norbin Nibbleweed: A Free Crochet Pattern for Beginners
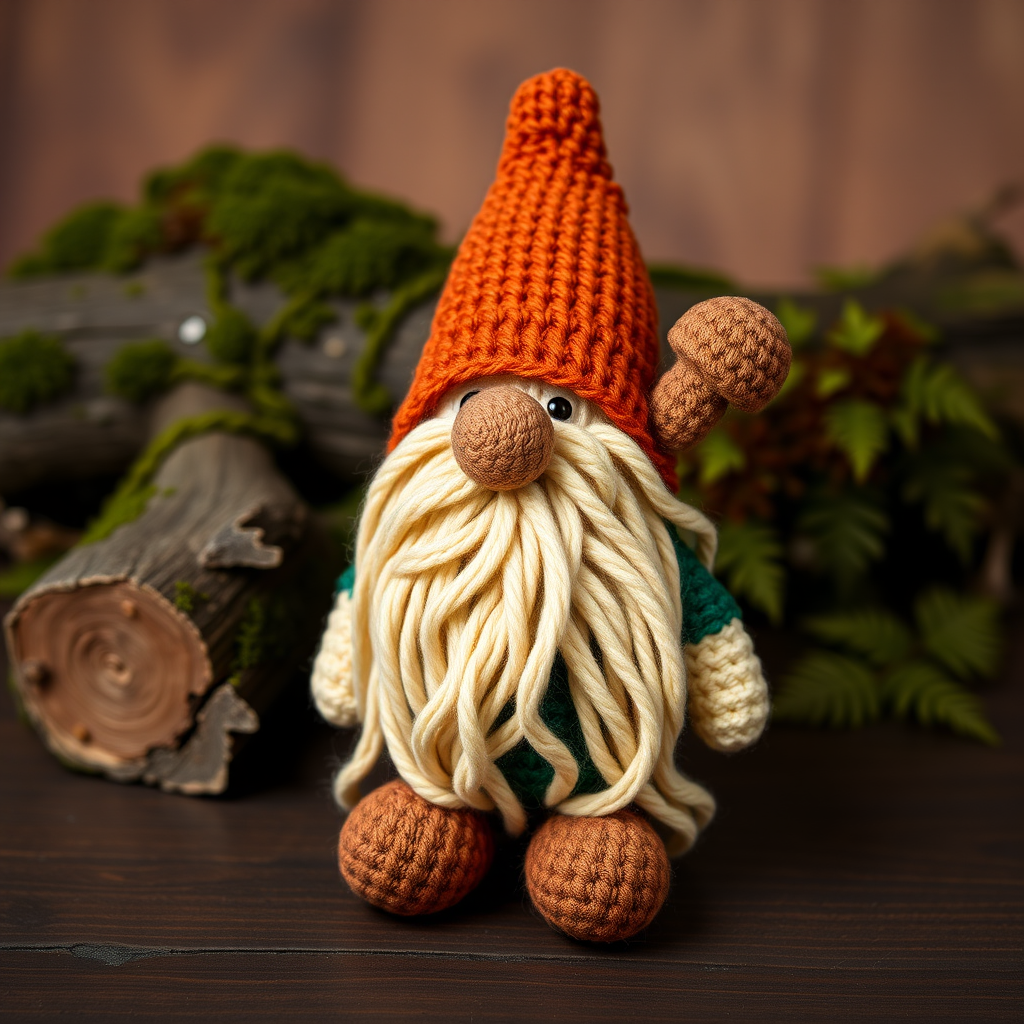
Bring a touch of forest magic into your home with Norbin Nibbleweed, an adorable crochet gnome with a mossy beard, a bulbous nose, and a mushroom-cap hat. This beginner-friendly amigurumi pattern is perfect for crafters looking to create a soft, huggable companion that adds whimsy to any shelf, desk, or nursery. With clear instructions and simple single-crochet techniques, you'll have your very own woodland friend in no time.
Materials Needed
Before you begin, gather the following supplies. This project uses worsted weight yarn and a 3.5mm hook—gauge is not critical, but aim for a tight tension to keep the stuffing from showing through.
- Yarn (worsted weight): Forest green (body), cream (beard and arms), rust orange (hat), brown (nose and mushroom), plus small amounts of black (eyes) and pink (cheeks) for embroidery.
- Crochet hook: 3.5mm (E) hook
- Stuffing: Polyester fiberfill or similar soft stuffing
- Yarn needle: For sewing pieces together and weaving in ends
- Stitch marker: To keep track of rounds (optional but helpful)
- Scissors: For cutting yarn
Step-by-Step Instructions
This pattern is worked in continuous rounds unless otherwise noted. Use a stitch marker to mark the beginning of each round. Let's start with the head, then move to the body, limbs, and finishing details.
Head
Using forest green yarn (or your preferred skin tone for the face—cream works well too), create the head:
- R1: Magic ring, 6 sc in ring (6)
- R2: Inc in each st around (12)
- R3: (Sc in next st, inc) around (18)
- R4: (Sc in next 2 sts, inc) around (24)
- R5: (Sc in next 3 sts, inc) around (30)
- R6-R10: Sc in each st around (30) — 5 rounds straight
- R11: (Sc in next 3 sts, dec) around (24)
- R12: (Sc in next 2 sts, dec) around (18)
- R13: (Sc in next st, dec) around (12)
Stuff the head firmly with fiberfill. Fasten off, leaving a long tail (about 12 inches) for sewing to the body.
Body
Using forest green yarn for the tunic:
- R1: Magic ring, 6 sc in ring (6)
- R2: Inc in each st around (12)
- R3: (Sc in next st, inc) around (18)
- R4: (Sc in next 2 sts, inc) around (24)
- R5-R8: Sc in each st around (24) — 4 rounds straight
- R9: (Sc in next 2 sts, dec) around (18)
- R10: Sc in each st around (18)
Stuff the body firmly. Fasten off, leaving a long tail for sewing to the head.
Arms (Make 2)
Using cream yarn:
- R1: Magic ring, 6 sc in ring (6)
- R2: (Sc in next st, inc) around (9)
- R3-R6: Sc in each st around (9) — 4 rounds straight
Stuff lightly—just enough to give shape. Fasten off, leaving a long tail for sewing.
Legs (Make 2)
Using brown yarn:
- R1: Magic ring, 6 sc in ring (6)
- R2: Inc in each st around (12)
- R3-R5: Sc in each st around (12) — 3 rounds straight
Stuff lightly. Fasten off, leaving a long tail for sewing.
Beard
Using cream yarn, this is worked flat in rows:
- Row 1: Chain 20. Sc in 2nd ch from hook and in each ch across (19).
- Row 2: Ch 1, turn, sc in each st across (19).
- Row 3: Ch 1, turn, (sc in next st, ch 3, sl st in same st) repeat across—this creates a wavy, textured fringe. Fasten off.
This beard will cover the lower half of the face, giving Norbin his signature mossy look.
Hat
Using rust orange yarn:
- R1: Magic ring, 6 sc in ring (6)
- R2: Inc in each st around (12)
- R3: (Sc in next st, inc) around (18)
- R4: (Sc in next 2 sts, inc) around (24)
- R5: (Sc in next 3 sts, inc) around (30)
- R6-R10: Sc in each st around (30) — 5 rounds straight
- R11: (Sc in next 3 sts, dec) around (24)
- R12: (Sc in next 2 sts, dec) around (18)
- R13: (Sc in next st, dec) around (12)
- R14: Dec around (6)
Fasten off and weave in the end. Gently fold the brim up slightly for a jaunty look.
Nose
Using brown yarn:
- Magic ring, 6 sc in ring. Fasten off, leaving a tail for sewing.
This small bulbous nose will be the centerpiece of his face.
Mushroom Detail
Using brown yarn, create a small mushroom cap for the hat:
- Magic ring, 6 sc in ring.
- Inc in each st around (12).
- Sc in each st for 2 rounds.
- Fasten off, leaving a tail for sewing.
Assembly
Now it's time to bring Norbin to life! Follow these steps carefully for a polished finish:
- Sew head to body: Use the long tail from the head to whip-stitch it securely to the top of the body. Make sure the seam is hidden.
- Attach arms: Sew the arms to the sides of the body, about 1-2 rows down from the neck. Position them so they hang naturally.
- Attach legs: Sew the legs to the bottom of the body, spacing them evenly so Norbin can sit or stand.
- Sew on the beard: Place the beard over the lower half of the face, with the wavy fringe pointing downward. Sew it in place along the top edge.
- Attach the nose: Sew the brown nose in the center of the beard, just above the fringe.
- Sew on the hat: Place the hat on top of the head, slightly tilted for character. Sew it securely around the base.
- Embroider the face: Using black yarn, embroider two small eyes above the beard. With pink yarn, add small blush circles on the cheeks.
- Add the mushroom: Sew the small mushroom cap onto the side of the hat for a woodland touch.
Weave in all loose ends and give your gnome a gentle squeeze to shape him. Congratulations—you've just created Norbin Nibbleweed, your very own whimsical woodland companion! This pattern is perfect for gifts, seasonal decor, or simply adding a bit of magic to your craft collection. Happy crocheting!



