Whimsical Woodland Moth Free Pattern – Crochet a Dreamy Night Flutter
Whimsical Woodland Moth Free Pattern – Crochet a Dreamy Night Flutter
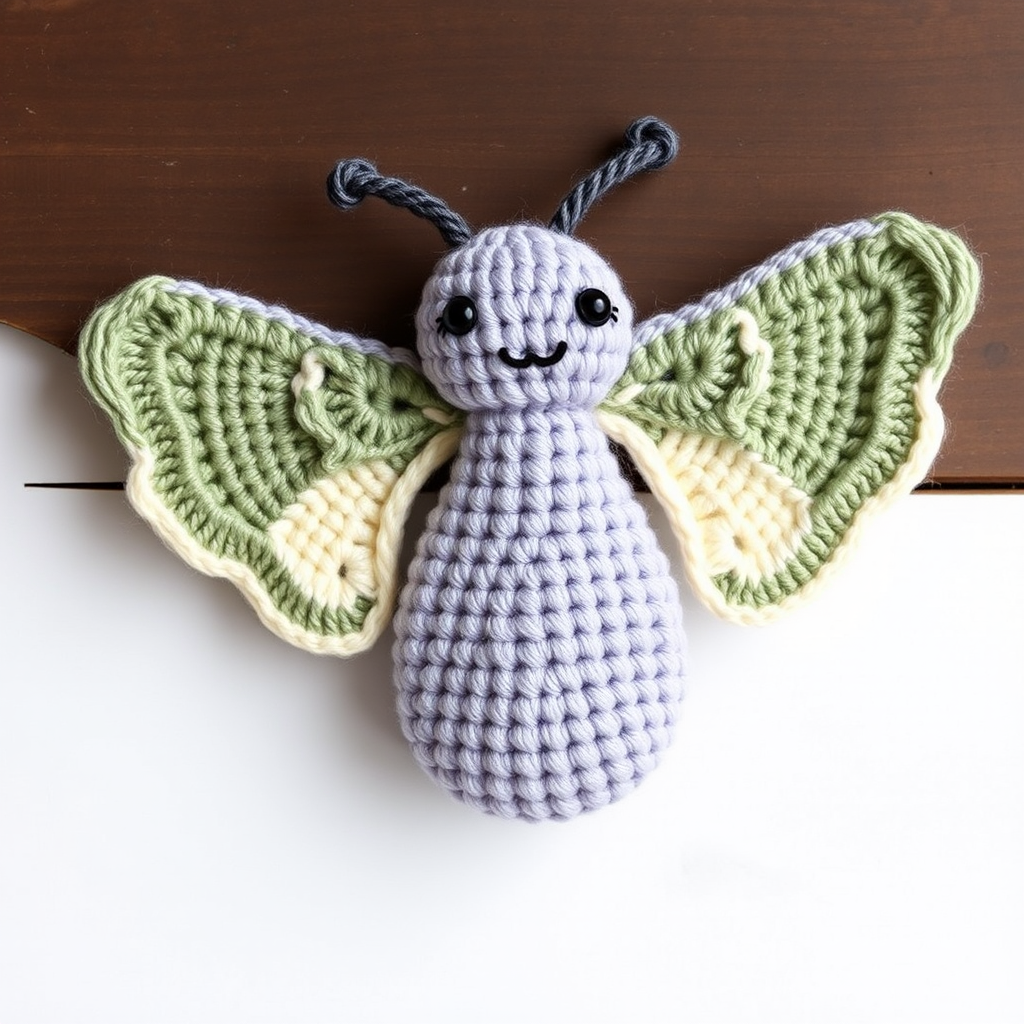
Capture the ethereal beauty of a moonlit forest with this soft, textured crochet moth, featuring delicate lace wings and a plush, huggable body. Perfect for adding a touch of whimsy to any shelf or nursery, this fairycore-inspired amigurumi is a delightful weekend project. With its muted lavender, sage green, and cream palette, this little night flutter brings a dreamy woodland charm to your handmade collection. Whether you're a seasoned crocheter or a curious beginner, this pattern is designed to be approachable, detailed, and endlessly rewarding.
Materials Needed
Before you begin, gather the following supplies. Using the specified yarn weight and hook size ensures the best results, but feel free to experiment with colors to make this moth uniquely yours.
- Yarn: Worsted weight cotton or acrylic in four colors:
- Color A: Dusty lavender (body and head)
- Color B: Sage green (upper wings)
- Color C: Cream (lower wings)
- Color D: Charcoal (antennae and facial details)
- Hook: 3.5mm (E) crochet hook
- Stuffing: Polyester fiberfill (or your preferred stuffing material)
- Notions: Yarn needle, stitch marker, scissors
- Optional: Pipe cleaners for bendable antennae
Gauge: Not critical for this project; aim for a tight tension to prevent stuffing from showing. Approx 4 sc = 1 inch.
Abbreviations
- MR: Magic ring
- sc: Single crochet
- inc: Increase (2 sc in same stitch)
- dec: Decrease (sc 2 together)
- ch: Chain
- sl st: Slip stitch
- hdc: Half double crochet
- dc: Double crochet
- st(s): Stitch(es)
Step-by-Step Instructions
Body (Make 1, starting with Color A)
The body is worked in continuous rounds (no joining, unless specified). Use a stitch marker to keep track of your rounds.
- Round 1: MR, 6 sc in ring. (6)
- Round 2: inc in each st around. (12)
- Round 3: (sc in next st, inc) around. (18)
- Round 4: (sc in next 2 sts, inc) around. (24)
- Round 5: (sc in next 3 sts, inc) around. (30)
- Rounds 6-10: sc in each st around. (30) — This creates the plump, teardrop shape.
- Round 11: (sc in next 3 sts, dec) around. (24)
- Round 12: (sc in next 2 sts, dec) around. (18)
- Stuff firmly with polyester fiberfill. Ensure the body is well-packed but not misshapen.
- Round 13: (sc in next st, dec) around. (12)
- Round 14: dec around. (6)
- Fasten off, leaving a tail. Weave the tail through the front loops of the remaining 6 stitches and pull tight to close. Weave in the end securely.
Head (Make 1, Color A)
The head is slightly smaller than the body, giving the moth a cute, proportionate look.
- Round 1: MR, 6 sc in ring. (6)
- Round 2: inc in each st around. (12)
- Round 3: (sc in next st, inc) around. (18)
- Rounds 4-6: sc in each st around. (18) — Work these three rounds straight to form the head's height.
- Round 7: (sc in next st, dec) around. (12)
- Stuff lightly — the head should be soft, not overly firm.
- Round 8: dec around. (6)
- Fasten off, leaving a long tail (about 12 inches) for sewing. Do not close the opening completely; you'll attach it to the body.
Wings (Make 4 – 2 Upper, 2 Lower)
These wings are worked flat in rows. The varying stitch heights (sc, hdc, dc) create a beautiful, ribbed texture that mimics real moth wings. The upper wings use Color B (sage green), and the lower wings use Color C (cream).
Upper Wing (Make 2, Color B)
- Row 1: Ch 11, sc in 2nd ch from hook and across. (10)
- Row 2: Ch 1, turn, sc in next 2 sts, hdc in next 2, dc in next 2, hdc in next 2, sc in last 2. (10)
- Row 3: Ch 1, turn, sc in next 3 sts, hdc in next 2, dc in next 2, hdc in next 2, sc in last 3. (12)
- Row 4: Ch 1, turn, sc in next 4 sts, hdc in next 2, dc in next 2, hdc in next 2, sc in last 4. (14)
- Row 5: Ch 1, turn, sc in next 5 sts, hdc in next 2, dc in next 2, hdc in next 2, sc in last 5. (16)
- Row 6: Ch 1, turn, sc in next 6 sts, hdc in next 2, dc in next 2, hdc in next 2, sc in last 6. (18)
- Fasten off, leaving a tail for sewing. Weave in the starting end. Repeat for the second upper wing.
Lower Wing (Make 2, Color C)
- Row 1: Ch 8, sc in 2nd ch from hook and across. (7)
- Row 2: Ch 1, turn, sc in next 2 sts, hdc in next 2, dc in next 2, sc in last st. (7)
- Row 3: Ch 1, turn, sc in next 3 sts, hdc in next 2, dc in next 2, sc in last 2. (9)
- Row 4: Ch 1, turn, sc in next 4 sts, hdc in next 2, dc in next 2, sc in last 3. (11)
- Row 5: Ch 1, turn, sc in next 5 sts, hdc in next 2, dc in next 2, sc in last 4. (13)
- Fasten off, leaving a tail for sewing. Weave in the starting end. Repeat for the second lower wing.
Antennae (Make 2, Color D)
These delicate, curled antennae add the perfect finishing touch. If you want them to be poseable, insert a small piece of pipe cleaner inside before closing.
- Ch 10.
- Sl st in 2nd ch from hook, sl st in next 3 ch. (This forms the straight base.)
- Ch 3, sl st in 2nd ch from hook and next ch. (This creates the tiny curl at the tip.)
- Sl st in remaining 4 ch of the base chain. (Work back down to the start.)
- Fasten off, leaving a tail for sewing.
Assembly
Now for the fun part — bringing your moth to life! Take your time with the placement to achieve that whimsical, natural look.
- Attach the head to the body: Using the long tail from the head, sew the head onto the top of the body. Position it slightly forward, centered. Use a whip stitch or mattress stitch, going through the stitches of both pieces. Secure firmly and weave in the end.
- Sew the upper wings: Position the upper wings on the sides of the body, slightly angled upward (like a butterfly at rest). Sew them securely using the tails left from the wings. Make sure they are symmetrical.
- Sew the lower wings: Attach the lower wings just below the upper wings, angled slightly downward. This creates the layered, natural moth wing silhouette. Sew securely.
- Attach the antennae: Sew the antennae to the top of the head, spacing them about 3-4 stitches apart. Angle them outward slightly for a lively look.
- Embroider the face: Using the charcoal yarn (Color D) and a yarn needle:
- Eyes: Create two small French knots, or use satin stitches for a simple, cute expression. Place them about 4-5 stitches apart on the front of the head, roughly at the level of Round 4-5.
- Smile: Optionally, add a tiny smile using a backstitch just below the eyes. Keep it subtle for that gentle, dreamy look.
Finishing Touches
- Weave in all ends: Use your yarn needle to carefully hide any remaining tails inside the body or wings.
- Shape the wings: Gently fold or curl the wings slightly to give them a natural, organic curve. You can dampen them slightly and shape them, letting them dry for a more permanent bend.
- Final fluff: Give your moth a gentle squeeze to distribute the stuffing evenly and fluff up the yarn fibers.
And there you have it — your very own Whimsical Woodland Moth! This charming little creature makes a wonderful gift, a lovely nursery decoration, or a magical addition to your fairycore collection. The soft, muted colors and textured wings are sure to spark joy and imagination. Happy crocheting!



