Whispering Prairie Sunburst Wall Hanging Free Crochet Pattern
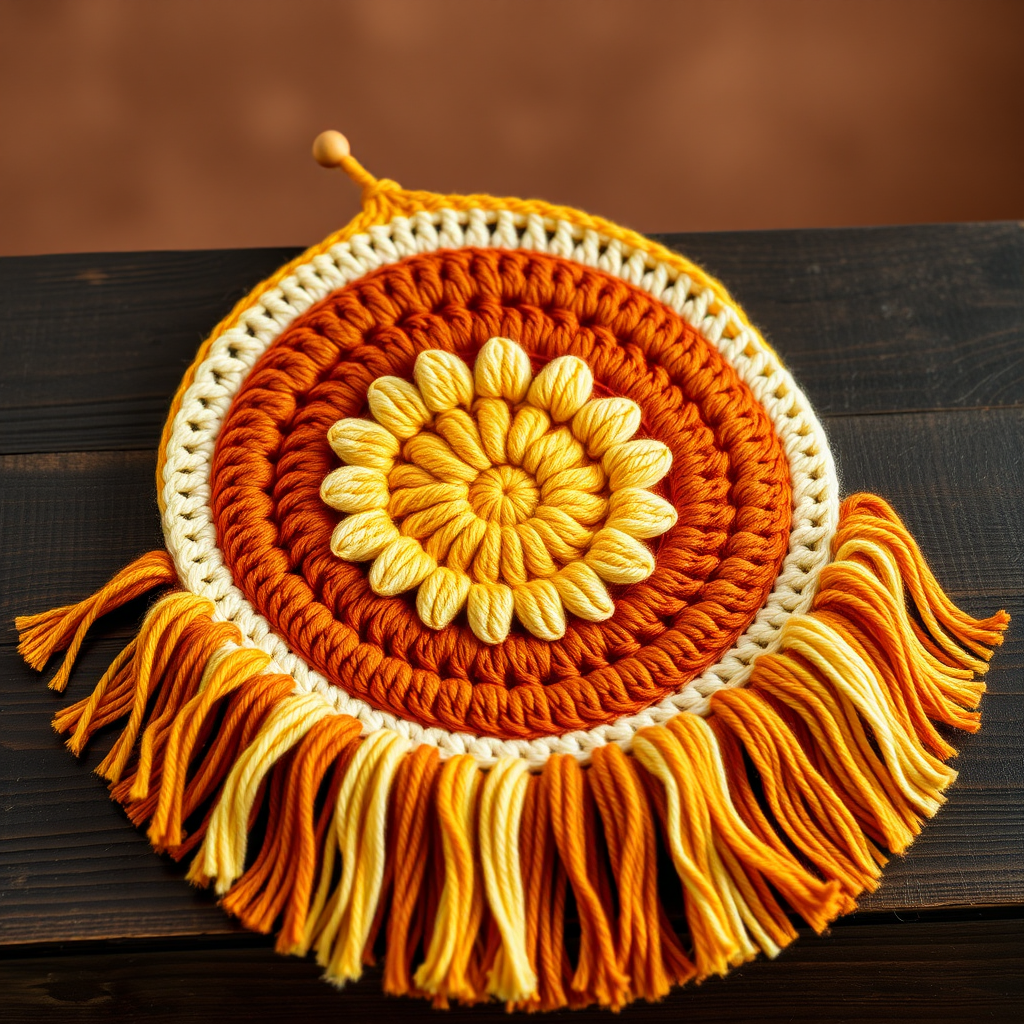
Whispering Prairie Sunburst Wall Hanging: A Free Boho Crochet Pattern
Bring the warmth of a golden prairie sunset into your home with this textured, boho-chic wall hanging. The intricate sunburst motif and flowing fringe create a stunning, handmade focal point for any room. This pattern is perfect for intermediate beginners who are comfortable with basic stitches and ready to explore texture and colorwork. The earthy terracotta, mustard yellow, cream, and rust orange palette evokes the serene beauty of the open plains, making it a versatile piece that complements any modern or rustic decor.
In this comprehensive guide, we will walk you through every step, from gathering your materials to adding the final finishing touches. By the end, you'll have a beautiful, handmade piece that adds warmth and character to your living space. Let's get started!
Materials Needed
Before you begin, gather the following supplies. Having everything ready will make your crafting session smooth and enjoyable.
- Yarn: Worsted weight cotton yarn in four colors:
- Terracotta (approx. 100g)
- Mustard Yellow (approx. 60g)
- Cream (approx. 60g)
- Rust Orange (approx. 30g)
- Crochet Hook: 5.0 mm (H-8) crochet hook. This size is ideal for worsted weight yarn to achieve the correct gauge and a sturdy fabric.
- Yarn Needle: A large-eyed tapestry needle for weaving in ends and sewing the hanging casing.
- Scissors: For cutting yarn and trimming fringe.
- Wooden Dowel or Branch: Approximately 12-14 inches long, for hanging the finished piece.
- Stitch Markers (optional): Helpful for keeping track of rounds, especially in the medallion.
Gauge Information
To ensure your wall hanging turns out the correct size, it's important to check your gauge. The specified gauge is 4-inch square = 16 double crochet stitches and 8 rows. Work a small swatch in double crochet to verify your tension. If your swatch is larger, try a smaller hook; if it's smaller, try a larger hook. Getting the gauge right ensures your project matches the intended dimensions and drape.
Step-by-Step Instructions
This wall hanging is worked in two main parts: the central sunburst medallion and the surrounding textured border. The fringe is added at the very end. Follow these detailed instructions carefully, and you'll have a gorgeous piece in no time.
Part 1: Sunburst Medallion (Make 1)
The medallion is the heart of the design, featuring a beautiful eight-petal sunburst. We'll work it in the round, starting with a magic ring.
Round 1: With terracotta yarn, make a magic ring. Work 12 double crochet (dc) into the ring. Slip stitch (sl st) to join. (12 dc)
Tip: If you're new to magic rings, you can chain 4 and slip stitch to form a loop instead, then work your stitches into the loop.
Round 2: Ch 3 (counts as dc), 1 dc in same st. Work 2 dc in each stitch around. Sl st to join. (24 dc)
This round doubles your stitch count, creating a flat circle. Ensure you work 2 dc into every stitch from Round 1.
Round 3: Ch 3, 1 dc in same st. *1 dc in next st, 2 dc in next st.* Repeat from * to * around. Sl st to join. (36 dc)
This round increases by 12 stitches, maintaining the circle's flatness. The pattern is: increase, then one single dc, then increase again.
Round 4: Ch 3, 1 dc in same st. *1 dc in next 2 sts, 2 dc in next st.* Repeat from * to * around. Sl st to join. (48 dc)
Now you're increasing every third stitch. This continues the even growth of the circle.
Round 5: Switch to mustard yellow yarn. Ch 1. Work 1 single crochet (sc) in same st. *Skip 1 st, 5 dc in next st, skip 1 st, 1 sc in next st.* Repeat from * to * around, ending with a sl st to the first sc. Fasten off. (8 petals)
This is the exciting part! You're creating the sunburst petals. Each petal is made of 5 dc worked into a single stitch, with sc stitches between them to separate the petals. Skipping stitches before and after each petal creates the scalloped effect. You should have 8 beautiful petals when complete.
Part 2: Textured Border
Now we'll add the textured border that surrounds the medallion, creating a beautiful gradient of colors and patterns. We'll be working in rows, not rounds, from this point forward.
Row 1: With cream yarn, attach to any sc between petals. Ch 1, work 1 sc in same st. *Work 1 sc in each of the next 5 dc, 1 sc in next sc.* Repeat from * to * around. Sl st to join. (48 sc)
This row smooths out the petals, creating a solid base of single crochet stitches. You're working one sc into each of the 5 dc of each petal, and one sc into the sc between petals.
Row 2: Ch 3 (counts as dc), 1 dc in same st. *Skip 1 st, 1 dc in next st, 1 dc in skipped st (crossed dc).* Repeat from * to * around, ending with 1 dc in the last st. Sl st to join. (48 dc)
This creates a beautiful crossed stitch texture. The technique is: skip one stitch, work a dc into the next stitch, then go back and work a dc into the skipped stitch. This creates an "X" pattern. The initial ch 3 and dc in the same stitch counts as your first crossed pair.
Row 3: Ch 1, work 1 sc in same st. *1 sc in next st.* Repeat from * to * around. Sl st to join. (48 sc)
A simple row of single crochet to create a solid band between the textured rows.
Row 4: Repeat Row 2 with rust orange yarn.
Switch to rust orange and repeat the crossed double crochet pattern. This adds a warm, earthy tone to the border.
Row 5: Repeat Row 3 with rust orange yarn.
Continue with rust orange for the single crochet row, maintaining the color block.
Row 6: Repeat Row 2 with cream yarn.
Switch back to cream for another textured row.
Row 7: Repeat Row 3 with cream yarn.
Add the matching single crochet row in cream.
Row 8: Repeat Row 2 with mustard yellow yarn.
Switch to mustard yellow for the final textured row.
Row 9: Repeat Row 3 with mustard yellow yarn. Fasten off.
Complete the border with a single crochet row in mustard yellow, then fasten off and weave in the end.
Part 3: Adding the Fringe
The fringe adds that perfect boho touch and frames the bottom edge beautifully. It's simple to make and adds significant visual appeal.
Step 1: Cut 12-inch lengths of all four yarn colors. You'll need enough for approximately 12-15 fringe groups, depending on how closely you space them.
Step 2: For each fringe group, fold 3 strands in half. You can mix colors or keep them uniform—it's your choice! For a gradient effect, try using one strand of each color in some groups.
Step 3: Insert your crochet hook through the bottom edge of the border, from front to back. Pull the folded loop of yarn through the fabric.
Step 4: Pull the ends of the yarn through the loop and tighten gently. This creates a secure knot.
Step 5: Space fringe groups evenly along the bottom edge. Aim for about 1 inch apart for a full, lush look.
Step 6: Once all fringe is attached, trim the ends to an even length. You can hold the fringe taut and cut straight across for a clean edge.
Part 4: Finishing Touches
Your wall hanging is almost complete! These final steps will ensure it hangs beautifully and lasts for years.
Weave in All Ends: Using your yarn needle, carefully weave in all loose ends from color changes and fastening off. Make sure to weave them in securely so they don't come undone with use.
Attach the Hanging Dowel: There are two easy methods to attach your wooden dowel or branch:
- Method 1 (Sewing): Fold the top edge of the wall hanging over the dowel. Using a matching thread or yarn, sew the folded edge down to create a casing. This is secure and invisible from the front.
- Method 2 (Crocheted Casing): With a contrasting or matching yarn, work a row of slip stitches or single crochet along the top edge, catching the dowel as you go. This creates a decorative, visible casing.
Hang and Enjoy: Add a piece of twine or rope to each end of the dowel for hanging, or use decorative hooks. Find the perfect spot in your home and enjoy your beautiful, handmade creation!
Your Whispering Prairie Sunburst Wall Hanging is now complete. This piece is sure to be a conversation starter and a cherished addition to your home decor. The combination of textures, colors, and the handmade touch makes it truly special. Happy crocheting!


