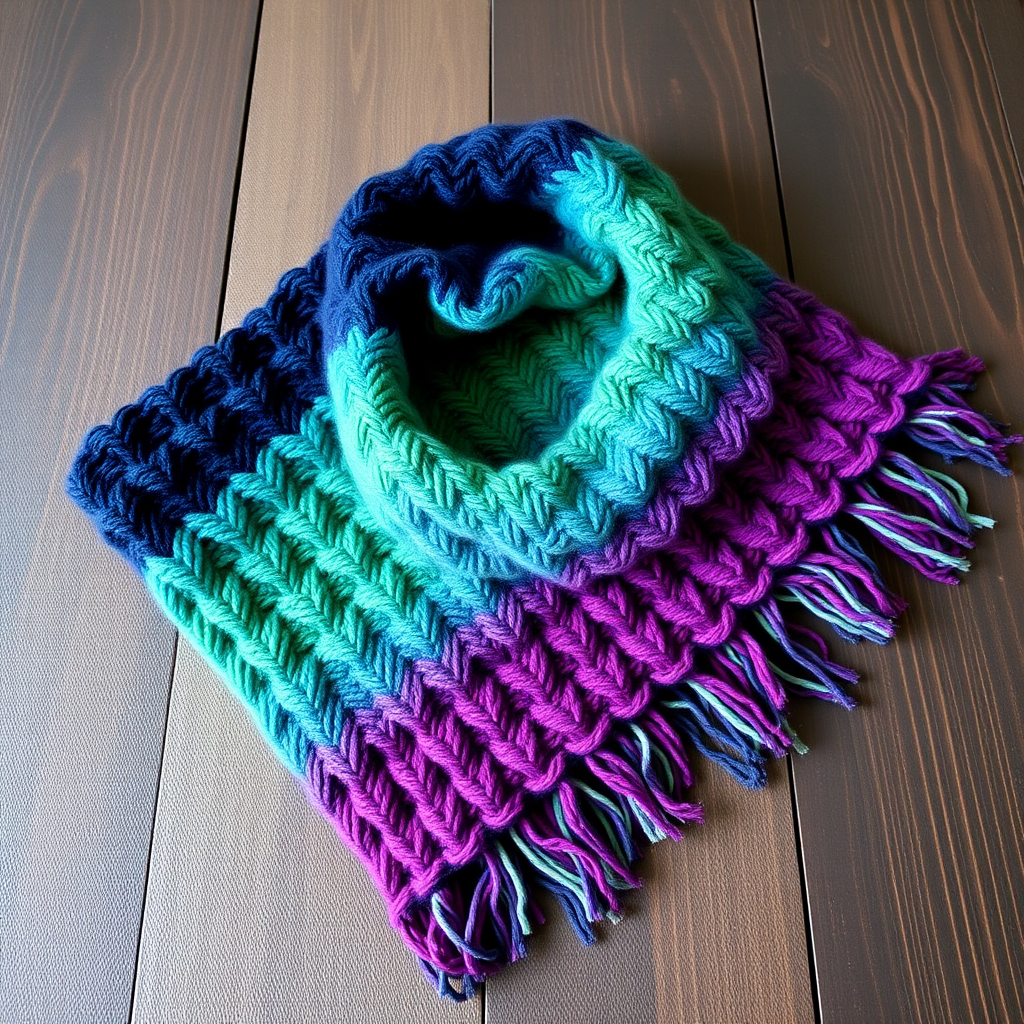
Aurora Borealis Infinity Scarf Free Pattern – A Shimmering Ombre Knit with Faux Fur Trim

Wrap Yourself in the Northern Lights: The Aurora Borealis Infinity Scarf
Imagine draping the swirling, vibrant colors of the aurora borealis around your neck. With this free knitting pattern, you can! The Aurora Borealis Infinity Scarf is a luxurious, cozy project that combines a stunning ombre color gradient with the plush, reversible texture of the brioche stitch. Finished with a soft faux fur trim, this scarf is as warm and beautiful as it is unique. Perfect for intermediate knitters looking for a rewarding project, this pattern will guide you through every step to create a statement piece you'll treasure all winter long.
Materials Needed: Gathering Your Shimmering Supplies
Before you begin, gather the following materials to ensure a smooth and enjoyable knitting experience. This list is designed to help you create the exact scarf shown, but feel free to experiment with your own color palette!
Yarn
- Worsted weight yarn in 4 colors (approximately 200g of each):
- Color A: Deep Teal
- Color B: Midnight Blue
- Color C: Violet
- Color D: Magenta
- 1 skein of faux fur yarn (e.g., Lion Brand Go For Faux) in a contrasting color (white or cream recommended) for the trim.
Needles & Notions
- US 8 (5.0 mm) 24-inch circular knitting needle – The circular needle is essential for working in the round.
- US J/6.0 mm crochet hook – For adding the faux fur trim.
- Stitch marker – To mark the beginning of your rounds.
- Yarn needle – For seaming and weaving in ends.
- Scissors
Gauge
16 stitches and 24 rows = 4 inches in brioche stitch (after blocking). Always knit a gauge swatch to ensure your finished scarf matches the intended dimensions. Adjust your needle size if necessary to achieve the correct gauge.
Step-by-Step Instructions: Knitting Your Aurora Scarf
This scarf is worked in the round as a seamless tube, then seamed at the ends to form an infinity loop. The brioche stitch creates a lofty, reversible fabric that looks intricate but is surprisingly simple once you get the rhythm. Follow these detailed instructions carefully, and you'll be amazed at what you create.
Abbreviations
- k = knit
- p = purl
- k2tog = knit two together
- sl1yo = slip one stitch purlwise with yarn over
- brk = brioche knit (knit the stitch together with its yarn over)
- brp = brioche purl (purl the stitch together with its yarn over)
Getting Started: Cast On & Setup Rounds
Step 1: Cast On
With Color A (Deep Teal), cast on 120 stitches onto your circular needle. Place a stitch marker on the right-hand needle to mark the beginning of the round. Join in the round by bringing the last cast-on stitch together with the first stitch, being very careful not to twist the stitches around the needle.
Step 2: Setup Round 1
Work the first setup round: *K1, p1* repeat from * to end of round. This establishes a simple ribbing base.
Step 3: Setup Round 2
Work the second setup round: *Sl1yo, p1* repeat from * to end of round. This round prepares your stitches for the brioche pattern by creating yarn overs.
The Brioche Pattern: Creating the Magic
Now you'll begin the main brioche stitch pattern. This two-round repeat creates the beautiful, ribbed texture.
Round 3 (Brioche Pattern Round 1):
*Brk, sl1yo* repeat from * to end of round. Remember, brk means you knit the stitch together with its yarn over from the previous round.
Round 4 (Brioche Pattern Round 2):
*Sl1yo, brp* repeat from * to end of round. Here, brp means you purl the stitch together with its yarn over.
Repeat Rounds 3 and 4 for the remainder of the brioche pattern. You'll quickly see the beautiful, plush fabric forming.
Color Changes: Building the Ombre Effect
The stunning gradient is achieved by working bold stripes in a specific sequence. Follow this color chart carefully.
Step 1: First Stripe Sequence
Work 12 rounds of the brioche pattern with Color A (Deep Teal).
Switch to Color B (Midnight Blue) and work 12 rounds.
Switch to Color C (Violet) and work 12 rounds.
Switch to Color D (Magenta) and work 12 rounds.
Step 2: Repeat the Sequence
Repeat the entire color sequence (A, B, C, D) two more times. This means you will have a total of 3 stripes of each color, with each stripe being 12 rounds. In total, you will have worked 36 rounds per color, and 144 rounds overall.
Pro Tip: When changing colors, simply drop the old yarn and pick up the new one. You can carry the yarn up the inside of the tube, or cut and weave in ends later. Carrying is easier for a seamless look.
Binding Off: Finishing the Tube
After you complete the last stripe of Color D (Magenta), it's time to bind off loosely to maintain the stretchy edge.
Step 1: Bind Off Round
With Color D, work the bind-off in pattern: *Brk, p1* repeat from * to end, binding off as you go. To do this, knit the brk stitch, then purl the next stitch, then pass the first stitch over the second. Continue this pattern across the round.
Step 2: Secure Yarn
Cut the yarn, leaving a long tail (at least 12 inches). Pull the tail through the last loop to secure it.
Seaming: Creating the Infinity Loop
Now you'll transform your tube into an infinity scarf.
Step 1: Fold the Tube
Fold the knitted tube in half so the cast-on edge meets the bind-off edge. The tube should be flat, with the seam you're about to create running along one side.
Step 2: Whip Stitch Seam
Thread the long yarn tail onto a yarn needle. Use a whip stitch to sew the cast-on edge to the bind-off edge. Insert the needle through the loops of both edges, working from one side to the other. Pull gently to close the seam, creating a continuous loop.
Step 3: Weave in Ends
Weave in all loose ends from your color changes and the seam using the yarn needle. Trim any excess yarn.
Adding the Faux Fur Trim: A Touch of Luxury
The faux fur trim adds that extra bit of coziness and elegance. This is done with a crochet hook.
Step 1: Attach Faux Fur Yarn
Using the faux fur yarn and your J/6.0 mm crochet hook, attach the yarn to one of the edges of the scarf with a slip stitch.
Step 2: Single Crochet Around
Work a round of single crochet (sc) around both the cast-on and bind-off edges of the scarf. Insert your hook into a stitch, yarn over, pull up a loop, yarn over, and pull through both loops on the hook. Work 1 sc in each stitch around the entire edge.
Step 3: Join and Finish
When you reach the starting point, join with a slip stitch to the first single crochet. Fasten off and weave in the ends. Repeat this process for the other edge of the scarf.
And there you have it—a stunning, luxurious Aurora Borealis Infinity Scarf! The plush brioche fabric, vibrant ombre stripes, and soft faux fur trim combine to create a truly special accessory. Whether you're making it for yourself or as a heartfelt gift, this scarf is sure to bring warmth and a touch of northern lights magic to any winter day.