Ember & Ash Hooded Scarf Free Pattern – Chunky Brioche Knit with Pockets
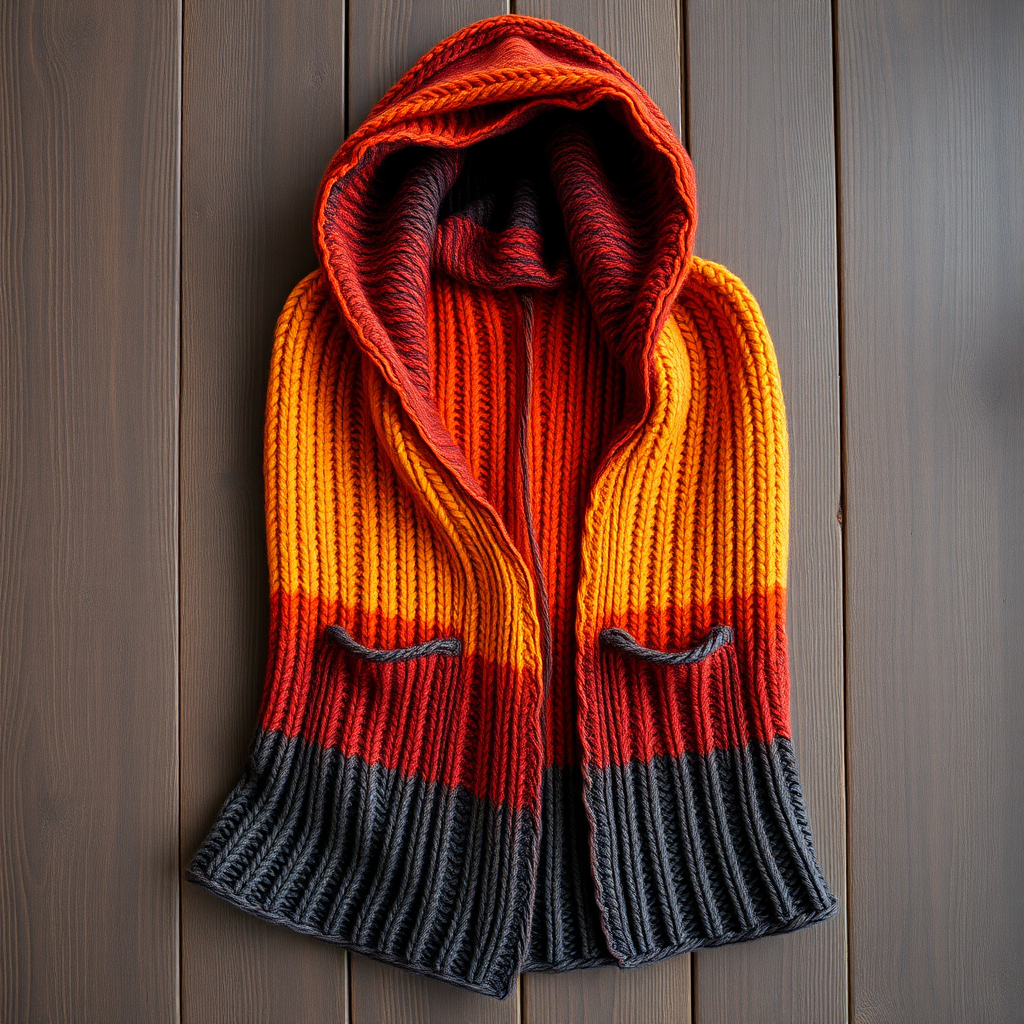
Ember & Ash Hooded Scarf: A Chunky Brioche Knit with Pockets
Wrap yourself in the cozy embrace of the Ember & Ash Hooded Scarf, a chunky brioche knit that combines a dramatic hood with deep, hidden pockets. This luxurious accessory is perfect for crisp autumn walks or snowy commutes, offering warmth and style in one stunning piece. The rich gradient color palette—transitioning from warm burnt orange to deep charcoal—creates a striking ombre effect that will turn heads wherever you go.
Whether you're a seasoned knitter looking for a new challenge or a confident beginner ready to expand your skills, this pattern is designed to guide you through every step. The brioche stitch creates a plush, ribbed texture that's both beautiful and incredibly warm, making this hooded scarf a staple piece for the colder months.
Materials Needed
Before you begin, gather the following materials to ensure a smooth knitting experience:
- Yarn: Super bulky weight yarn (approx. 300-350 yards). The sample shown uses a gradient of burnt orange to deep charcoal, but feel free to choose any color combination that speaks to you.
- Needle: US 11 (8.0 mm) circular knitting needle with a 24-inch cable. The long cable is essential for accommodating all stitches, especially during the hood shaping.
- Gauge: 10 stitches and 14 rows = 4 inches in brioche stitch (after blocking). Achieving the correct gauge ensures your finished scarf has the perfect drape and fit.
- Extras: Tapestry needle for weaving in ends, stitch markers (optional but helpful), and blocking mats or towels for finishing.
Understanding the Brioche Stitch
Before diving into the pattern, it's important to familiarize yourself with the brioche stitch. This technique creates a lofty, double-sided fabric that's incredibly squishy and warm. The key to successful brioche knitting is understanding the "slip one with yarn over" (Sl1yo) maneuver, which forms the foundation of the pattern.
Here are the abbreviations you'll need to know:
- CO: Cast on
- K: Knit
- P: Purl
- K2tog: Knit two together (decrease)
- P2tog: Purl two together (decrease)
- Sl1yo: Slip one stitch purlwise with yarn over (brioche increase)
- Brk: Brioche knit (knit the slipped stitch together with its yarn over)
- Brp: Brioche purl (purl the slipped stitch together with its yarn over)
- BO: Bind off
Step-by-Step Instructions
This pattern is worked in one piece from the bottom up, then the hood is shaped at the top. Pockets are added as separate panels and sewn on. Follow these detailed instructions carefully, and you'll have a beautiful hooded scarf in no time.
Pattern Notes
- The scarf is worked flat in rows, then stitches are added for the hood.
- Use a long circular needle to accommodate all stitches comfortably.
- Always end with a WS (wrong side) row before starting the hood section.
Main Scarf Body
Cast On: CO 60 stitches.
Row 1 (RS): K1, *Sl1yo, K1; repeat from * to last stitch, K1.
Row 2 (WS): K1, *Brp, Sl1yo; repeat from * to last 2 stitches, Brp, K1.
Row 3 (RS): K1, *Sl1yo, Brk; repeat from * to last 2 stitches, Sl1yo, K1.
Repeat Rows 2 and 3 until the piece measures 30 inches from the cast-on edge, ending with a WS row. This forms the long, cozy body of the scarf that will wrap around your neck.
Hood Shaping
Now it's time to create the dramatic hood that makes this scarf so special.
Next Row (RS): K1, *Sl1yo, Brk; repeat from * to last 2 stitches, Sl1yo, K1, then CO 30 stitches at the end of the row (for the back of the hood). You should now have 90 stitches total.
Next Row (WS): K1, *Brp, Sl1yo; repeat from * to last 2 stitches, Brp, K1.
Continue in brioche pattern (alternating Rows 2 and 3) until the hood measures 12 inches from the CO edge of the hood section, ending with a WS row. This creates a deep, voluminous hood that will drape beautifully.
Hood Decreases
To shape the top of the hood, you'll gradually decrease stitches. This creates a rounded crown that fits comfortably over your head.
Row 1 (RS): K1, *Sl1yo, Brk; repeat from * to last 3 stitches, Sl1yo, K2tog (decrease 1 stitch). You now have 89 stitches.
Row 2 (WS): K1, *Brp, Sl1yo; repeat from * to last 2 stitches, Brp, K1.
Row 3 (RS): K1, *Sl1yo, Brk; repeat from * to last 4 stitches, Sl1yo, K2tog, K1 (decrease 1 stitch). You now have 88 stitches.
Row 4 (WS): K1, *Brp, Sl1yo; repeat from * to last 2 stitches, Brp, K1.
Repeat Rows 3 and 4 until 60 stitches remain, ending with a WS row. The gradual decreases will create a smooth, rounded shape for the top of your hood.
Hood Bind Off
BO all stitches loosely in pattern (knit the knits and purl the purls with their yarn overs). Binding off loosely is crucial here—it ensures the edge remains stretchy and comfortable when the hood is worn.
Pockets (Make 2)
These deep, hidden pockets are the perfect place to warm your hands on chilly days.
Cast On: CO 20 stitches.
Work in brioche stitch (alternating Rows 2 and 3) for 8 inches, ending with a WS row.
BO all stitches loosely.
Finishing
Now it's time to assemble your masterpiece:
- Close the Hood: Fold the hood in half at the top and seam the top edge together to close the hood. Use a mattress stitch or whip stitch for a seamless finish.
- Attach the Pockets: Position each pocket on the front of the scarf, about 6 inches from the bottom edge and 2 inches from the side edges. Sew the sides and bottom of each pocket to the scarf, leaving the top open for your hands.
- Weave in Ends: Use your tapestry needle to weave in all loose ends carefully, ensuring they're hidden within the brioche texture.
- Block Gently: Block the finished scarf to shape. Lay it flat on blocking mats, gently pat it into shape, and allow it to dry completely. This helps even out the brioche stitches and gives the scarf a polished, professional look.
Tips for Success
As you work through this pattern, keep these tips in mind:
- Count Your Stitches: Brioche can be tricky to count. Use stitch markers every 10 stitches to help you keep track, especially during the hood decreases.
- Stay Consistent: Always bring the yarn forward before slipping a stitch purlwise with a yarn over. Consistency is key to achieving that beautiful, uniform texture.
- Don't Rush the Blocking: Blocking transforms brioche from a slightly scrunched fabric into a smooth, drapey masterpiece. Be patient and let it dry completely.
- Customize Your Colors: While the burnt orange to charcoal gradient is stunning, don't be afraid to experiment with your own color combinations. This pattern works beautifully with any super bulky yarn.
The Ember & Ash Hooded Scarf is more than just an accessory—it's a statement piece that combines functionality with undeniable style. The plush brioche texture, dramatic hood, and hidden pockets make it the ultimate companion for cold-weather adventures. Whether you're treating yourself or gifting it to a loved one, this handcrafted scarf is sure to become a cherished favorite for years to come.
Happy knitting, and enjoy creating your own cozy masterpiece!


