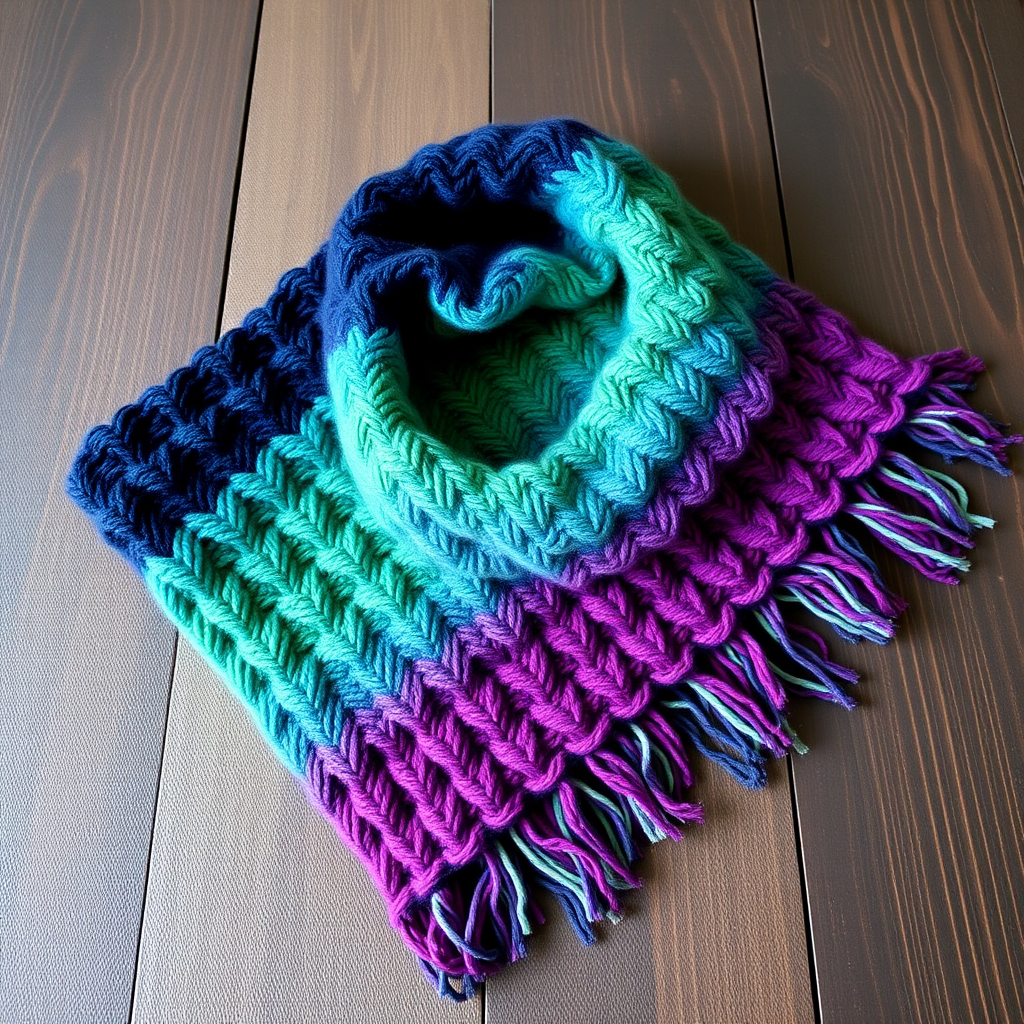
Emberglow Basketweave Scarf Free Pattern – Knit a Cozy Textured Wrap

Introducing the Emberglow Basketweave Scarf: A Cozy, Textured Knit
Wrap yourself in the warmth of the Emberglow Basketweave Scarf, a richly textured knit that mimics the interwoven fibers of a handcrafted basket. This pattern offers a soothing rhythm of knits and purls, perfect for cozy evenings and thoughtful gift-giving. The classic basketweave stitch creates a beautifully dimensional fabric—raised squares of knit stitches alternating with recessed purl blocks—that resembles a woven basket. It's a beginner-friendly pattern that produces a professional-looking, fully reversible scarf with a rustic, handcrafted aesthetic.
Whether you're a new knitter looking to expand your skills or an experienced maker seeking a meditative project, this scarf is a joy to create. The pattern is simple to memorize, works up quickly in worsted weight yarn, and the result is a substantial, cozy wrap that evokes the warmth of a crackling fireplace. The variegated yarn shown—a rich gradient of burnt orange, deep amber, and warm terracotta with subtle flecks of deep teal—adds an autumnal, earthy feel that makes this scarf a standout accessory.
Materials Needed
Before you begin, gather the following supplies. This project requires minimal materials, making it an accessible and affordable knit.
Yarn
- Worsted weight yarn (Category 4), approximately 400-450 yards. The sample shown uses a heathered burnt orange and deep teal variegated yarn, but any worsted weight yarn will work beautifully. Choose a solid color to highlight the texture, or a variegated yarn for a more dynamic look.
Needles
- US Size 8 (5.0 mm) knitting needles—straight or circular. Circular needles are often more comfortable for long projects as they distribute the weight of the work, but straight needles work perfectly fine.
Additional Supplies
- Tapestry needle for weaving in ends
- Scissors
- Measuring tape (optional, for checking length)
Gauge
- 18 stitches and 24 rows = 4 inches in stockinette stitch. Gauge is not critical for this project, but maintaining consistency ensures the desired drape and finished measurements. If your gauge is significantly different, your scarf may be wider or narrower than the stated 8 inches.
Step-by-Step Instructions
Follow these detailed instructions carefully, and you'll have a beautiful basketweave scarf in no time. The pattern is broken down into manageable sections, and each row is clearly explained.
Finished Measurements
Approximately 8 inches wide x 70 inches long. You can easily adjust the length by adding or subtracting pattern repeats—each 8-row repeat adds about 1.5 inches to the length.
Abbreviations
- CO: Cast on
- K: Knit
- P: Purl
- Rep: Repeat
- St(s): Stitch(es)
- RS: Right side
- WS: Wrong side
- wyf: With yarn in front
Pattern Notes
- The basketweave pattern is created with a simple 8-row repeat, alternating blocks of stockinette and reverse stockinette.
- Work all slipped stitches as if to purl with yarn in front (wyf) for a neat, tidy edge.
- The scarf is fully reversible, with the basketweave texture appearing beautifully on both sides.
- The first and last stitches of each row are edge stitches. The first stitch is always slipped, and the last stitch is worked as indicated to create a clean, finished edge.
Getting Started: Cast On and Border
Step 1: Cast On
CO 40 stitches using your preferred method. A long-tail cast-on works well for this project, providing a stretchy yet sturdy edge.
Step 2: Work the Border Rows (worked once)
These two rows create a neat, stable edge that prevents the basketweave pattern from curling excessively.
- Row 1 (RS): Slip 1 wyf, K to end. (You will knit all 39 remaining stitches.)
- Row 2 (WS): Slip 1 wyf, P to end. (You will purl all 39 remaining stitches.)
The Basketweave Pattern
Now you'll begin the main pattern. The 8-row repeat creates the beautiful woven texture. Pay close attention to whether you're on a right-side (RS) or wrong-side (WS) row, as the pattern alternates.
Row 1 (RS): Slip 1 wyf, K6, P6, K6, P6, K6, P6, K2. (The last 2 stitches are edge stitches; knit them.)
Row 2 (WS): Slip 1 wyf, P6, K6, P6, K6, P6, K6, P2. (The last 2 stitches are edge stitches; purl them.)
Row 3 (RS): Slip 1 wyf, K6, P6, K6, P6, K6, P6, K2. (Same as Row 1.)
Row 4 (WS): Slip 1 wyf, P6, K6, P6, K6, P6, K6, P2. (Same as Row 2.)
Row 5 (RS): Slip 1 wyf, P6, K6, P6, K6, P6, K6, P2. (Notice the shift—you're now starting with purls on the RS.)
Row 6 (WS): Slip 1 wyf, K6, P6, K6, P6, K6, P6, K2. (Now you're starting with knits on the WS.)
Row 7 (RS): Slip 1 wyf, P6, K6, P6, K6, P6, K6, P2. (Same as Row 5.)
Row 8 (WS): Slip 1 wyf, K6, P6, K6, P6, K6, P6, K2. (Same as Row 6.)
Understanding the Pattern: Rows 1-4 create a block of stockinette (knit on RS, purl on WS) on the first 6 stitches, followed by a block of reverse stockinette (purl on RS, knit on WS) on the next 6 stitches, and so on. Rows 5-8 reverse this, creating the checkerboard basketweave effect. The 6-stitch blocks are 4 rows tall, giving you a balanced, woven look.
Repeating the Pattern
Repeat Rows 1-8 until the scarf measures approximately 69 inches from the cast-on edge, ending with a Row 8 (WS) to ensure the pattern is complete. This ensures that the last visible pattern block is finished before you begin the border.
Pro Tip: Use a row counter or place a removable stitch marker every 10 repeats to keep track of your progress without losing count.
Finishing the Scarf: Border and Bind Off
Step 1: Work the Border Rows (worked once)
These final two rows mirror the beginning border, creating a symmetrical, polished finish.
- Next Row (RS): Slip 1 wyf, K to end.
- Next Row (WS): Slip 1 wyf, P to end.
Step 2: Bind Off
Bind off all stitches loosely in pattern on the next RS row. This means you'll knit the knit stitches and purl the purl stitches as they appear. Binding off in pattern maintains the stretch and texture of the fabric, preventing a tight, puckered edge.
- Knit the first stitch.
- Knit (or purl, depending on the stitch pattern) the next stitch.
- Pass the first stitch over the second stitch and off the needle.
- Continue this process across the row, working each stitch as it appears (knit the knits, purl the purls).
- When one stitch remains, cut the yarn leaving a 6-inch tail, and pull it through the last loop to secure.
Weaving in Ends and Blocking
Step 1: Weave in Ends
Thread a tapestry needle with the yarn tail. Weave the tail through the purl bumps on the wrong side of the scarf, following the path of the yarn for about 2-3 inches. Trim the excess yarn. Repeat for all remaining ends.
Step 2: Block Gently
Blocking is optional but highly recommended. It evens out the texture, relaxes the fibers, and gives your scarf a professional finish. To block, soak the scarf in lukewarm water with a drop of mild wool wash for 15-20 minutes. Gently squeeze out excess water (do not wring), then lay the scarf flat on a clean towel. Roll the towel to remove more water, then lay the scarf flat on a dry towel or blocking mat. Gently shape it to the correct dimensions and pin if necessary. Allow it to dry completely before wearing.
Final Thoughts
Your Emberglow Basketweave Scarf is now complete! This textured, cozy wrap is perfect for chilly autumn days, winter commutes, or as a heartfelt handmade gift. The rhythmic pattern is meditative and relaxing, making it an ideal project for cozy evenings by the fire.
Remember, the beauty of this pattern lies in its simplicity and versatility. Feel free to experiment with different yarn colors and fiber blends—a soft merino will drape beautifully, while a wool-acrylic blend offers durability and easy care. You can also adjust the width by casting on multiples of 12 stitches (plus 4 for the edge stitches) to make a wider shawl or a narrower neck warmer.
Happy knitting, and enjoy your beautiful new scarf!