Evergreen Garland Hot Pad Free Pattern – Textured Crochet Christmas Wreath
Evergreen Garland Hot Pad Free Pattern – Textured Crochet Christmas Wreath
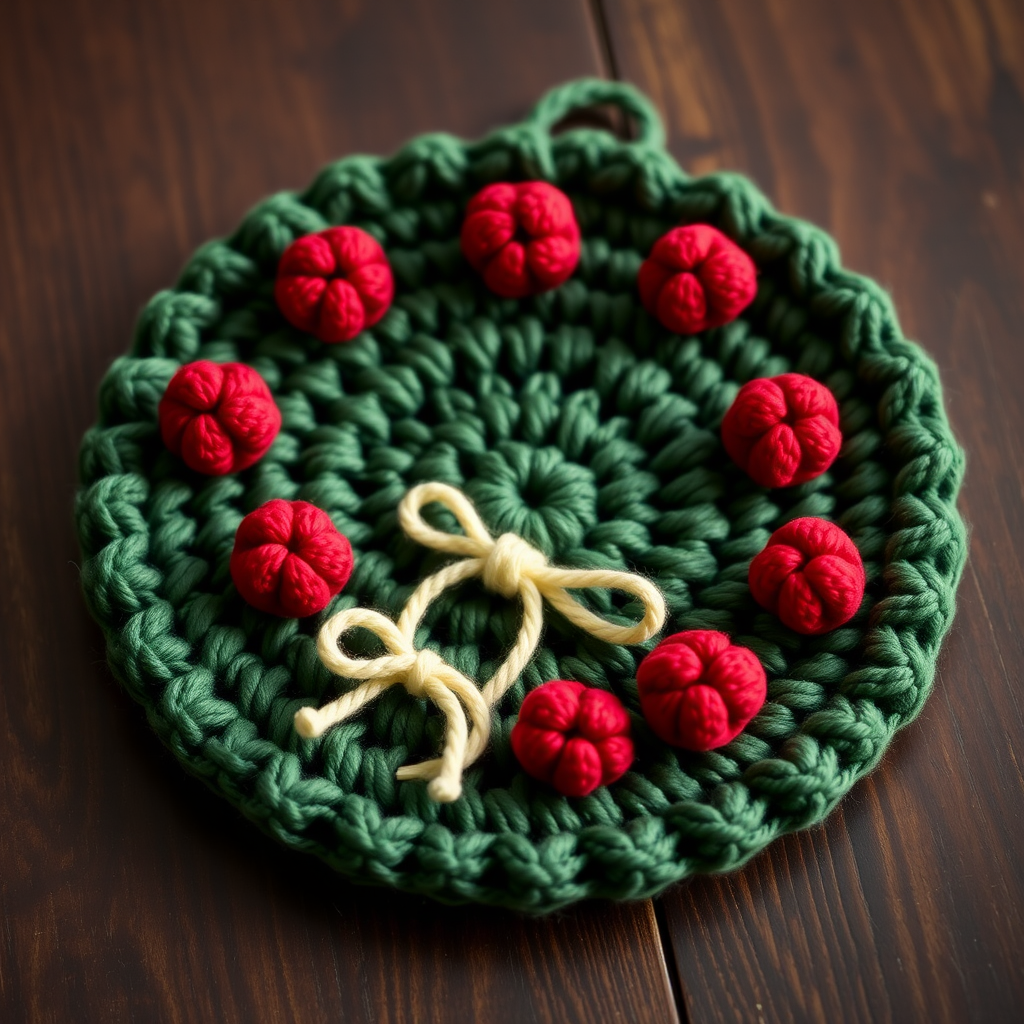
Bring the cozy charm of a winter forest into your kitchen this holiday season with this lush, textured crochet wreath hot pad. This stunning piece doubles as a trivet, protecting your table while adding a handmade, festive touch to your holiday décor. The layered pine needle stitches create a realistic evergreen texture, while plump red berry clusters and a sweet cream bow add that perfect pop of Christmas color. Whether you're an experienced crocheter or a confident beginner looking for a rewarding project, this pattern is designed to guide you through every step with clarity and ease. Let's get started on creating a holiday heirloom you'll be proud to display year after year!
Materials Needed
Before you begin, gather the following supplies to ensure a smooth and enjoyable crochet experience:
- Yarn: Worsted weight cotton yarn in three colors:
- Forest Green (main color – approximately 2 skeins of Lily Sugar'n Cream or similar)
- Deep Red (for berry clusters – 1 skein)
- Cream (for the bow – small amount)
- Crochet Hook: 5.0 mm (H-8) crochet hook
- Stitch Markers (to track rounds)
- Yarn Needle (for weaving in ends and sewing)
- Scissors
- Fiberfill (for stuffing the berry clusters)
Gauge: 4 inches = 16 single crochet stitches and 18 rows in single crochet. (Gauge is important for achieving the correct finished size, but this pattern is forgiving – even if your gauge is slightly off, the hot pad will still be functional and beautiful.)
Step-by-Step Instructions
Wreath Base (Make 2 Identical Pieces)
Note: This pattern is worked in continuous rounds. Use a stitch marker to track the start of each round – this is crucial for maintaining the correct stitch count.
Round 1: With forest green yarn, make a magic ring. Chain 1, then work 8 single crochet (sc) into the ring. Pull the tail to tighten the ring closed. (8 stitches)
Round 2: Work 2 single crochet in each stitch around. (16 stitches)
Round 3: *Single crochet in the next stitch, 2 single crochet in the next stitch* – repeat from * to * around. (24 stitches)
Round 4: *Single crochet in the next 2 stitches, 2 single crochet in the next stitch* – repeat from * to * around. (32 stitches)
Round 5: *Single crochet in the next 3 stitches, 2 single crochet in the next stitch* – repeat from * to * around. (40 stitches)
Round 6: *Single crochet in the next 4 stitches, 2 single crochet in the next stitch* – repeat from * to * around. (48 stitches)
Round 7: *Single crochet in the next 5 stitches, 2 single crochet in the next stitch* – repeat from * to * around. (56 stitches)
Round 8: *Single crochet in the next 6 stitches, 2 single crochet in the next stitch* – repeat from * to * around. (64 stitches)
Round 9: *Single crochet in the next 7 stitches, 2 single crochet in the next stitch* – repeat from * to * around. (72 stitches)
Round 10: *Single crochet in the next 8 stitches, 2 single crochet in the next stitch* – repeat from * to * around. (80 stitches)
Round 11: *Single crochet in the next 9 stitches, 2 single crochet in the next stitch* – repeat from * to * around. (88 stitches)
Round 12: *Single crochet in the next 10 stitches, 2 single crochet in the next stitch* – repeat from * to * around. (96 stitches)
Round 13: *Single crochet in the next 11 stitches, 2 single crochet in the next stitch* – repeat from * to * around. (104 stitches)
Round 14: *Single crochet in the next 12 stitches, 2 single crochet in the next stitch* – repeat from * to * around. (112 stitches)
Round 15: *Single crochet in the next 13 stitches, 2 single crochet in the next stitch* – repeat from * to * around. (120 stitches)
Round 16: *Single crochet in the next 14 stitches, 2 single crochet in the next stitch* – repeat from * to * around. (128 stitches)
Fasten off and weave in the ends securely. Repeat this entire process to create a second identical wreath base piece. Set both aside.
Pine Needle Texture (Worked on One Side of the Wreath)
This textured layer creates the beautiful, realistic evergreen appearance. You'll be working in continuous rounds, building up the pine needle effect with double crochet clusters and chain spaces.
Round 1: With forest green yarn, attach to the center of one wreath base piece. Chain 3 (counts as first double crochet), *skip 1 stitch, double crochet (dc) in the next stitch, chain 1* – repeat from * to * around, ending with a slip stitch to the top of the initial chain-3. (64 double crochet, 64 chain-1 spaces)
Round 2: Slip stitch into the first chain-1 space. Chain 3, *double crochet in the same space, chain 1, double crochet in the next chain-1 space* – repeat from * to * around, ending with a slip stitch to the top of the chain-3. (128 double crochet)
Round 3: Slip stitch into the first chain-1 space. Chain 3, *double crochet in the same space, chain 2, double crochet in the next chain-1 space* – repeat from * to * around, ending with a slip stitch. (128 double crochet, 64 chain-2 spaces)
Round 4: Slip stitch into the first chain-2 space. Chain 3, *double crochet in the same space, chain 2, double crochet in the next chain-2 space* – repeat from * to * around, ending with a slip stitch. (128 double crochet)
Round 5: Slip stitch into the first chain-2 space. Chain 3, *double crochet in the same space, chain 3, double crochet in the next chain-2 space* – repeat from * to * around, ending with a slip stitch. (128 double crochet, 64 chain-3 spaces)
Round 6: Slip stitch into the first chain-3 space. Chain 3, *double crochet in the same space, chain 3, double crochet in the next chain-3 space* – repeat from * to * around, ending with a slip stitch. (128 double crochet)
Fasten off and weave in all ends carefully. The textured pine needle layer is now complete.
Berry Clusters (Make 8 Total)
These plump, festive berries add the perfect pop of red to your wreath. Each cluster is worked in the round and lightly stuffed.
Round 1: With deep red yarn, make a magic ring. Chain 1, work 6 single crochet into the ring. Pull tight. Join with a slip stitch to the first single crochet. (6 stitches)
Round 2: Chain 1, work 2 single crochet in each stitch around, join with a slip stitch. (12 stitches)
Round 3: Chain 1, *single crochet in the next stitch, 2 single crochet in the next stitch* – repeat from * to * around, join. (18 stitches)
Round 4: Chain 1, single crochet in each stitch around, join. (18 stitches)
Round 5: Chain 1, *single crochet 2 together (sc2tog)* – repeat from * to * around, join. (9 stitches)
Fasten off, leaving a long tail (approximately 12 inches) for sewing. Lightly stuff the berry with fiberfill before closing. Use the yarn needle to weave the tail through the remaining stitches and pull tight to close the opening. Set aside. Repeat to create all 8 berry clusters.
Assembly
Now it's time to bring all the pieces together to create your beautiful hot pad.
Step 1: Place the two wreath base pieces together with wrong sides facing each other. The textured pine needle side should be facing outward on the front.
Step 2: Using forest green yarn, single crochet through both layers around the outer edge. Work 3 single crochet in each corner area (if any) to keep the piece flat and prevent curling. Continue around the entire outer circumference.
Step 3: When you reach the top of the wreath, create the hanging loop: Chain 15, then slip stitch into the same stitch to form a loop. This creates a subtle but functional hanging loop for displaying your hot pad.
Step 4: Continue single crocheting around the inner edge to join the two pieces completely. This creates a clean, finished edge. Fasten off and weave in all ends securely.
Step 5: Sew the 8 berry clusters evenly around the wreath, spacing them approximately 2 inches apart. Position them so they're distributed beautifully around the circle – you can place them at equal intervals (think of clock positions: 12, 1:30, 3, 4:30, 6, 7:30, 9, and 10:30).
Step 6: Create a simple bow using the cream yarn. Make two loops and a center knot, then attach it securely at the bottom center of the wreath. This adds the perfect finishing touch.
Finishing Touches
Block the hot pad gently to ensure it lies perfectly flat. To block, lightly mist with water and shape with your hands, then allow to dry completely. This helps the stitches settle and creates a professional, polished look.
Your Evergreen Garland Hot Pad is now complete and ready to protect your table in festive style! This beautiful piece makes a wonderful handmade gift for friends and family, or a charming addition to your own holiday kitchen décor. The thick cotton yarn provides excellent heat protection, making it both functional and beautiful.
Care Instructions: This hot pad is machine washable on a gentle cycle with cold water. Lay flat to dry to maintain its shape. Do not use bleach or fabric softener.
Enjoy your handmade holiday creation – may it bring warmth and cheer to your kitchen for many seasons to come!


