Evergreen Starry Night Knit Pillow Free Pattern
Bring the Magic of a Winter Forest Indoors: The Evergreen Starry Night Knit Pillow
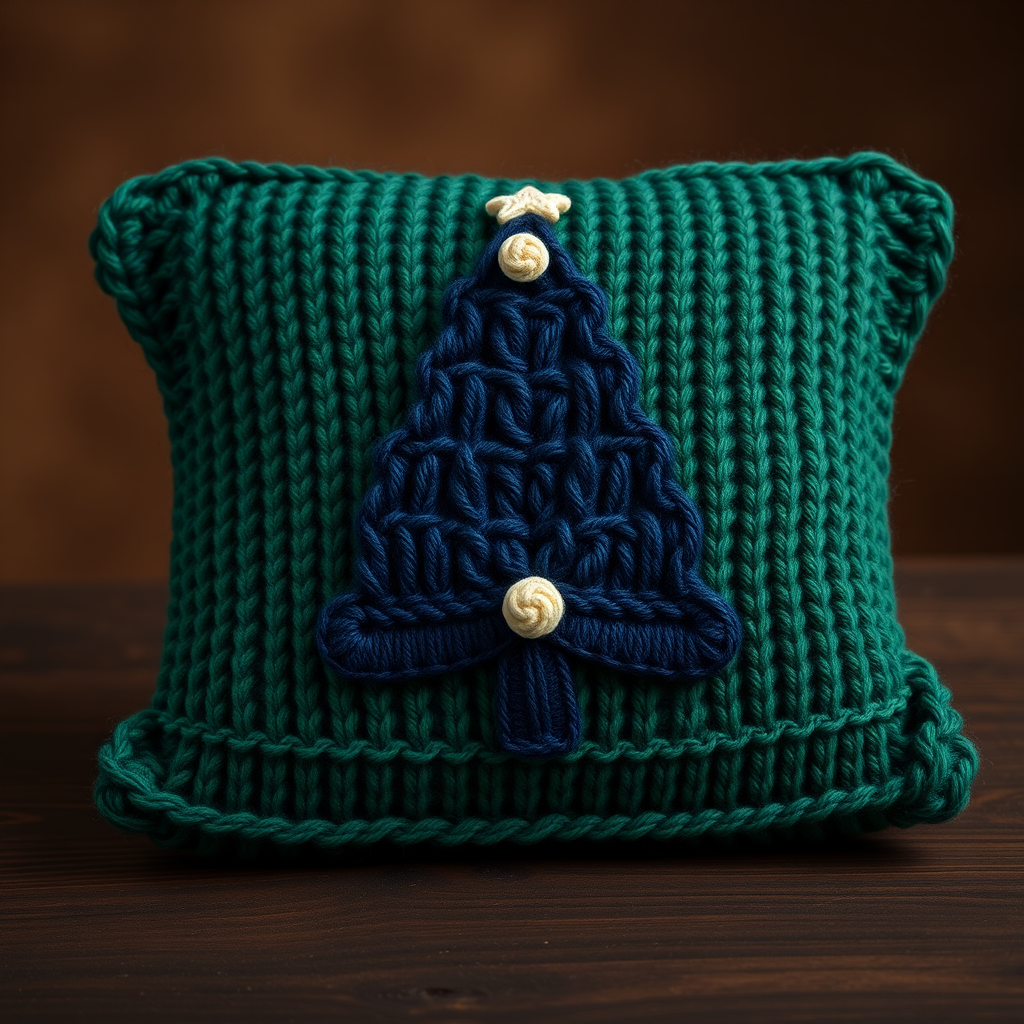
There's something truly special about handmade holiday decor. It carries warmth, intention, and a story that store-bought items simply can't replicate. Today, I'm thrilled to share a pattern that captures the serene beauty of a snow-dusted forest under a midnight sky—the Evergreen Starry Night Knit Pillow. This textured, sculptural piece features a striking tree motif rising from the base, adorned with a row of delicate bobbles and a tiny cream star at its peak. It's the perfect project for intermediate knitters looking to add a premium, cozy touch to their seasonal decorating.
Knitted flat in two panels and seamed together, this pillow is as enjoyable to make as it is to display. The combination of stockinette, reverse stockinette, and bobbles creates a rich, dimensional texture that feels luxurious and looks incredibly intricate—yet the pattern is surprisingly approachable. Let's dive into everything you'll need to create this stunning centerpiece for your holiday sofa or reading nook.
Materials Needed: Gathering Your Supplies
Before you cast on, let's make sure you have all the essentials. This project uses worsted weight yarn, which is perfect for creating a plush, durable pillow with excellent stitch definition.
Yarn Requirements
- Main Color (MC) - Forest Green: Approximately 350 yards. This forms the base of the pillow and the tree trunk.
- Contrast Color 1 (CC1) - Midnight Blue: Approximately 150 yards. This creates the beautiful, deep blue tree motif.
- Contrast Color 2 (CC2) - Cream: Approximately 100 yards. Used for the small star at the tree's peak.
Pro Tip: Choose a yarn with good stitch definition, like a wool blend or a smooth acrylic, to make the textured bobbles and colorwork really pop.
Tools & Notions
- Knitting Needles: US 7 (4.5 mm) straight needles, or a circular needle if you prefer to knit flat.
- Tapestry Needle: For weaving in ends and seaming the panels together.
- Stitch Markers: To help you keep track of pattern sections.
- Pillow Form: A 16-inch square pillow insert.
Gauge
To ensure your pillow comes out the correct size, it's crucial to check your gauge. In stockinette stitch, you should have 18 stitches and 24 rows = 4 inches. If your gauge is off, adjust your needle size accordingly—a tighter gauge will make a smaller pillow, and a looser gauge will make a larger one.
Step-by-Step Instructions: Knitting Your Evergreen Masterpiece
This pattern is worked in two flat panels—a front and a back—which are then seamed together. We'll take it step by step, so you can follow along with confidence.
Front Panel: Creating the Starry Scene
Cast On & Border:
With your Main Color (MC), cast on 72 stitches. We'll begin with a neat garter stitch border. Knit every row for 8 rows. This creates a sturdy, non-curling edge that frames the pillow beautifully.
Setting Up the Stockinette Body:
Now we'll establish the main body of the pillow, keeping a 6-stitch garter border on each side for a clean finish.
- Row 1 (Right Side): K6 (garter border), knit across the next 60 stitches in stockinette, K6 (garter border).
- Row 2 (Wrong Side): K6, purl across the next 60 stitches, K6.
Repeat these two rows until your piece measures 4 inches from the cast-on edge, ending with a Wrong Side row. This solid green base gives the tree a place to "grow" from.
Introducing the Midnight Blue Tree:
It's time to bring in your Contrast Color 1 (CC1) to start the tree motif. We'll be working the tree in the center 30 stitches of the panel.
- Next Row (RS): K6, k30 in MC, join CC1 and knit 30 stitches in CC1, K6 in MC.
- Continue in stockinette stitch, maintaining the garter borders, and work 2 rows even in this color pattern. This sets up the base of your tree.
Shaping the Tree: Decreasing for a Triangular Silhouette
Now we'll shape the tree by decreasing stitches at the edges of the CC1 section. This creates the iconic triangular form. We'll work decreases on Right Side rows only.
- Row 1 (RS): K6, k15 in MC, k2tog (in CC1), k11 in CC1, k2tog (in CC1), k15 in MC, K6. (You've decreased 2 stitches in the CC1 section.)
- Row 2 (WS): K6, p15 in MC, p24 in CC1, p15 in MC, K6.
- Row 3 (RS): K6, k15 in MC, k2tog (in CC1), k9 in CC1, k2tog (in CC1), k15 in MC, K6.
- Row 4 (WS): K6, p15 in MC, p20 in CC1, p15 in MC, K6.
Continue decreasing 2 stitches every Right Side row in this manner until you have only 10 CC1 stitches remaining in the center. Work the Wrong Side rows in pattern as established.
Once you have 10 CC1 stitches, we'll switch to a slower decrease to taper the tree to a point. Now, decrease only 1 stitch at each edge of the CC1 section on every Right Side row. Continue until only 2 CC1 stitches remain. Cut CC1, leaving a long tail for weaving in later.
Creating the Tree Trunk:
With your MC, continue in stockinette stitch over the center 60 stitches (keeping the 6-stitch garter borders) for 10 rows. This solid section forms the trunk of your tree.
Adding Texture: The Bobble Row
This is where the pillow gets its wonderful, tactile dimension! We'll create a row of bobbles at the base of the tree. A bobble is a cluster of stitches worked into one, then decreased back down.
- Bobble Row (RS): K6, *k5, (k1, yo, k1, yo, k1) into the next stitch—you now have 5 stitches on your right needle from that one stitch. Turn your work, purl those 5 stitches. Turn, knit those 5 stitches. Turn, purl those 5 stitches. Turn, then k2tog, k1, k2tog (decreasing 5 stitches back to 3), then pass the first stitch over the second to decrease to 1 stitch. Bobble complete!* Repeat from * to * across the center 60 stitches, ending with K6.
This creates a beautiful, bumpy row that mimics the forest floor or snow-dusted branches. After the bobble row, work 4 rows in stockinette stitch with MC across the entire panel, including the borders.
Embroidering the Star:
Switch to your Contrast Color 2 (CC2) - the cream yarn. We'll add a small, five-point star at the top of the tree using duplicate stitch. This is a simple embroidery technique where you follow the "V" shape of the knitted stitches to create a new color on top. Position the star in the center of the panel, about 2 inches below the top border. You can follow a simple chart or freehand a small star shape. This little detail is the "starry night" magic!
Finishing the Front Panel:
Switch back to your MC and work in garter stitch (knit every row) for 8 rows. Bind off loosely to prevent the edge from pulling. Your front panel is complete!
Back Panel: A Simple, Clean Finish
The back of the pillow is wonderfully simple, allowing the front to be the star of the show.
- Cast on 72 stitches with MC.
- Work in garter stitch for 8 rows.
- Switch to stockinette stitch (knit on RS, purl on WS) and continue until the piece measures the same length as your front panel.
- Bind off loosely.
Finishing Touches: Seaming and Assembly
Now for the satisfying final steps—bringing your two panels together to create a plush, finished pillow.
- Block Your Panels: This is crucial for a professional look. Wet block or steam block both panels to the same measurements—approximately 16 inches square. This evens out your stitches and ensures the seams will align perfectly.
- Seam Three Sides: Place the panels with right sides together. Using a mattress stitch or whip stitch with your tapestry needle and MC yarn, sew three sides of the pillow together. The mattress stitch creates an invisible seam, which is ideal for a polished finish.
- Insert the Pillow Form: Carefully turn the pillow cover right side out. Gently insert your 16-inch pillow form, making sure the corners are pushed out nicely.
- Sew the Fourth Side: Fold the raw edges of the remaining side inward and sew it closed using a ladder stitch or whip stitch for a neat, invisible closure.
- Weave in All Ends: Use your tapestry needle to weave in any remaining yarn tails securely. Trim any excess.
And there you have it—your very own Evergreen Starry Night Knit Pillow! This piece is more than just decor; it's a cozy heirloom that brings the quiet peace of a winter forest into your home. Whether it graces your couch, a reading chair, or a guest bed, it's sure to be a conversation starter and a beloved part of your holiday traditions for years to come. Happy knitting!


