Frosted Evergreen Santa Rug Free Pattern – A Knitted Holiday Hearth Statement
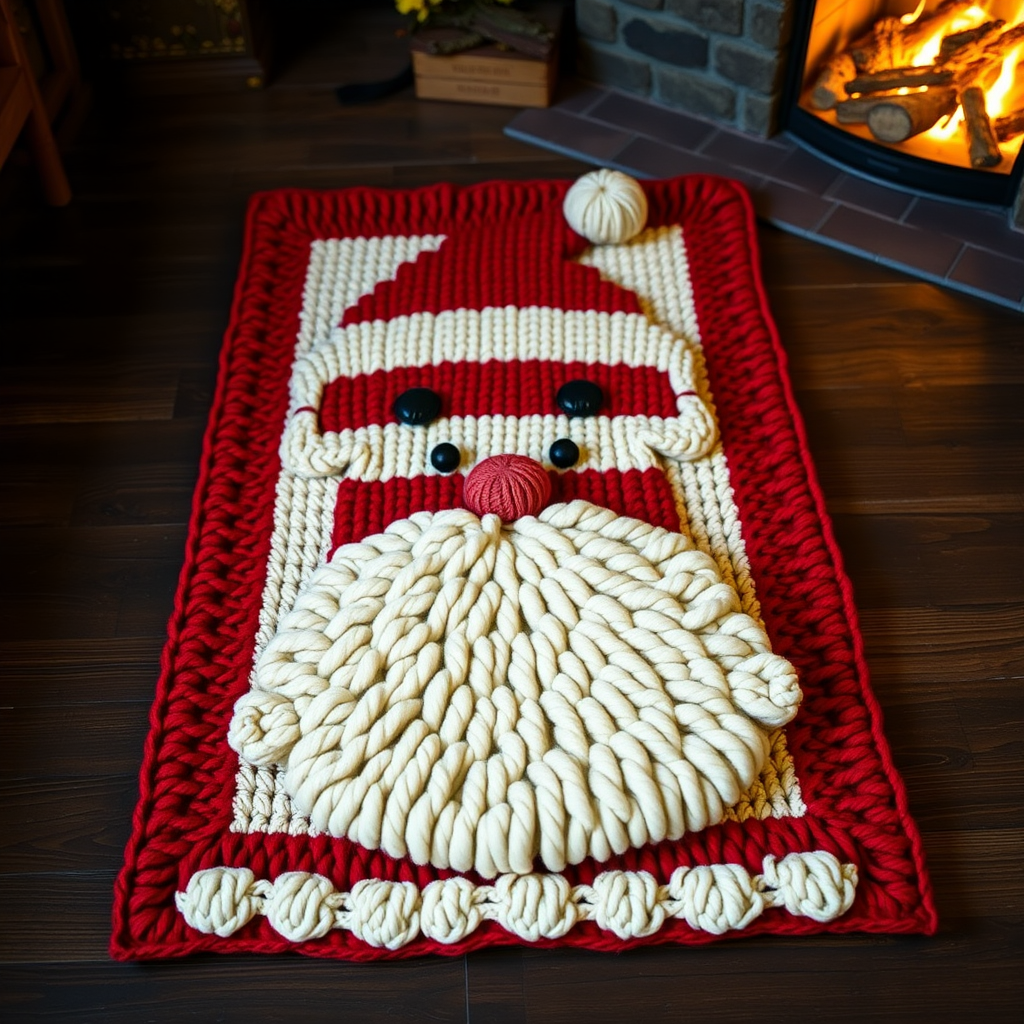
Frosted Evergreen Santa Rug Free Pattern – A Knitted Holiday Hearth Statement
Bring the magic of a snowy forest to your hearth this holiday season with this plush, textured Santa rug. Combining classic holiday charm with modern geometric flair, this knitted rug features a stylized Santa face with a lush, dimensional beard and a cozy, inviting texture that will become the centerpiece of your festive decor. Whether placed beside a fireplace, in an entryway, or under the Christmas tree, this handmade rug adds warmth and personality to any space.
Knitted in soft, chunky yarn, this pattern is perfect for intermediate knitters looking to expand their skills with intarsia colorwork and duplicate stitch embroidery. The result is a stunning, heirloom-quality piece that captures the spirit of the season.
Materials Needed
Before you begin, gather the following materials to ensure a smooth and enjoyable knitting experience:
Yarn
- Super bulky weight yarn (size 6) in the following colors:
- Red (A): Approximately 800 yards
- Cream (B): Approximately 300 yards
- Black (C): Approximately 50 yards
- Gold (D): Approximately 50 yards
- Total yarn needed: approximately 1200 yards
Needles and Tools
- US 13 (9 mm) circular knitting needles (24-inch or longer) or straight needles
- Tapestry needle for weaving in ends and duplicate stitch
- Stitch markers (at least 4)
- Crochet hook size 9 mm (for beard edging, optional)
- Steam iron or spray bottle for blocking
- Non-slip rug pad (optional, for safety)
Gauge
8 stitches and 12 rows = 4 inches in stockinette stitch (knit on US 13 needles).
Always take time to check your gauge to ensure your rug turns out the correct size.
Step-by-Step Instructions
This rug is knitted flat in one piece from the bottom up, using intarsia and duplicate stitch for the face details. The beard is created with a combination of knit and purl bumps and a separate crocheted edging. Follow along carefully, and you'll have a beautiful Santa rug in no time.
Abbreviations
- K = knit
- P = purl
- K2tog = knit two together (decrease)
- P2tog = purl two together (decrease)
- M1 = make one (increase)
- St(s) = stitch(es)
- RS = right side
- WS = wrong side
Rug Body (Worked from Bottom Edge Upward)
Row 1 (RS): With Red (A), cast on 80 stitches. Knit across.
Row 2 (WS): Purl across.
Rows 3-10: Repeat Rows 1-2 four more times to create a red border. You should have 10 rows of red total.
Begin Face Section (Using Intarsia with Separate Balls of Yarn)
Note: When changing colors in intarsia, twist the yarns around each other on the wrong side to prevent holes.
Row 11 (RS): K10 in Red (A), place marker, K20 in Cream (B) for the left side of the beard, place marker, K20 in Red (A) for the face, place marker, K20 in Cream (B) for the right side of the beard, place marker, K10 in Red (A).
Row 12 (WS): P10 in Red (A), P20 in Cream (B), P20 in Red (A), P20 in Cream (B), P10 in Red (A).
Rows 13-20: Continue in stockinette stitch (knit on RS, purl on WS) following the same color pattern, maintaining the markers. This creates the base of the face and beard sections.
Shape the Face (Decrease Rows)
Now we'll begin shaping the face by decreasing stitches in each section. Keep the markers in place and maintain the color pattern throughout.
Row 21 (RS): K10 Red (A), K2tog, K16 Cream (B), K2tog, K16 Red (A), K2tog, K16 Cream (B), K2tog, K10 Red (A) – 76 sts.
Row 22 (WS): Purl across in the same color pattern (Red 10, Cream 18, Red 18, Cream 18, Red 10).
Row 23 (RS): K10 Red (A), K2tog, K14 Cream (B), K2tog, K14 Red (A), K2tog, K14 Cream (B), K2tog, K10 Red (A) – 72 sts.
Row 24 (WS): Purl across in pattern.
Row 25 (RS): K10 Red (A), K2tog, K12 Cream (B), K2tog, K12 Red (A), K2tog, K12 Cream (B), K2tog, K10 Red (A) – 68 sts.
Row 26 (WS): Purl across in pattern.
Row 27 (RS): K10 Red (A), K2tog, K10 Cream (B), K2tog, K10 Red (A), K2tog, K10 Cream (B), K2tog, K10 Red (A) – 64 sts.
Row 28 (WS): Purl across in pattern.
Row 29 (RS): K10 Red (A), K2tog, K8 Cream (B), K2tog, K8 Red (A), K2tog, K8 Cream (B), K2tog, K10 Red (A) – 60 sts.
Row 30 (WS): Purl across in pattern.
Row 31 (RS): K10 Red (A), K2tog, K6 Cream (B), K2tog, K6 Red (A), K2tog, K6 Cream (B), K2tog, K10 Red (A) – 56 sts.
Row 32 (WS): Purl across in pattern.
Row 33 (RS): K10 Red (A), K2tog, K4 Cream (B), K2tog, K4 Red (A), K2tog, K4 Cream (B), K2tog, K10 Red (A) – 52 sts.
Row 34 (WS): Purl across in pattern.
Row 35 (RS): K10 Red (A), K2tog, K2 Cream (B), K2tog, K2 Red (A), K2tog, K2 Cream (B), K2tog, K10 Red (A) – 48 sts.
Row 36 (WS): Purl across in pattern.
Row 37 (RS): K10 Red (A), K2tog, K2tog Cream (B), K2tog, K2tog Red (A), K2tog, K2tog Cream (B), K2tog, K10 Red (A) – 44 sts.
Row 38 (WS): Purl across in pattern.
Row 39 (RS): K10 Red (A), K2tog, K2tog Cream (B), K2tog, K2tog Red (A), K2tog, K2tog Cream (B), K2tog, K10 Red (A) – 40 sts.
Row 40 (WS): Purl across in pattern.
Row 41 (RS): K10 Red (A), K2tog, K2tog Cream (B), K2tog, K2tog Red (A), K2tog, K2tog Cream (B), K2tog, K10 Red (A) – 36 sts.
Row 42 (WS): Purl across in pattern.
Row 43 (RS): K10 Red (A), K2tog, K2tog Cream (B), K2tog, K2tog Red (A), K2tog, K2tog Cream (B), K2tog, K10 Red (A) – 32 sts.
Row 44 (WS): Purl across in pattern.
Row 45 (RS): K10 Red (A), K2tog, K2tog Cream (B), K2tog, K2tog Red (A), K2tog, K2tog Cream (B), K2tog, K10 Red (A) – 28 sts.
Row 46 (WS): Purl across in pattern.
Row 47 (RS): K10 Red (A), K2tog, K2tog Cream (B), K2tog, K2tog Red (A), K2tog, K2tog Cream (B), K2tog, K10 Red (A) – 24 sts.
Row 48 (WS): Purl across in pattern.
Row 49 (RS): K10 Red (A), K2tog, K2tog Cream (B), K2tog, K2tog Red (A), K2tog, K2tog Cream (B), K2tog, K10 Red (A) – 20 sts.
Row 50 (WS): Purl across in pattern.
Row 51 (RS): K10 Red (A), K2tog, K2tog Cream (B), K2tog, K2tog Red (A), K2tog, K2tog Cream (B), K2tog, K10 Red (A) – 16 sts.
Row 52 (WS): Purl across in pattern.
Row 53 (RS): K10 Red (A), K2tog, K2tog Cream (B), K2tog, K2tog Red (A), K2tog, K2tog Cream (B), K2tog, K10 Red (A) – 12 sts.
Row 54 (WS): Purl across in pattern.
Row 55 (RS): K10 Red (A), K2tog, K2tog Cream (B), K2tog, K2tog Red (A), K2tog, K2tog Cream (B), K2tog, K10 Red (A) – 8 sts.
Row 56 (WS): Purl across in pattern.
Row 57 (RS): K10 Red (A), K2tog, K2tog Cream (B), K2tog, K2tog Red (A), K2tog, K2tog Cream (B), K2tog, K10 Red (A) – 4 sts.
Row 58 (WS): Purl across in pattern.
Row 59 (RS): K10 Red (A), K2tog, K2tog Cream (B), K2tog, K2tog Red (A), K2tog, K2tog Cream (B), K2tog, K10 Red (A) – 0 sts. Bind off all remaining stitches.
Add Facial Features (Using Duplicate Stitch or Embroidery)
Now that the rug body is complete, it's time to bring Santa's face to life with embroidery. Using the tapestry needle and the duplicate stitch technique (following the knit stitches to create new stitches on top), add the following features:
Eyes
With Black (C) yarn, using duplicate stitch, create two oval eyes centered on the red face section. Position them approximately 2 inches apart and 3 inches up from the bottom of the face. Each eye should be about 1 inch wide and 1.5 inches tall.
Nose
With Gold (D) yarn, using duplicate stitch, create a small oval or circle for the nose. Center it between the eyes and position it slightly lower, about 1 inch below the eyes. The nose should be approximately 1 inch in diameter.
Cheeks (Optional)
With a lighter shade of red or pink yarn (if you have it), add small circular stitches on each side of the nose for rosy cheeks. Position them about 1.5 inches to each side of the nose and slightly below eye level.
Create the Beard Texture (Optional but Recommended)
To give Santa's beard that fluffy, dimensional look, we'll add a crocheted edging along the bottom of the cream beard sections.
Step 1: Using Cream (B) yarn and a 9 mm crochet hook, work a row of single crochet (sc) along the bottom edge of the cream beard sections. Insert the hook into the edge stitches, yarn over, pull through, yarn over, and pull through both loops on the hook. Continue across the entire bottom of the beard.
Step 2: Work a row of reverse single crochet (crab stitch) for a bumpy, textured edge. To do this, work single crochet in the opposite direction (from left to right instead of right to left). Insert the hook into the next stitch to the right, yarn over, pull through, yarn over, and pull through both loops.
Alternative: If you prefer not to crochet, you can add loop stitches by knitting a separate strip of cream yarn and sewing it onto the beard edge. To create loops, knit a strip about 4 inches wide and the length of the beard bottom, then fold it in half and sew it along the edge, creating a fluffy fringe effect.
Finishing
Complete your Santa rug with these final steps:
1. Weave in all ends securely. Use the tapestry needle to thread yarn tails through the wrong side of the rug, weaving back and forth through several stitches to secure them. Trim any excess yarn.
2. Block the rug gently to shape. Lay the rug flat on a blocking mat or towel. Using a steam iron held a few inches above the surface (do not press directly), steam the rug to relax the fibers and even out the stitches. Alternatively, spray the rug lightly with water and pin it to shape, allowing it to dry completely. Be careful not to flatten the textured beard edge.
3. Add a non-slip rug pad underneath for safety. This is especially important if placing the rug on hardwood or tile floors. Cut the pad to fit the rug's dimensions and place it underneath.
4. Place your finished Santa rug by the hearth, under the tree, or in your entryway to welcome guests with festive cheer!
Tips for Success
- Keep your tension consistent throughout the project to ensure the rug lies flat and even.
- Use separate balls or bobbins for each color section in the intarsia work toAlso Check Out: We think you'd love this beautiful pattern on our sister site: Parquet Tiles Crochet Blanket Free Pattern


