Frosted Fern Lace Snowflake Free Pattern – Delicate Crochet Ornament
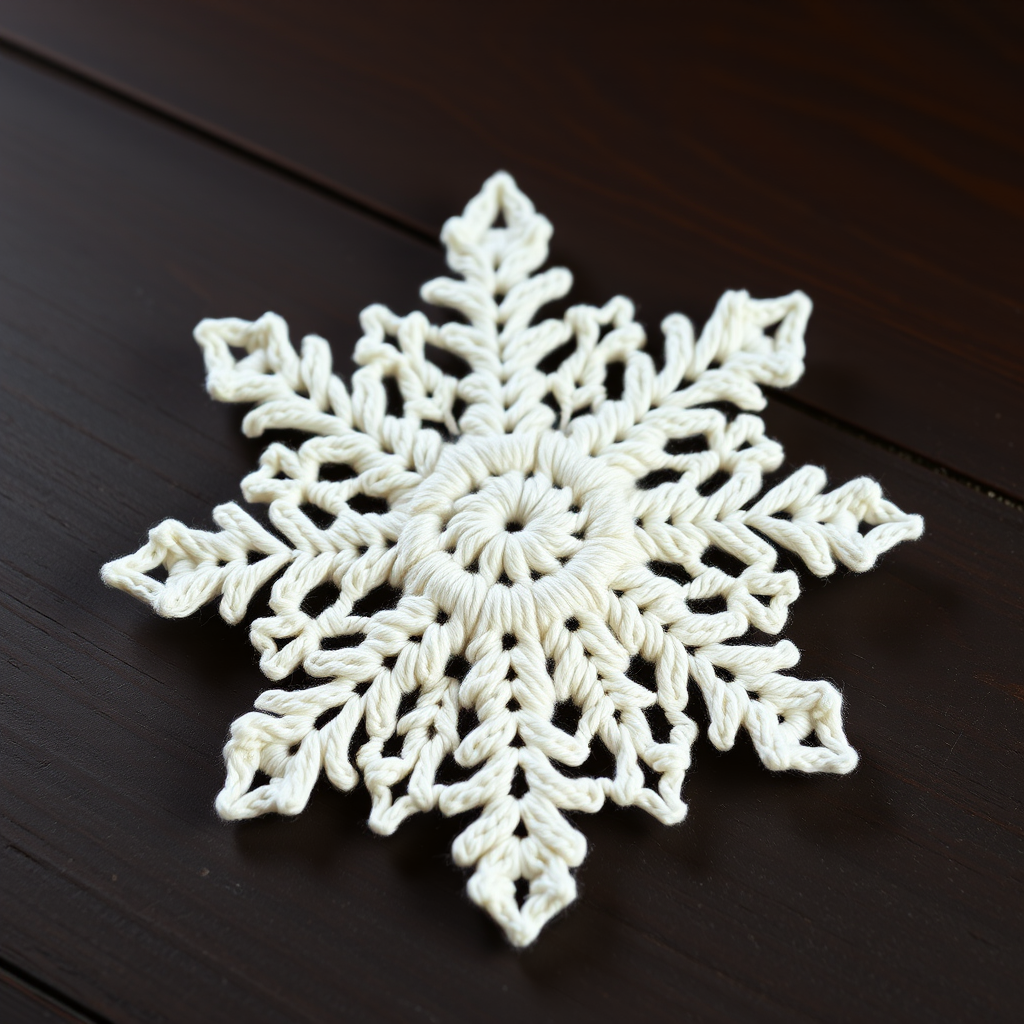
Frosted Fern Lace Snowflake Free Pattern – Delicate Crochet Ornament
There's something truly magical about transforming a simple ball of thread into an intricate, delicate snowflake that captures the essence of winter. The Frosted Fern Lace Snowflake is one of those patterns that looks impossibly complex but is actually quite approachable, even for beginners who have mastered the basics of crochet. This stunning ornament combines classic lacework with a modern fern-inspired motif, resulting in a piece that will become a cherished part of your holiday decor for years to come.
What makes this pattern so special is its versatility. Hang it on your Christmas tree, string several together for a beautiful garland, or attach them to gifts for a handmade touch. The crisp, star-like shape with its six symmetrical arms, each ending in a triple-picot tip that resembles tiny fern fronds, creates an airy, intricate look that catches the light beautifully. Whether you're a seasoned crafter looking for a quick afternoon project or a beginner ready to stretch your skills, this snowflake pattern delivers stunning results every time.
In this comprehensive guide, I'll walk you through every step, from gathering your materials to the final blocking process that gives your snowflake that professional, crisp finish. Let's dive in and create something beautiful together!
Materials Needed
Before we begin, let's gather everything you'll need for this project. The beauty of this snowflake pattern is that it requires minimal supplies, making it perfect for last-minute crafting or gift-making.
Essential Supplies:
- Yarn: Size 10 crochet thread in white or silver (approximately 10 yards per snowflake). This fine thread creates the delicate, lace-like appearance that makes this pattern so stunning. The subtle sheen of the thread adds a touch of elegance to the finished piece.
- Crochet Hook: Steel crochet hook size 7 (1.65 mm). This small hook is essential for working with the fine thread and achieving the tight, crisp stitches that give the snowflake its structure.
- Scissors: A sharp pair for cleanly cutting your thread when finishing.
- Tapestry Needle: For weaving in those pesky ends and ensuring your snowflake looks polished from every angle.
Optional But Recommended:
- Liquid starch or fabric stiffener: This is the secret to achieving that crisp, professional look. Stiffening your snowflake helps it hold its shape and maintain those beautiful points and loops.
- Foam board and pins: For blocking and shaping your snowflake as it dries.
- Ribbon or thread: For creating a hanging loop once your snowflake is complete.
Gauge Note: Gauge is not critical for this project, but maintaining consistent tension throughout will ensure your snowflake comes out uniform and symmetrical. If you tend to crochet loosely, you might want to try a slightly smaller hook; if you crochet tightly, go up a size.
Understanding the Pattern
Before we jump into the step-by-step instructions, let's review the abbreviations you'll need to know. This pattern uses standard crochet terminology, so if you're familiar with basic crochet, you'll feel right at home.
Abbreviations:
- ch = chain
- sl st = slip stitch
- sc = single crochet
- dc = double crochet
- tr = treble crochet
- picot = ch 3, sl st in 3rd ch from hook
The pattern is worked in rounds, starting from the center and working outward. Each round builds upon the previous one, gradually creating the intricate fern-like design. Take your time with each round, and don't be afraid to count your stitches as you go—this will save you from having to rip out work later!
Step-by-Step Instructions
Now, let's get to the fun part! Follow along with these detailed instructions, and you'll have a beautiful snowflake in no time. Remember to work slowly and carefully, especially with the picot stitches, as they're the key to that delicate fern look.
Round 1: The Foundation
Make a magic ring. This technique creates a tight, adjustable center that will close up neatly. If you're not familiar with magic rings, you can also chain 4 and join with a slip stitch to form a ring.
Ch 3 (this counts as your first double crochet), then work 11 dc into the ring. Join with a sl st to the top of the ch-3. You should now have 12 double crochet stitches total. This forms the dense center of your snowflake.
Round 2: Creating the First Spaces
Ch 5 (this counts as a dc plus a ch-2 space). Now, *dc in the next dc, ch 2; repeat from * around. You'll end with 12 dc and 12 ch-2 spaces. Join with a sl st to the 3rd ch of the ch-5. This round begins to open up the center, creating the airy structure that will become the snowflake's arms.
Round 3: Building the Clusters
Sl st into the first ch-2 space. Ch 3 (counts as first dc), then work 2 dc in the same space. Ch 3. *In the next ch-2 space, work 3 dc, ch 3; repeat from * around. Join with a sl st to the top of the ch-3. You'll now have 12 dc clusters with 12 ch-3 spaces between them. This round gives the snowflake more structure and definition.
Round 4: Creating the Loops
Sl st into the next 2 dc to position yourself between clusters. Ch 1, then sc in the same space (between the clusters). Ch 5. *Sc in the next ch-3 space, ch 5; repeat from * around. Join with a sl st to the first sc. You should have 12 ch-5 loops. These loops will form the framework for the decorative picot points.
Round 5: Adding the First Picots
Sl st into the first ch-5 loop. Ch 1, sc in the same loop. Now, ch 3, make a picot (sl st in the 3rd ch from hook), ch 3, then sc in the same loop. Ch 5. *In the next ch-5 loop, sc, ch 3, picot, ch 3, sc in the same loop, ch 5; repeat from * around. Join with a sl st to the first sc. You'll have 12 picot points and 12 ch-5 loops. This is where the snowflake really starts to take shape!
Round 6: Expanding the Design
Sl st into the next ch-3 space (the one before the picot). Ch 1, sc in the same space. Ch 5, then sc in the next ch-3 space (after the picot). Ch 5. *Sc in the next ch-3 space (before the picot), ch 5, sc in the next ch-3 space (after the picot), ch 5; repeat from * around. Join with a sl st to the first sc. You'll now have 24 ch-5 loops. This round doubles the number of loops, creating more intricate detail.
Round 7: Alternating Picots and Loops
Sl st into the first ch-5 loop. Ch 1, sc in the same loop. Ch 5, then sc in the next ch-5 loop. Now, ch 3, picot, ch 3. *Sc in the next ch-5 loop, ch 5, sc in the next ch-5 loop, ch 3, picot, ch 3; repeat from * around. Join with a sl st to the first sc. You'll have 12 picot points and 12 ch-5 loops. This round creates a beautiful rhythm of open spaces and decorative points.
Round 8: The Fern Tips (Final Round)
This is the showstopper round! Sl st into the first ch-5 loop. Ch 1, sc in the same loop. Now, here's where the magic happens:
Ch 7, then work a tr in the 4th ch from the hook. Ch 3, sl st in the same ch (this creates your first picot). Ch 3, work another tr in the same ch, ch 3, sl st in the same ch (second picot). Ch 3, work a third tr in the same ch, ch 3, sl st in the same ch (third picot). Ch 3, then sl st in the 4th ch from the hook (the base of your treble crochet). Ch 3, then sc in the same ch-5 loop. Ch 5.
Now repeat this sequence around: *Sc in the next ch-5 loop, ch 7, tr in the 4th ch from hook, ch 3, sl st in same ch (picot), ch 3, tr in same ch, ch 3, sl st in same ch (picot), ch 3, tr in same ch, ch 3, sl st in same ch (picot), ch 3, sl st in 4th ch from hook, ch 3, sc in the same ch-5 loop, ch 5; repeat from * around.
Join with a sl st to the first sc. Fasten off and weave in your ends with the tapestry needle. Congratulations—you've just created a stunning Frosted Fern Lace Snowflake!
Finishing and Blocking
Your snowflake is complete, but to achieve that beautiful, crisp shape, you'll want to block it. This step is crucial for making your snowflake look professionally made.
Blocking Instructions:
- Fill a bowl with lukewarm water and add a generous amount of liquid starch or fabric stiffener. Mix well.
- Submerge your snowflake in the mixture, making sure it's completely saturated. Let it soak for about 5-10 minutes.
- Gently squeeze out the excess liquid (don't wring it—that can distort the stitches).
- Lay the snowflake on a foam board and pin it into shape. Pull the points gently to define the six arms and ensure the picot tips are clearly visible. Pin each picot point and the spaces between them.
- Allow it to dry completely, preferably overnight. The starch will stiffen the thread, helping your snowflake hold its shape.
- Once dry, carefully remove the pins. Your snowflake should be crisp and hold its shape beautifully.
Adding a Hanging Loop:
To hang your snowflake, thread a piece of ribbon, thread, or fishing line through one of the picot points. You can also attach a small ornament hook for easy hanging on your tree.
Tips for Success
- Take your time with picots: These small stitches are what give the snowflake its delicate, fern-like appearance. Make sure each picot is uniform in size by keeping consistent tension.
- Count your stitches: It's easy to lose track, especially in the later rounds. Count after each round to catch any mistakes early.
- Use a stitch marker: Mark the beginning of each round to help you keep track of where you are.
- Practice makes perfect: Your first snowflake might not be perfect, but that's okay! Each one you make will be better than the last.
This pattern is perfect for using up scrap thread, and once you've mastered it, you'll want to make a whole flock of snowflakes! They make wonderful handmade gifts, thoughtful additions to gift wrapping, or beautiful decorations for your holiday table. The Frosted Fern Lace Snowflake is more than just a craft project—it's a way to bring a little handmade magic to your winter celebrations.
Happy crocheting, and may your holidays be filled with warmth, creativity, and beautiful handmade touches!


