Harvest Moon Cable Knit Pumpkin Post Topper Free Pattern – Cozy Fall Porch Decor
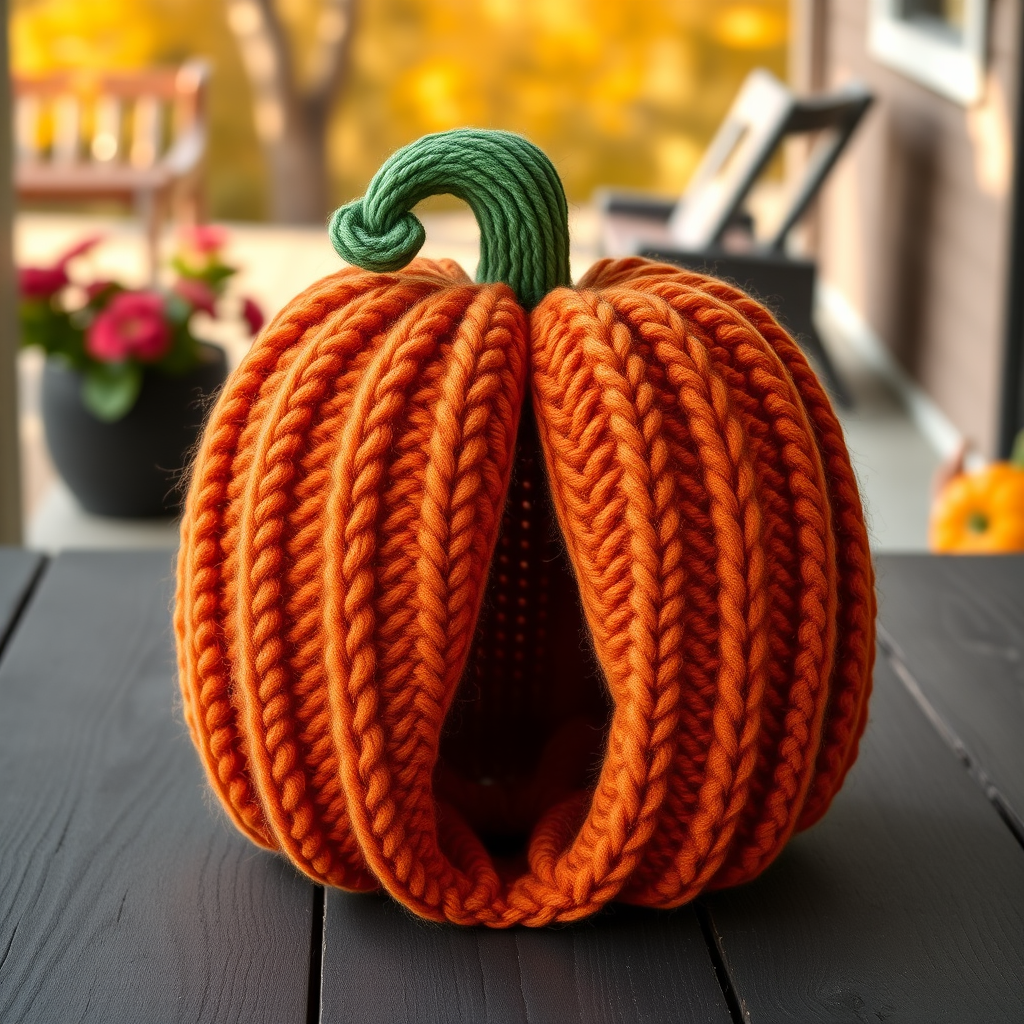
Harvest Moon Cable Knit Pumpkin Post Topper: A Free Cozy Fall Porch Decor Pattern
There's something magical about the transition into autumn—the crisp air, the golden light, and the urge to wrap our homes in warmth. This Harvest Moon Cable Knit Pumpkin Post Topper is the perfect way to bring that handcrafted harvest feeling to your outdoor space. Whether it graces a mailbox post, a porch column, or a garden stake, this richly textured design combines classic cable stitches with a plush pumpkin silhouette for a unique seasonal statement that will have neighbors stopping to admire your handiwork.
This free pattern is designed with the beginner-to-intermediate knitter in mind. The cables look intricate but are surprisingly simple once you get into the rhythm, and the construction—knitted flat in two halves and seamed—makes it approachable and portable. Let's dive into creating this cozy piece of fall decor that you'll be proud to display year after year.
Materials Needed
Before you begin, gather these supplies to ensure a smooth knitting experience:
- Yarn: Worsted weight yarn in two colors:
- Main Color (MC): Burnt orange, approximately 200 yards
- Contrast Color (CC): Forest green, approximately 50 yards
- Needles: US 8 (5.0 mm) knitting needles
- Cable needle (or a double-pointed needle as a substitute)
- Tapestry needle for seaming and weaving in ends
- Polyester fiberfill for light stuffing
- Scissors
Gauge: 18 stitches and 24 rows = 4 inches in stockinette stitch. Always check your gauge to ensure the topper fits snugly over your post.
Understanding Your Pattern: Abbreviations
Familiarize yourself with these abbreviations before you start. I've included a quick reference guide that you can bookmark or print:
- CO: Cast on
- K: Knit
- P: Purl
- C4F: Slip 2 stitches to cable needle, hold in front, knit 2, knit 2 from cable needle
- C4B: Slip 2 stitches to cable needle, hold in back, knit 2, knit 2 from cable needle
- K2tog: Knit 2 together (decrease)
- P2tog: Purl 2 together (decrease)
- St st: Stockinette stitch (knit on right side, purl on wrong side)
- RS: Right side
- WS: Wrong side
Pro tip: If you're new to cables, practice the C4F and C4B on a small swatch first. The motion becomes second nature quickly, and you'll feel confident when you start the actual pattern.
Step-by-Step Instructions
This pattern creates a pumpkin-shaped cover that slips over a standard 4x4 or 6x6 post top. It is knitted flat in two halves and seamed, with a cable panel running vertically to mimic pumpkin ridges. Follow along carefully, and you'll have a beautiful topper in no time.
Pumpkin Body (Make 2 Identical Pieces)
Cast On: CO 40 stitches with your main color (MC).
Row 1 (RS): K4, P2, C4F, P2, K8, P2, C4B, P2, K4, P2, C4F, P2, K4 (total 40 sts)
Row 2 and all even rows (WS): Purl all stitches.
Row 3: K4, P2, K4, P2, K8, P2, K4, P2, K4, P2, K4
Row 5: K4, P2, C4B, P2, K8, P2, C4F, P2, K4, P2, C4B, P2, K4
Row 7: K4, P2, K4, P2, K8, P2, K4, P2, K4, P2, K4
Row 8: Repeat Row 2 (purl all stitches).
Repeat Rows 1-8 until the piece measures 8 inches from the cast-on edge, ending with a wrong-side row (Row 2, 4, 6, or 8). This ensures you're ready to begin the shaping on the right side.
Shape Top (Decrease Section)
Now we'll shape the top of the pumpkin, creating that gathered, plump look. Follow these decrease rows carefully, maintaining your cable pattern where indicated:
Row 1 (RS): K2tog, K2, P2, C4F, P2, K2tog, K4, K2tog, P2, C4B, P2, K2tog, K2, P2, C4F, P2, K2tog, K2 (36 sts)
Row 2 and all even rows: Purl all stitches.
Row 3: K2tog, K1, P2, K4, P2, K2tog, K2, K2tog, P2, K4, P2, K2tog, K1, P2, K4, P2, K2tog, K1 (32 sts)
Row 5: K2tog, P2, C4B, P2, K2tog, K2tog, P2, C4F, P2, K2tog, P2, C4B, P2, K2tog (28 sts)
Row 7: K2tog, P2, K4, P2, K2tog, K2tog, P2, K4, P2, K2tog, P2, K4, P2, K2tog (24 sts)
Row 9: K2tog, P2, C4F, P2, K2tog, K2tog, P2, C4B, P2, K2tog, P2, C4F, P2, K2tog (20 sts)
Row 11: K2tog, P2, K4, P2, K2tog, K2tog, P2, K4, P2, K2tog, P2, K4, P2, K2tog (16 sts)
Row 13: K2tog, P2, C4B, P2, K2tog, K2tog, P2, C4F, P2, K2tog (12 sts)
Row 15: K2tog, P2, K4, P2, K2tog, K2tog, P2, K4, P2, K2tog (8 sts)
Row 17: K2tog, P2, K2tog, K2tog, P2, K2tog (4 sts)
Cut yarn, leaving a 12-inch tail. Thread the tail through the remaining 4 stitches on your needle, then pull tight to gather. Weave in the end securely. Repeat this entire process to make a second identical piece.
Stem (Make 1)
With your contrast color (CC) forest green, CO 6 stitches.
Row 1: Knit all stitches.
Row 2: Purl all stitches.
Repeat Rows 1-2 until the stem measures 4 inches. Bind off all stitches.
Fold the stem in half lengthwise (right sides together) and sew the long edges together to form a tube. Turn it right side out. Set aside for now—you'll attach it during finishing.
Optional Leaf (Make 1)
Add a charming detail with a simple knitted leaf:
CO 5 stitches with CC.
Row 1: Knit all stitches.
Row 2: Knit all stitches.
Row 3: K2tog, K1, K2tog (3 sts)
Row 4: Knit all stitches.
Bind off. Sew the leaf to the base of the stem for a natural, finished look.
Finishing: Assembling Your Pumpkin Topper
Now for the satisfying part—bringing your pumpkin to life!
- Seam the pieces: With right sides together, sew the two pumpkin pieces along the side and top edges, leaving the bottom edge completely open. Turn the piece right side out.
- Stuff lightly: Insert polyester fiberfill to give your pumpkin a plush, dimensional shape. Important: Keep the stuffing light and even—you want it to slide easily over your post without being too bulky.
- Attach the stem: Sew the base of the stem to the gathered top center of the pumpkin. Curl it slightly as you attach it for a natural, organic look that mimics a real pumpkin stem.
- Add the leaf (optional): Sew the leaf to the base of the stem, positioning it to one side for a realistic touch.
- Slide onto your post: The stretch of the knit will hold the topper snugly over a standard 4x4 or 6x6 post. If you need a more secure fit, thread a yarn tie through the bottom edge and cinch it closed like a drawstring.
Tips for Success
- Keep your tension consistent: Cables naturally pull the fabric in, so don't be alarmed if your piece looks narrower than expected—this is normal and creates the beautiful ribbed pumpkin effect.
- Use stitch markers: Place markers between pattern repeats to help you keep track of where you are, especially during the decrease section.
- Block your pieces before seaming: Lightly steam or wet-block the two halves before sewing them together. This will even out your stitches and make the cables pop beautifully.
- Customize your fit: If your post is larger or smaller than standard, adjust your cast-on count in multiples of 8 stitches to maintain the cable pattern symmetry.
This Harvest Moon Cable Knit Pumpkin Post Topper is more than just fall decor—it's a handmade treasure that brings warmth and personality to your home's entrance. The rich texture of the cables, the plump pumpkin shape, and the charming green stem create a piece that looks like it came straight from a cozy farmhouse catalog. Plus, it makes a wonderful handmade gift for neighbors, family, or anyone who loves autumn.
I'd love to see your finished pumpkins! Share your photos on social media with the hashtag #HarvestMoonPumpkin and tag me so I can admire your handiwork. Happy knitting, and may your porch be filled with harvest charm all season long!


