Hygge Windowpane Mosaic Crochet Shawl Free Pattern
Hygge Windowpane Mosaic Crochet Shawl
Introduction
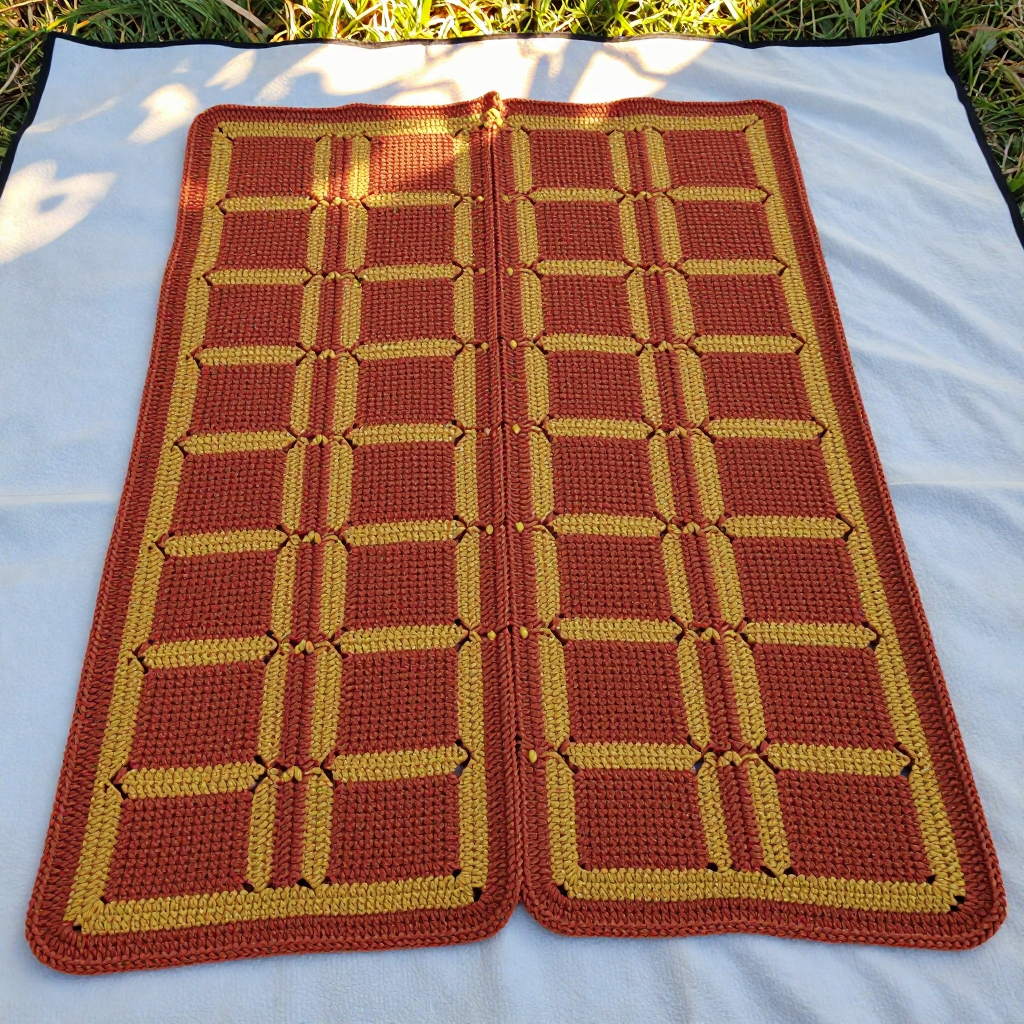
This cozy rectangular shawl is the perfect project for anyone who has mastered the very basics of crochet and is ready for something truly beautiful. Worked flat in two-tone mosaic crochet, it creates a warm windowpane grid of mustard over a rich terracotta ground — a combination that feels like a crackling fire and a mug of something warm. The finished shawl is a long, generous rectangle (22 inches wide by 68 inches long) with a slightly ridged, squishy texture and a crisp three-round striped border. It drapes softly around the shoulders and is big enough to wrap up in on cool evenings. Best of all, you only ever work with one color per row, so the intricate-looking grid is far easier than it appears.
Materials Needed
- Yarn: Fingering weight (category 1) yarn — approximately 900 yards (823 m) of terracotta (Color A) and 450 yards (411 m) of mustard (Color B). The sample uses a soft wool/nylon blend.
- Crochet hook: Size F/5 (3.75 mm), or whatever size you need to match the gauge below.
- Stitch markers: At least 4, to mark corners and your side edge.
- Tapestry needle: A blunt needle with a large eye for weaving in ends.
- Scissors for cutting yarn.
- Measuring tape and blocking mats with pins (for finishing).
- Finished size: 22 inches (56 cm) wide x 68 inches (173 cm) long, after blocking.
Abbreviations and Beginner Glossary
- ch – chain: yarn over the hook, pull the loop through the loop on your hook. This makes a small linked loop.
- sc – single crochet: insert your hook into the stitch, yarn over, pull up a loop (2 loops on hook), yarn over again, pull through both loops. One single crochet made.
- scBLO – single crochet in back loop only: instead of going under both top loops of the stitch, insert your hook only under the back loop (the loop farthest from you). This creates a ridge.
- dc – double crochet: yarn over, insert hook into stitch, yarn over, pull up a loop (3 loops on hook), yarn over, pull through 2 loops, yarn over, pull through remaining 2 loops.
- dc2below – double crochet in the front loop of the stitch two rows below: yarn over, then insert your hook into the front loop of the stitch that sits two rows down (not the row you are working into), yarn over, pull up a loop, then finish as a normal double crochet. This is what makes the raised windowpane lines.
- st(s) – stitch(es).
- sk – skip: miss the next stitch and do not work into it.
- RS – right side: the front, public face of your work.
- sl st – slip stitch: insert hook, yarn over, pull the loop straight through the loop on your hook (no extra yarn over). Used to join rounds.
- fasten off – cut the yarn a few inches from your work, then pull the tail all the way through the last loop to secure it.
Gauge
24 stitches and 12 rows = 4 inches (10 cm) in the mosaic pattern, after blocking.
Gauge matters because it tells you your stitches are the same size as the designer's. If your stitches are bigger, your shawl will come out too large and use more yarn; if smaller, it will be too short. To check, crochet a small square (about 6 x 6 inches) in the pattern, wet it, pin it flat, let it dry, then measure 4 inches across and count the stitches. If you have more than 24 stitches in 4 inches, try a larger hook; if fewer, try a smaller hook.
Beginner Tips Before You Start
- Use stitch markers at both side edges so you always know where a row begins and ends — mosaic crochet is worked from the same edge every time, which can feel confusing at first.
- Do not pull your yarn too tight. The dc2below stitches need a little slack to sit flat. Keep your tension relaxed and even.
- Carry the unused color loosely up the side. Never cut it between rows; just let it travel up the edge. If the carried strand pulls, your edge will pucker.
- Count your stitches at the end of every row. You should always have 133 stitches. Catching a mistake early is far easier than fixing it later.
- Work in good light. Fingering-weight yarn and dark colors are hard on the eyes — a bright lamp makes the back loops much easier to find.
- Trust the process. The windowpane grid only becomes visible after a few rows. Keep going — it will appear!
Step-by-Step Instructions
Setup
With Color A (terracotta), ch 134.
Row 1 (RS): Sc in 2nd ch from hook and in each ch across. (133 sc) Do not turn.
Row 2 (RS): Ch 1, sc in first st, sc in each st across. (133 sc) Do not turn. Carry Color A up the side; do not fasten off.
Body
Row 3 (RS, Color B – mustard): Ch 1, sc in first st, [scBLO in next 5 sts, dc2below in next st] repeat to last 6 sts, scBLO in next 5 sts, sc in last st. (133 sts) Do not turn. Carry Color B up the side.
Row 4 (RS, Color A): Ch 1, sc in first st, scBLO in each st across to last st, sc in last st. (133 sts) Do not turn.
Row 5 (RS, Color B): Ch 1, sc in first st, [scBLO in next 5 sts, dc2below in next st] repeat to last 6 sts, scBLO in next 5 sts, sc in last st. (133 sts) Do not turn.
Row 6 (RS, Color A): Ch 1, sc in first st, scBLO in each st across to last st, sc in last st. (133 sts) Do not turn.
Repeat Rows 3–6 for the mosaic windowpane pattern until the shawl measures approximately 66 inches (168 cm) from the beginning, ending after a Color A row (Row 6 of the repeat). Your last row worked should be a solid terracotta row. At the stated gauge this is about 198 rows total (Rows 1–2 plus 49 repeats of Rows 3–6).
Border
Border Row 1 (RS, Color A): Ch 1, sc evenly around the entire perimeter of the shawl, working 1 sc in each st along the top and bottom edges, and approximately 1 sc per row along the side edges, with 3 sc in each corner. Join with a slip stitch to the first sc. Fasten off.
Border Row 2 (RS, Color B – mustard): Join Color B with a slip stitch in any corner sc, ch 1, sc in each sc around, working 3 sc in each corner sc. Join with a slip stitch to the first sc. Fasten off.
Border Row 3 (RS, Color A): Join Color A with a slip stitch in any corner sc, ch 1, sc in each sc around, working 3 sc in each corner sc. Join with a slip stitch to the first sc. Fasten off.
Assembly and Finishing
Weave in ends: Thread each yarn tail onto your tapestry needle and weave it back and forth through the back of several stitches (about 2 inches), then trim close. Do this for every tail, including the carried color ends at the side edges.
Blocking: Fill a basin with cool water and soak the shawl for 15 minutes. Gently squeeze out the water — do not wring or twist. Roll it in a towel to remove excess moisture. Lay it flat on blocking mats and pin it out to exactly 22 inches wide by 68 inches long. Pin the corners firmly and pin along the edges at regular intervals to open up the windowpane pattern and create crisp, straight sides. Leave it to dry completely (usually 24 hours) before unpinning.
Pro Tips and Variations
- Change the colors: Swap terracotta and mustard for any two contrasting shades — deep teal and cream, charcoal and blush, or navy and gold all look stunning in this grid.
- Adjust the size: To make a wider shawl, add chains in multiples of 6 at the start (each extra 6 chains adds about 1 inch of width). To make it longer or shorter, simply work more or fewer repeats of Rows 3–6, always ending on a Color A row.
- Substitute yarn: A sport weight (category 2) yarn will work beautifully — just go up a hook size and check your gauge again, since the shawl will grow faster and use slightly less yardage.
- Add a fringe: For extra hygge, cut 8-inch strands of both colors and attach them along the two short ends, two strands per stitch, for a soft, cozy finish.