Mini Giraffe Desk Companion Free Pattern: Striped Crochet Amigurumi with Autumn Leaf Band
Mini Giraffe Desk Companion Free Crochet Pattern
Introduction
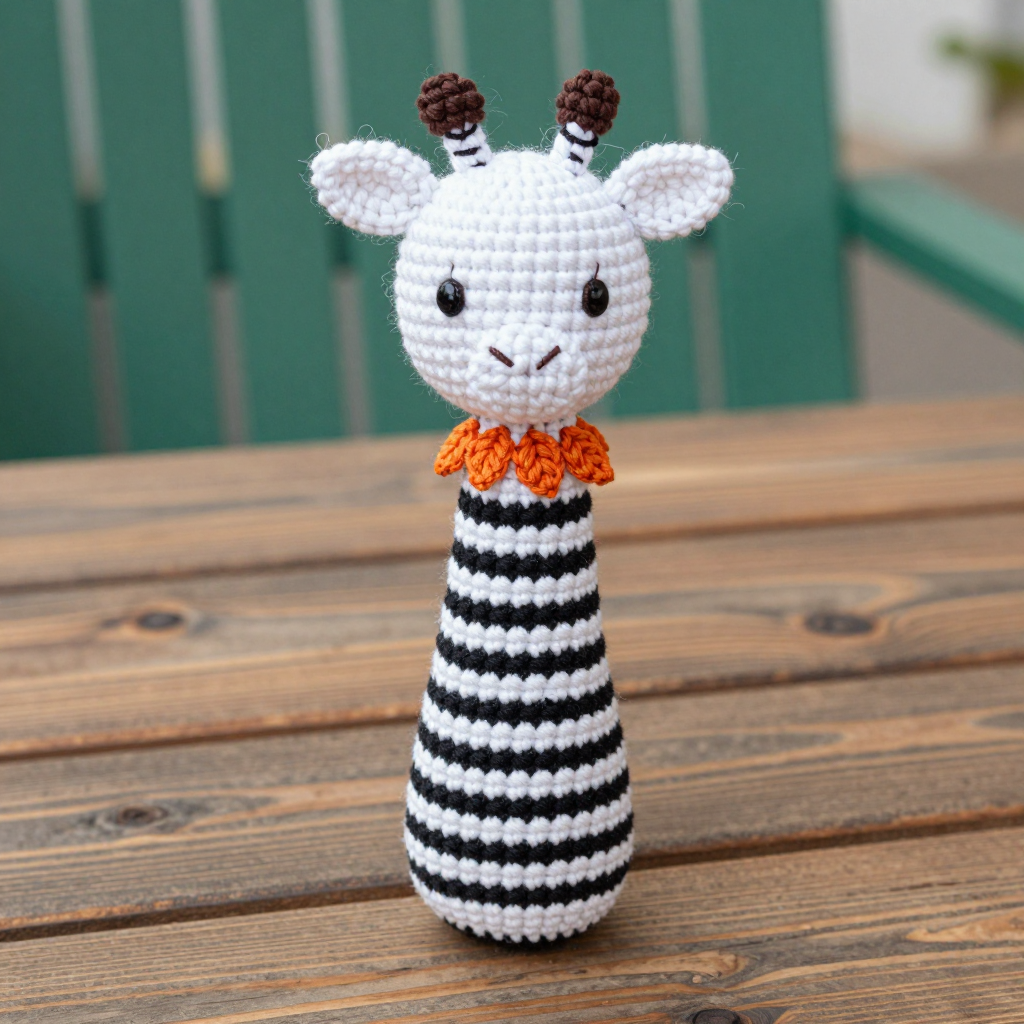
Meet your new tiny coworker: a 15 cm (6 in) tall crochet giraffe who stands upright on your desk and quietly keeps you company through every email, essay, and afternoon slump. This little friend is worked in soft DK cotton with bold black-and-white stripes, a simple round head, two tiny half-circle ears, and a delicate autumn-orange leaf band stitched around the neck like a little scarf. It is the perfect project for someone who has just learned the basic single crochet stitch and wants to make something genuinely adorable. The finished giraffe is dense, squishy, and sturdy enough to stand on its own flat base, with a clean, kawaii look that makes people smile the moment they see it.
Materials Needed
- Yarn: DK weight cotton yarn (approximately 125 m / 137 yd per 50 g ball). You need 25 g black (Color A), 25 g white (Color B), a small amount of autumn orange (Color C) for the leaf band, and a tiny amount of dark brown (Color D) for the ossicones and face embroidery.
- Crochet hook: 2.75 mm (US C-2 / UK 12), or whatever hook size you need to match the gauge below.
- Stitch marker: one, to mark the first stitch of each round.
- Tapestry needle: a blunt-tipped yarn needle for sewing and embroidery.
- Small scissors: for cutting yarn.
- Polyester fiberfill: for stuffing the body and head.
- Finished size: Height approx. 15 cm (6 in) from base to top of head. Body width approx. 3.5 cm (1 3/8 in). Head diameter approx. 4 cm (1 5/8 in).
Abbreviations and Beginner Glossary
- ch – chain: yarn over the hook and pull it through the loop on your hook to make one chain. (Used only if you need to start without a magic ring.)
- sc – single crochet: insert your hook into the stitch, yarn over, pull up a loop (2 loops on hook), yarn over again, pull through both loops. One single crochet made.
- sl st – slip stitch: insert hook into stitch, yarn over, pull the yarn straight through both the stitch and the loop on your hook. Used to join rounds if you choose to.
- inc – increase: work 2 single crochet stitches into the same stitch. This adds one stitch.
- dec – decrease: single crochet 2 stitches together. Insert hook into the first stitch, yarn over, pull up a loop, insert hook into the next stitch, yarn over, pull up a loop, yarn over, pull through all 3 loops. This removes one stitch.
- st(s) – stitch(es).
- rnd – round: one complete circle of stitches worked in the round.
- [ ] – repeat the instructions inside the brackets the number of times stated after the bracket.
- magic ring – an adjustable loop of yarn you crochet into, then pull tight to close the center hole. If you don't know it yet, chain 2 and work your first round into the first chain instead.
- continuous rounds – spiraling around and around without joining at the end of each round, so there is no seam.
Gauge
24 sc x 26 rounds = 10 x 10 cm (4 x 4 in) in continuous single crochet worked in the round.
Gauge matters because it controls the finished size. If your stitches are bigger than this, your giraffe will come out taller and floppier and may not stand up. If they are smaller, it will be tiny and stiff. To check, crochet a small flat swatch of about 30 single crochet stitches for 15 rounds, lay it flat, and measure a 10 cm (4 in) square in the middle with a ruler. Count the stitches across and the rounds up. If you have more stitches than 24, try a larger hook; if fewer, try a smaller hook. Amigurumi is forgiving, so a small difference is fine, but try to get close.
Beginner Tips Before You Start
- Use a stitch marker. Because you work in a spiral, the first stitch of each round moves. Clip a marker into the first stitch of every round so you never lose your place.
- Don't pull the yarn too tight. Keep an even, relaxed tension. Tight stitches make it hard to insert your hook and leave gaps where stuffing shows through.
- Change colors on the last yarn-over. When a round says "change to B," finish the very last stitch of that round by pulling the new color through the final loop. This makes a clean stripe.
- Carry the unused color loosely. Let the color you are not using travel up the inside of the body. Don't pull it tight or the body will pucker.
- Stuff as you go. Stuff the body firmly before the opening gets too small. Firm but not stretched — you should not see the stuffing through the stitches.
- Count every round. Say the stitch count out loud at the end of each round. It is the easiest way to catch a mistake early.
Step-by-Step Instructions
Notes: Work in continuous rounds without joining unless stated. Use a stitch marker to mark the first stitch of each round. Change colors on the last yarn-over of the stitch before the color change. Carry the unused color loosely up the inside of the work.
Body (worked from the base upward in alternating 2-round stripes)
With A (black), make a magic ring.
Rnd 1: 6 sc into ring. (6 sts)
Rnd 2: inc in each st around. (12 sts)
Rnd 3: [sc in next st, inc] 6 times. (18 sts)
Rnd 4: [sc in next 2 sts, inc] 6 times. (24 sts)
Rnd 5: [sc in next 3 sts, inc] 6 times. (30 sts)
Rnds 6–8: sc in each st around. (30 sts) Change to B (white) after Rnd 8.
Rnds 9–10: With B, sc in each st around. (30 sts) Change to A after Rnd 10.
Rnds 11–12: With A, sc in each st around. (30 sts) Change to B after Rnd 12.
Rnds 13–14: With B, sc in each st around. (30 sts) Change to A after Rnd 14.
Rnds 15–16: With A, sc in each st around. (30 sts) Change to B after Rnd 16.
Rnds 17–18: With B, sc in each st around. (30 sts) Change to A after Rnd 18.
Rnds 19–20: With A, sc in each st around. (30 sts) Change to B after Rnd 20.
Rnds 21–22: With B, sc in each st around. (30 sts) Change to A after Rnd 22.
Rnds 23–24: With A, sc in each st around. (30 sts) Change to B after Rnd 24.
Rnd 25: With B, sc in each st around. (30 sts)
Rnd 26: [sc in next 3 sts, dec] 6 times. (24 sts)
Rnd 27: [sc in next 2 sts, dec] 6 times. (18 sts)
Stuff the body firmly through the opening.
Rnd 28: [sc in next st, dec] 6 times. (12 sts)
Rnd 29: dec 6 times. (6 sts)
Fasten off, leaving a long tail. Thread the tail through the remaining 6 sts and pull closed. Weave in the end.
Head (worked in white B)
With B (white), make a magic ring.
Rnd 1: 6 sc into ring. (6 sts)
Rnd 2: inc in each st around. (12 sts)
Rnd 3: [sc in next st, inc] 6 times. (18 sts)
Rnd 4: [sc in next 2 sts, inc] 6 times. (24 sts)
Rnds 5–8: sc in each st around. (24 sts)
Rnd 9: [sc in next 2 sts, dec] 6 times. (18 sts)
Stuff the head firmly.
Rnd 10: [sc in next st, dec] 6 times. (12 sts)
Rnd 11: dec 6 times. (6 sts)
Fasten off, leaving a long tail. Thread the tail through the remaining 6 sts and pull closed. Do not weave in this tail yet — you will use it to sew the head to the body.
Ears (make 2, in white B)
With B (white), make a magic ring.
Rnd 1: 6 sc into ring. (6 sts)
Rnd 2: inc in each st around. (12 sts)
Rnd 3: sc in each st around. (12 sts)
Rnd 4: [sc in next 2 sts, dec] 3 times. (9 sts)
Rnd 5: sc in each st around. (9 sts)
Fasten off, leaving a long tail. Do not stuff the ears. Flatten each ear into a half-circle shape. Sew the flat base of each ear to the sides of the head, about 1 cm apart, with the rounded edges pointing outward and slightly upward.
Ossicones (embroidered, no separate pieces)
Using D (dark brown) and a tapestry needle, embroider two short vertical straight stitches on top of the head, each about 6 mm tall and 1 cm apart. Work 3–4 satin stitches over each straight stitch to create two small raised brown nubs. Do not add stuffing.
Face Embroidery
Using D (dark brown), embroider two small eyes with single straight stitches placed about 1 cm apart and 5 mm below the ossicones. Embroider two tiny vertical nostril stitches about 5 mm below the eyes and 4 mm apart. Keep the expression simple and kawaii.
Autumn Leaf Neck Band (surface embroidery)
Using C (autumn orange) and a tapestry needle, work a horizontal band of embroidered leaves around the neck area where the head meets the body. Bring the needle up at the join, then work a small lazy-daisy leaf: make a loop of yarn and secure it with a tiny straight stitch at the tip. Repeat 6–8 leaves evenly around the neck, alternating leaf direction slightly for a scattered autumn look. Keep the band narrow, about 5 mm tall, so it reads as a delicate collar.
Assembly and Finishing
1. Sew the head to the body. Thread the long tail from the head onto your tapestry needle. Hold the head on top of the body, matching the 12-stitch opening of the head to the 12-stitch top of the body. Add a little extra fiberfill at the neck before closing so the join is firm. Sew through one stitch of the head and one stitch of the body all the way around, pulling gently but snugly. Fasten off and weave in the end.
2. Sew on the ears. Use the long tails from the ears to sew each flat base to the sides of the head as described above. Take a few small stitches back and forth to make them secure, then weave in the ends.
3. Embroider the face. Add the ossicones, eyes, and nostrils with dark brown D as described in the instructions above.
4. Embroider the leaf band. Work the autumn orange lazy-daisy leaves around the neck join.
5. Weave in all ends. Turn the giraffe inside out where you can and run each tail through several stitches in different directions, then trim close to the work so nothing pokes out.
6. Shape and finish. Gently shape the giraffe with your fingers and use the tapestry needle to nudge any loose stuffing into place. Lightly steam the embroidered leaf band if it looks ruffled, but do not press the amigurumi flat — you want to keep its round, stuffed shape. The finished giraffe should stand upright on its flat base as a desk companion.
Pro Tips and Variations
- Change the stripe colors. Swap black and white for any two colors you love — mustard and cream, sage and grey, or pink and white. Keep the same 2-round stripe rhythm so the proportions stay the same.
- Make it taller or shorter. To make a taller giraffe, add extra plain rounds (sc in each st around, 30 sts) before Rnd 26. Each extra round adds about 4 mm (1/8 in) of height. To make it shorter, work fewer plain rounds. Keep the increase and decrease rounds exactly as written.
- Try a different yarn. This pattern works in any smooth DK weight yarn. Cotton gives a crisp, matte finish; acrylic or a cotton-acrylic blend gives a softer, cuddlier feel. Always check your gauge with the new yarn.
- Change the neck band. Instead of autumn leaves, embroider tiny flowers, stars, or simple dots in a contrasting color. You can also use a scrap of thin ribbon tied in a small bow for a quick no-stitch collar.