Slumbering Log Sloth Mini Free Pattern: No-Sew Crochet Amigurumi
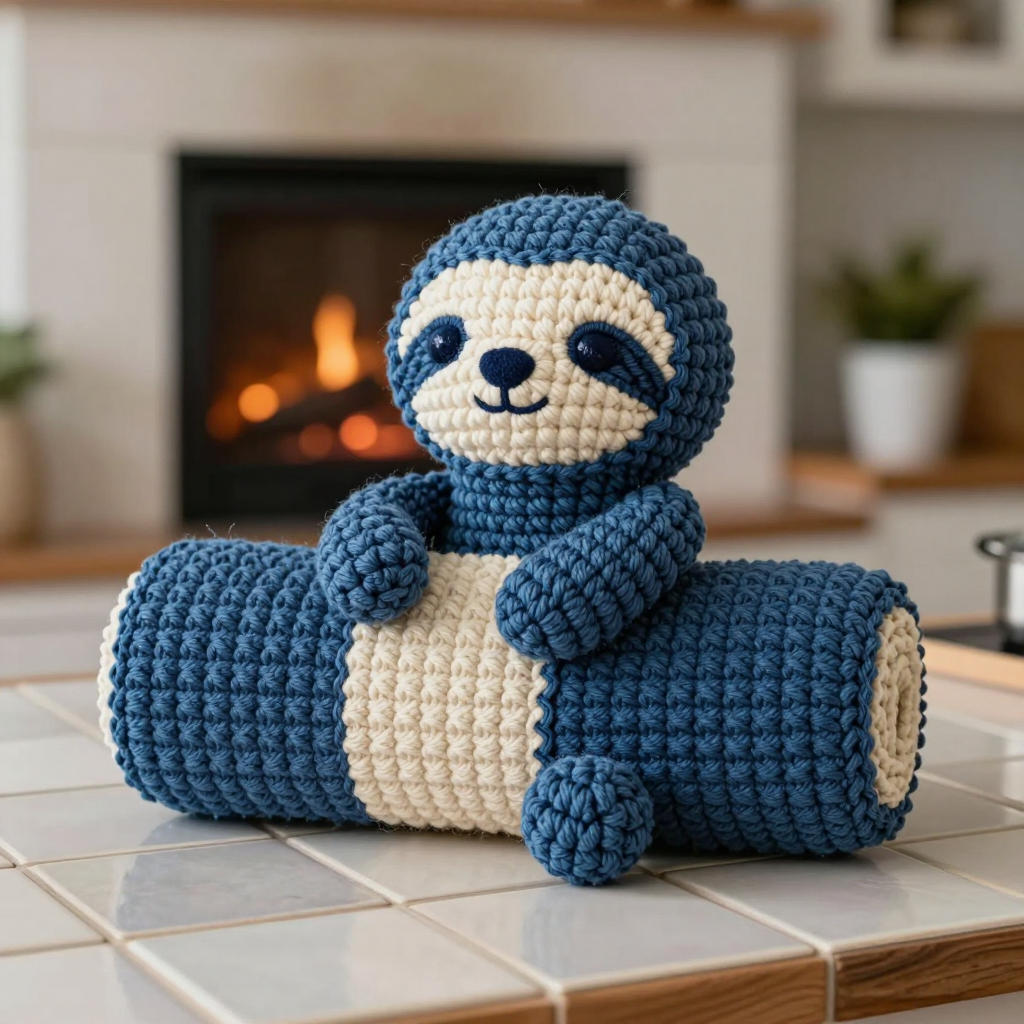
Slumbering Log Sloth Mini: No-Sew Crochet Amigurumi
Introduction
Meet the Slumbering Log Sloth Mini — a tiny, curled-up sloth shaped like a little log, crocheted in cozy denim blue with a soft cream belly stripe. This project is absolutely perfect for complete beginners, because it is worked as one continuous tube with rounded, closed ends, which means there is no sewing at all beyond attaching a tiny face mask with its own yarn tail. The finished sloth is about 4 inches (10 cm) long and 1.75 inches (4.5 cm) tall — a bohemian little pocket companion that fits in your palm. It feels firm and squishy at the same time, with a tight, even single-crochet texture and stubby little arms and legs that hug its body. If you have never picked up a hook before, you can absolutely make this, and you will be so proud of the tiny friend you create.
Materials Needed
- Yarn: Worsted weight (CYC 4) cotton yarn, approximately 35–40 yards total — about 25–30 yards denim blue and 8–10 yards cream.
- Crochet hook: 3.5 mm (US size E/4).
- Stitch marker: 1 (or a small scrap of contrasting yarn) to mark the first stitch of each round.
- Tapestry needle (yarn needle): a blunt-tipped needle with an eye large enough for worsted yarn, for weaving in ends and embroidering the face.
- Scissors for cutting yarn.
- Polyester fiberfill stuffing (a small handful).
- Finished size: approximately 4 inches (10 cm) long and 1.75 inches (4.5 cm) tall.
Abbreviations and Beginner Glossary
- sc – single crochet: insert your hook into the stitch, yarn over (wrap yarn around hook), pull up a loop (2 loops on hook), yarn over again, pull through both loops. One loop remains.
- inc – increase: work 2 single crochet stitches into the same stitch. This makes the piece wider.
- dec – invisible decrease: insert your hook into the front loop only of the next stitch, then into the front loop only of the following stitch (2 loops on hook), yarn over, pull through both front loops, yarn over, pull through the remaining 2 loops. This makes the piece narrower with a neat, invisible join.
- ch – chain: yarn over and pull through the loop on your hook. Creates a small linked loop.
- sl st – slip stitch: insert hook into stitch, yarn over, pull through both the stitch and the loop on your hook at once. Used here to join yarn to the work.
- st(s) – stitch(es).
- BLO – back loop only: work into the loop of the stitch that is farthest from you.
- FLO – front loop only: work into the loop of the stitch that is closest to you.
- Magic ring – an adjustable loop of yarn that you crochet stitches into, then pull tight to close the center hole.
- Continuous spiral – working round after round without joining or turning, so the rounds spiral upward like a coil.
- Yarn over – wrapping the working yarn around your hook.
- Fasten off – cut the yarn and pull the tail through the last loop to secure it.
- Whipstitch – a simple over-and-over stitch used to attach one piece to another.
- Satin stitch – straight stitches worked side by side to fill a shape, used here for the eyes and nose.
Gauge
Gauge: 5 sc x 6 rounds = 1 inch (2.5 cm) in continuous spiral single crochet, worked firmly.
Gauge matters because it controls the finished size and how firmly your sloth holds its shape. If your stitches are too loose, the stuffing will show through and the sloth will be floppy; if too tight, your hands will ache and the fabric will be stiff. To check your gauge, crochet a small flat swatch: make a magic ring, work 6 sc into it, then increase evenly for a few rounds until your swatch is at least 2 inches (5 cm) wide. Measure 1 inch across the middle and count the stitches. If you have more than 5 stitches per inch, try a larger hook; if fewer, try a smaller hook. Because this toy is worked in a spiral, you can also simply begin the body and measure after Round 4 — if the circle measures about 1 inch across, your gauge is on track.
Beginner Tips Before You Start
- Use a stitch marker. Place it in the first stitch of each round. In a continuous spiral there is no seam to guide you, so the marker tells you exactly where each new round begins.
- Do not pull your yarn too tight. Keep an even, gentle tension. Tight stitches are hard to work into on the next round and make the toy stiff.
- Count every round. The stitch counts in parentheses are your safety net. If a count is off, fix it before moving on — it is much easier now than later.
- Carry the cream loosely. When you change colors for the belly stripe, leave the unused yarn relaxed inside the tube. If you pull it tight, the body will pucker.
- Stuff as you go. Add stuffing before the opening gets too small. Stuff firmly but not so much that the stitches stretch apart.
- Work the face mask last. Attach it only after the head is complete and stuffed, so you can center it perfectly.
Step-by-Step Instructions
Important: Work in continuous spiral rounds. Do not join or turn unless the pattern says so. Use a stitch marker in the first stitch of each round. The numbers in parentheses are your stitch counts.
Body (one continuous tube, both ends closed by decreases — no sewing)
With denim blue, make a magic ring.
Round 1: 6 sc in ring. (6 sts)
Round 2: inc in each st around. (12 sts)
Round 3: [sc in next st, inc] 6 times. (18 sts)
Round 4: [sc in next 2 sts, inc] 6 times. (24 sts)
Rounds 5–6: sc in each st around. (24 sts)
Round 7 (begin cream belly stripe): With denim blue, sc in next 9 sts; change to cream, sc in next 6 sts; change to denim blue, sc in next 9 sts. (24 sts)
Round 8: With denim blue, sc in next 9 sts; with cream, sc in next 6 sts; with denim blue, sc in next 9 sts. (24 sts)
Rounds 9–16: Repeat Round 8 eight more times, carrying cream loosely inside. (24 sts)
Round 17: With denim blue, sc in next 9 sts; with cream, sc in next 6 sts; with denim blue, sc in next 9 sts. (24 sts)
Round 18: With denim blue, sc in next 9 sts; change to cream, sc in next 6 sts; change to denim blue, sc in next 9 sts. (24 sts)
Round 19: With denim blue, [sc in next 2 sts, dec] 6 times. (18 sts)
Round 20: With denim blue, [sc in next st, dec] 6 times. (12 sts)
Stuff the tube firmly through the opening, shaping it into a horizontal log with rounded ends.
Round 21: dec 6 times. (6 sts)
Cut yarn leaving a 6-inch tail. Thread the tail onto a yarn needle and draw it through the front loops of the remaining 6 stitches; pull tight to close. Weave the end inside the body.
Head End (worked directly onto the opposite end of the tube — no sewing)
Find the starting magic ring at the other end of the tube. Join denim blue with a sl st to any stitch of the magic ring.
Round 1: Work 6 sc evenly around the magic ring opening. (6 sts)
Round 2: inc in each st around. (12 sts)
Round 3: [sc in next st, inc] 6 times. (18 sts)
Rounds 4–6: sc in each st around. (18 sts)
Round 7: [sc in next st, dec] 6 times. (12 sts)
Stuff the head lightly.
Round 8: dec 6 times. (6 sts)
Cut yarn leaving a 6-inch tail. Draw through the front loops of the remaining 6 stitches and pull tight to close. Weave in the end.
Face Mask (flat oval, worked in turned rows, attached with its own yarn tail)
With cream, ch 5.
Row 1: sc in 2nd ch from hook and in each ch across. (4 sts)
Row 2: ch 1, turn, inc, sc in next 2 sts, inc. (6 sts)
Row 3: ch 1, turn, inc, sc in next 4 sts, inc. (8 sts)
Row 4: ch 1, turn, sc in each st across. (8 sts)
Row 5: ch 1, turn, dec, sc in next 4 sts, dec. (6 sts)
Row 6: ch 1, turn, dec, sc in next 2 sts, dec. (4 sts)
Fasten off, leaving a 10-inch tail. Use the tail to whipstitch the oval to the front of the head, centered, with the wider part at the top. Weave in the end.
Eyes (make 2 — no sewing)
With a 12-inch length of denim blue yarn and a yarn needle, embroider a small satin-stitch oval on each side of the cream face mask, about 3/8 inch (1 cm) apart. (Alternatively, work 2 sc in a magic ring with denim blue for each eye and attach with the tails.) Weave in the ends.
Nose (no sewing)
With a 10-inch length of cream yarn and a yarn needle, embroider a tiny horizontal satin stitch centered below the eyes on the face mask. Weave in the end.
Arms (make 2, worked directly onto the body — no sewing)
Locate a stitch on the side of the body about 1 inch (2.5 cm) from the head end, in the denim blue section.
Round 1: Join denim blue with a sl st, ch 1, work 5 sc into the same stitch and surrounding stitches to form a small circle. (5 sts)
Rounds 2–3: sc in each st around. (5 sts)
Round 4: dec, sc in next 3 sts. (4 sts)
Cut yarn, draw through the remaining 4 stitches, pull tight. Weave the end inside the arm. Repeat for the second arm on the opposite side, positioning it slightly forward so the arms appear to hug the body.
Legs (make 2, worked directly onto the body — no sewing)
Locate a stitch on the underside of the body about 1 inch (2.5 cm) from the tail end.
Round 1: Join denim blue with a sl st, ch 1, work 5 sc into the same stitch and surrounding stitches. (5 sts)
Rounds 2–3: sc in each st around. (5 sts)
Round 4: dec, sc in next 3 sts. (4 sts)
Cut yarn, draw through the remaining 4 stitches, pull tight. Weave in the end. Repeat for the second leg on the opposite side.
Tail (no sewing)
Join denim blue with a sl st to a stitch at the tail end of the body, centered.
Round 1: ch 1, work 4 sc into the same stitch and surrounding stitches. (4 sts)
Round 2: sc in each st around. (4 sts)
Cut yarn, draw through the remaining 4 stitches, pull tight. Weave in the end.
Assembly and Finishing
Use the yarn needle to weave in all remaining ends inside the body. To weave in an end, thread it onto the needle, insert the needle into the body, and pass it through the inside of several stitches in different directions so the tail is hidden and secure; then trim the yarn close to the fabric.
Gently shape the log with your fingers so the cream belly stripe faces forward and the rounded ends sit level. If any stuffing shows through, add a small amount of extra stuffing or a tiny scrap of matching yarn to fill the gap.
To block the finished sloth (optional), lightly mist it with water, pat it into shape with your hands, and let it air-dry completely on a flat surface. Cotton yarn benefits from this gentle blocking, which evens out the stitches and helps the toy hold its shape.
No sewing is required beyond attaching the face mask with its own yarn tail and embroidering the eyes and nose.
Pro Tips and Variations
- Change the colors: Try a gray body with a white belly, or a warm brown with a tan stripe, for a different sloth personality. Any worsted cotton works beautifully.
- Adjust the size: Use a larger hook (such as 4.5 mm) and bulky yarn for a bigger log sloth, or a smaller hook (3.0 mm) and sport yarn for a tiny keychain version. Always check your gauge first.
- Add a hanging loop: Before closing the head end, chain 8 and sl st back into the same stitch to create a small loop, turning your sloth into a bag charm or ornament.
- Personalize the face: Use a contrasting color for the eyes, add tiny embroidered eyelashes, or give your sloth a little smile with a single curved stitch below the nose.