Sage & Cream Striped Penguin Crochet Pattern with Witch Hat — Free Pattern
Sage & Cream Striped Penguin Crochet Pattern with Witch Hat
Introduction
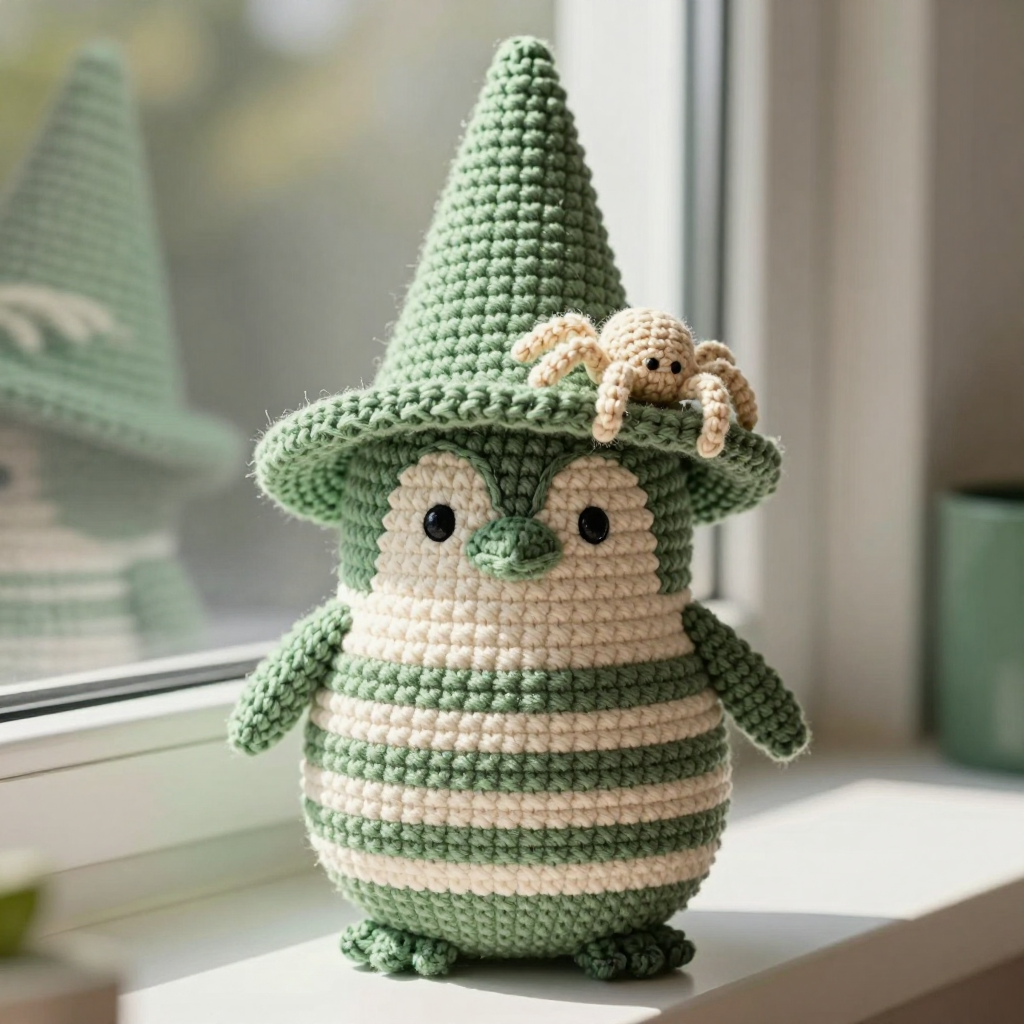
Meet your new desk buddy: a plump little penguin dressed in soft sage-green and cream stripes, topped with a tall, slightly floppy witch hat and a tiny crocheted spider dangling from the brim. This project is perfect for a confident beginner who has already made a few simple amigurumi and wants to try stripes, a shaped hat, and a few small appliqué pieces. The finished penguin is about 4 inches (10 cm) tall and 3.25 inches (8 cm) wide, with a hat that adds another 3.5 inches (9 cm) — small enough to sit on a shelf or desk, soft enough to squeeze. Worked in smooth worsted acrylic, it has a matte, cozy Scandinavian-Halloween feel that looks handmade in the best way. If you can single crochet in the round, you can make this — and we will walk through every single stitch together.
Materials Needed
- Yarn: Worsted weight (CYC 4) smooth matte acrylic yarn, approximately 90 yards total — Sage Green (A): approx. 55 yds and Cream (B): approx. 35 yds.
- Crochet hook: 3.5 mm (US E/4). If you crochet loosely, drop to 3.0 mm (US D/3) — the fabric must be tight enough that stuffing does not show through.
- Stuffing: Polyester fiberfill (a small handful is plenty).
- Stitch marker: One locking or safety-pin style marker to track the start of each round.
- Tapestry needle: A blunt-tipped needle with an eye big enough for worsted yarn, for sewing pieces together and weaving in ends.
- Scissors: Any small sharp pair for cutting yarn.
- Extras: A small amount of black embroidery floss or black worsted yarn for the eyes.
- Finished size: Penguin body approx. 4 in (10 cm) tall and 3.25 in (8 cm) wide; hat approx. 3.5 in (9 cm) tall including the brim; spider approx. 1 in (2.5 cm) long.
Abbreviations and Beginner Glossary
- ch — chain: yarn over the hook, pull the loop through the loop on your hook. This makes a small linked loop.
- sc — single crochet: insert your hook into the stitch, yarn over, pull up a loop (2 loops on hook), yarn over again, pull through both loops. One sc made.
- sc2tog — single crochet 2 together (a decrease): insert hook into the first stitch, yarn over, pull up a loop; insert hook into the next stitch, yarn over, pull up a loop (3 loops on hook); yarn over, pull through all 3 loops. This turns 2 stitches into 1.
- 2 sc in next st — an increase: work two single crochets into the same stitch, making 2 stitches where there was 1.
- sl st — slip stitch: insert hook into the stitch, yarn over, pull the loop straight through both the stitch and the loop on your hook. It joins without adding height.
- st(s) — stitch(es).
- rnd — round: one complete circle of stitches worked around.
- BLO — back loop only: each stitch has two top loops (front and back). Working in the back loop only means you insert your hook under just the loop farther from you, leaving a visible ridge.
- FLO — front loop only: insert your hook under just the loop closer to you.
- Magic ring — an adjustable loop of yarn you crochet into, then pull tight so the center closes with no hole.
- Fasten off — cut the yarn a few inches from the work, pull the tail through the last loop, and tighten.
- Whipstitch — a simple over-and-over sewing stitch used to close an opening or join two edges.
Gauge
Gauge: 20 sc x 22 rounds = 4 inches (10 cm) in continuous single crochet worked in the round.
Why gauge matters: Gauge is how many stitches and rounds fit into a set measurement. If your stitches are bigger than the pattern's, your penguin will be larger and the stuffing may show through gaps; if smaller, the pieces won't match up. How to check: With Sage Green, make a magic ring, work 6 sc into it, then increase evenly for 4 rounds (6, 12, 18, 24 sts). Continue working sc in each st around until the piece measures at least 4 inches across. Lay it flat and count how many stitches fit across 4 inches and how many rounds fit in 4 inches. If you have more than 20 stitches, your tension is tight — try a larger hook. If fewer, your tension is loose — try a smaller hook. The stitch counts in this pattern are what really control the shape, so match them exactly even if your gauge is slightly off.
Beginner Tips Before You Start
- Use your stitch marker every round. Amigurumi is worked in a continuous spiral, so the first stitch of each round moves. Place the marker in the first stitch of the new round and move it up each time — this is how you know where you are.
- Do not pull the yarn too tight. Keep an even, relaxed tension. Tight stitches make it hard to insert the hook and create gaps when you stuff.
- Stuff in small pieces as you go. Add fiberfill a little at a time starting around Round 27 of the body, shaping as you close. Big clumps make lumps.
- Count out loud (or in your head) at the end of every round. The stitch count in parentheses tells you exactly how many stitches you should have. If it's off, fix it before moving on.
- Change colors on the last stitch of the round before. Work the final sc of the old color until 2 loops remain, then pull the new color through to finish it. This hides the color change neatly.
- Keep your work inside out until you stuff. Amigurumi naturally curls with the "wrong" side facing you; the smooth side is the inside. Flip it right side out before stuffing the body.
Step-by-Step Instructions
Penguin Body
Worked from the bottom up in continuous spirals — do not join rounds. Move your stitch marker to the first stitch of each new round. The body is worked in alternating 3-round stripes of Sage (A) and Cream (B).
With A (Sage), make a magic ring.
Rnd 1: 6 sc in ring. (6 sts)
Rnd 2: 2 sc in each st around. (12 sts)
Rnd 3: [Sc in next st, 2 sc in next st] 6 times. (18 sts)
Rnd 4: [Sc in next 2 sts, 2 sc in next st] 6 times. (24 sts)
Rnd 5: [Sc in next 3 sts, 2 sc in next st] 6 times. (30 sts)
Rnd 6: [Sc in next 4 sts, 2 sc in next st] 6 times. (36 sts)
Rnd 7: [Sc in next 5 sts, 2 sc in next st] 6 times. (42 sts)
Rnds 8–10: Sc in each st around. (42 sts) — 3 rounds of Sage complete.
Change to B (Cream).
Rnds 11–13: Sc in each st around. (42 sts)
Change to A.
Rnds 14–16: Sc in each st around. (42 sts)
Change to B.
Rnds 17–19: Sc in each st around. (42 sts)
Change to A.
Rnds 20–22: Sc in each st around. (42 sts)
Change to B.
Rnds 23–24: Sc in each st around. (42 sts)
Change to A.
Rnd 25: [Sc in next 5 sts, sc2tog] 6 times. (36 sts)
Rnd 26: [Sc in next 4 sts, sc2tog] 6 times. (30 sts)
Rnd 27: [Sc in next 3 sts, sc2tog] 6 times. (24 sts)
Stuff the body firmly now and continue stuffing as the opening closes.
Rnd 28: [Sc in next 2 sts, sc2tog] 6 times. (18 sts)
Rnd 29: [Sc in next st, sc2tog] 6 times. (12 sts)
Rnd 30: [Sc2tog] 6 times. (6 sts)
Fasten off, leaving a 6 in tail. Thread the tail through the front loops of the last 6 sts and pull closed. Weave in the end.
Witch Hat (solid Sage)
Worked from the brim up to the tip. This piece is joined each round with a slip stitch, so the brim stays crisp and flat.
With A, ch 42. Join with sl st to the first ch to form a ring, being careful not to twist.
Rnd 1: Ch 1, sc in each ch around. Join with sl st to first sc. (42 sts)
Rnd 2: Ch 1, working in BLO, sc in each st around. Join with sl st to first sc. (42 sts) — this creates the crisp brim edge.
Rnd 3: Ch 1, sc in each st around. Join with sl st to first sc. (42 sts)
Rnd 4: Ch 1, [sc in next 5 sts, sc2tog] 6 times. Join with sl st to first sc. (36 sts)
Rnd 5: Ch 1, sc in each st around. Join with sl st to first sc. (36 sts)
Rnd 6: Ch 1, [sc in next 4 sts, sc2tog] 6 times. Join with sl st to first sc. (30 sts)
Rnd 7: Ch 1, sc in each st around. Join with sl st to first sc. (30 sts)
Rnd 8: Ch 1, [sc in next 3 sts, sc2tog] 6 times. Join with sl st to first sc. (24 sts)
Rnd 9: Ch 1, sc in each st around. Join with sl st to first sc. (24 sts)
Rnd 10: Ch 1, [sc in next 2 sts, sc2tog] 6 times. Join with sl st to first sc. (18 sts)
Rnd 11: Ch 1, sc in each st around. Join with sl st to first sc. (18 sts)
Rnd 12: Ch 1, [sc in next st, sc2tog] 6 times. Join with sl st to first sc. (12 sts)
Rnd 13: Ch 1, sc in each st around. Join with sl st to first sc. (12 sts)
Rnd 14: Ch 1, [sc2tog] 6 times. Join with sl st to first sc. (6 sts)
Rnd 15: Ch 1, sc in each st around. Join with sl st to first sc. (6 sts)
Fasten off, leaving a 6 in tail. Thread through the front loops of the last 6 sts and pull closed. Weave in the end. Lightly stuff only the lower cone of the hat so the tip stays pointed and slightly floppy.
Spider Appliqué (Cream)
Worked flat in rows, then sewn to the hat brim.
With B, ch 2.
Row 1: 4 sc in the 2nd ch from hook. (4 sts)
Row 2: Ch 1, turn. 2 sc in each st across. (8 sts)
Row 3: Ch 1, turn. [Sc in next st, 2 sc in next st] 4 times. (12 sts)
Row 4: Ch 1, turn. Sc in each st across. (12 sts)
Row 5: Ch 1, turn. [Sc2tog] 6 times. (6 sts)
Fasten off, leaving a long tail. Using the tail, whipstitch the opening closed to form a small oval body about 1 in (2.5 cm) long. Stuff lightly with a small amount of fiberfill before closing to make it plump.
Legs (make 8): With B, ch 6. Sl st in the 2nd ch from hook and in each ch across. Fasten off, leaving a short tail. Sew 4 legs to each side of the spider body, angling them outward and slightly down so the spider looks like it is dangling.
Assembly and Finishing
1. Hat placement: Slip the hat onto the top of the penguin body, centering it. The brim (the Rnd 2 BLO round) should sit just above the topmost Sage stripe (Rnds 20–22). Thread a tapestry needle with matching Sage yarn and sew the brim to the body, catching only the inner loops of the brim stitches so the seam stays invisible from the outside. Take small stitches all the way around.
2. Eyes: Using black yarn or embroidery floss, embroider two small French knots (or 3-stitch straight stitches) on the Cream stripe at Rnds 23–24, about 1 in (2.5 cm) apart. Bring the needle up through the fabric, wrap the yarn around the needle twice, and pull through to make a French knot. (If using safety eyes, attach them before closing the body at Rnd 30 — but embroidered eyes are recommended for the target look.)
3. Beak: With a small amount of Sage Green (A) yarn, embroider a tiny triangle (3 straight stitches) centered between and slightly below the eyes.
4. Spider: Sew the spider body to the front of the hat brim at one side, letting the legs hang down over the brim edge. Use the long tail from the body and take a few anchoring stitches so the spider sits plump and slightly dangling.
5. Hanging thread: Cut a 4 in (10 cm) length of Cream yarn, fold it in half, and sew the fold to the top of the spider body. Tack the two ends to the underside of the brim so the spider appears suspended.
6. Weave in all ends: Thread each tail onto the tapestry needle and run it back and forth through the inside of the work for about 1 inch, then trim close. Never knot — knots work loose and create bumps.
7. Shape and block: Shape the hat tip gently with your fingers. Do not felt or wet-block; simply smooth the pieces with your hands and let them sit. The worsted acrylic gives a soft matte finish. Care: spot clean with cool water and mild soap; air dry. Do not machine wash or dry.
Pro Tips and Variations
- Change the color story: Swap Sage and Cream for charcoal and pumpkin orange for a classic Halloween look, or dusty rose and ivory for a softer palette. Keep one color as the "base" and one as the "stripe" so the contrast stays clear.
- Adjust the size: To make a bigger penguin, go up one hook size (4.0 mm / US G/6) and add 2 extra plain rounds to each stripe section. To make a mini, use 3.0 mm (US D/3) and worsted yarn held snugly — the stitch counts stay the same, only the finished size changes.
- Try a different yarn: Cotton or cotton-blend worsted gives a crisper stitch definition and a slightly heavier feel; a soft acrylic-blend keeps it squishy. Avoid fuzzy or bouclé yarns for a first attempt — they hide your stitches.
- Make the hat removable: Instead of sewing the brim down, leave it loose and add a small elastic loop inside the hat to hook over the penguin's head. This lets you swap hats for different seasons.