Tiki Torch Bowl Sleeve Free Crochet Pattern: Tropical Striped Cozy with Flame Appliqués
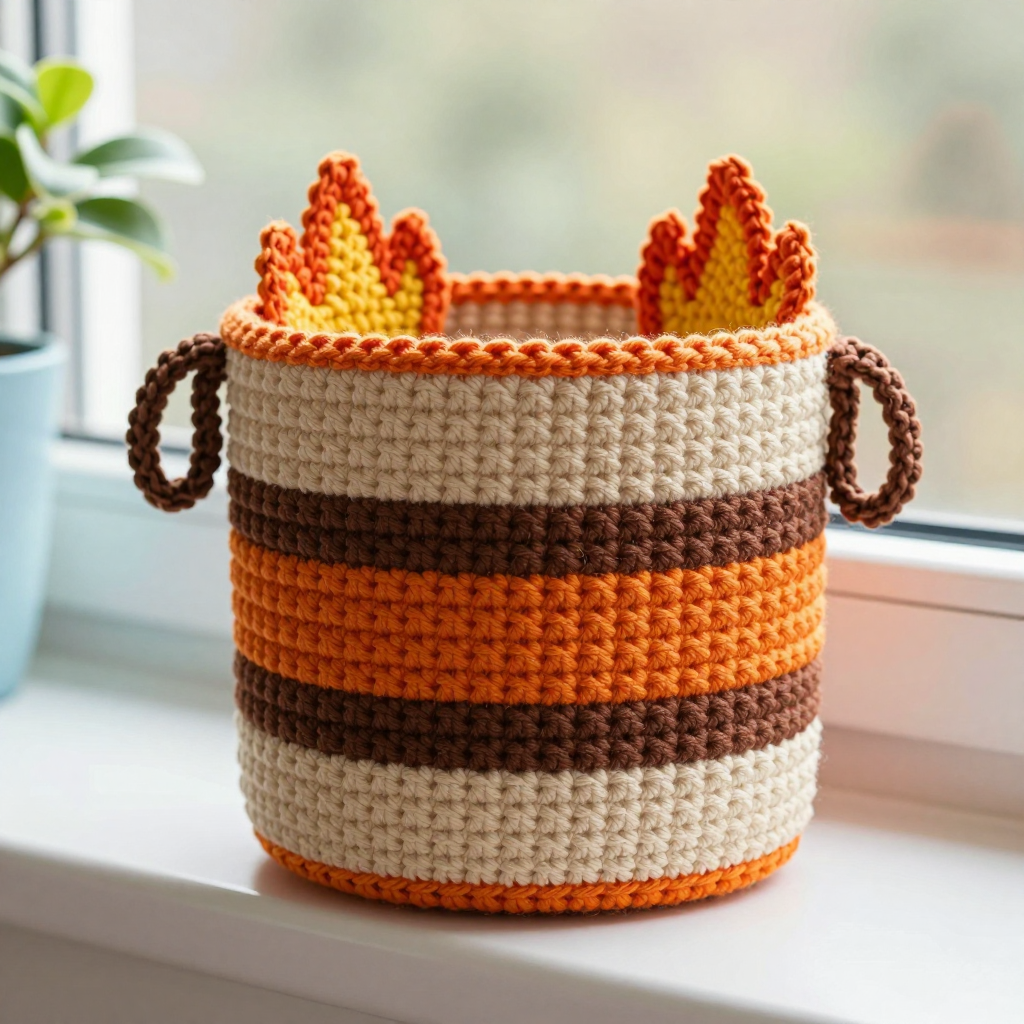
Tiki Torch Bowl Sleeve: A Free Beginner Crochet Pattern
Introduction
Bring a little island-night warmth to your table with this Tiki Torch Bowl Sleeve, a cozy little tube that hugs a standard soup or cereal bowl and keeps your hands comfortable while you eat. It's perfect for total beginners because it's built from just one stitch (single crochet) worked in a simple circle and then straight up the sides, so there are no complicated stitch patterns to memorize. The finished sleeve is a soft, slightly ridged cylinder about 6 inches across and 3 inches tall, striped in sandy cream, warm brown, and ember orange like a glowing tiki torch. Two tiny crocheted flame appliqués flicker at the rim, and two little brown loop handles stand out at the sides so you can lift the bowl easily. It looks handmade and cheerful, feels soft and squishy in your hands, and comes together in just a few cozy evenings.
Materials Needed
- Yarn: Worsted weight (Category 4) acrylic or cotton-blend yarn, approximately 150 yards total, divided as follows:
- 60 yards sand/cream (Color A)
- 50 yards warm brown (Color B)
- 40 yards ember orange (Color C)
- A few yards bright yellow (Color D) for the flame tips
- Main hook: 4.5 mm (US 7) crochet hook
- Small hook: 3.5 mm (US E/4) crochet hook for the flame appliqués
- Stitch markers: at least 2 (to mark the first stitch of each round and to mark handle placement)
- Tapestry needle: a blunt-tipped yarn needle for sewing on handles and flames and weaving in ends
- Scissors
- Finished size: approximately 6 inches in diameter across the base and about 3 inches tall, fitting a standard 5–6 inch soup or cereal bowl
Abbreviations and Beginner Glossary
- ch – chain: wrap the yarn over your hook and pull it through the loop already on your hook. This makes a small link.
- sl st – slip stitch: insert your hook into the stitch, wrap yarn over, and pull it through both the stitch and the loop on your hook at the same time. It joins rounds together without adding height.
- sc – single crochet: insert hook into the stitch, wrap yarn over and pull up a loop (2 loops on hook), wrap yarn over again and pull through both loops. One single crochet made.
- sc2tog – single crochet 2 together (a decrease): insert hook into the first stitch, pull up a loop, insert hook into the next stitch, pull up a loop (3 loops on hook), wrap yarn over and pull through all 3 loops. Two stitches become one.
- st(s) – stitch(es): one completed loop/unit of crochet.
- magic ring – an adjustable loop of yarn you crochet into to start a circle; pull the tail to close the hole tightly.
- join – finish a round by working a slip stitch into the first stitch of that round.
- turn – flip your work over so you crochet back the other way (used only for the flat flame pieces).
- fasten off – cut the yarn a few inches from your work and pull the tail through the last loop to lock it.
- whipstitch – a simple sewing stitch: pass the needle over the edge of both pieces and back through, over and over, to join them.
- US terms – all stitches in this pattern use US crochet names.
Gauge
Gauge: 4 single crochet stitches x 5 rounds = 1 inch square (worked in the round with the 4.5 mm hook).
Gauge matters because it controls the finished size. If your stitches are bigger than this, the sleeve will be too loose and slide off the bowl; if they are smaller, it won't fit over the bowl at all. To check, crochet a small flat circle of about 20 stitches across and 10 rounds, lay it flat, and measure 1 inch across the middle. Count how many stitches fit in that inch and how many rounds fit in an inch. If you have more than 4 stitches per inch, try a larger hook; if fewer, try a smaller hook. Always make the swatch before starting the real sleeve.
Beginner Tips Before You Start
- Mark your first stitch. Place a stitch marker in the first stitch of every round so you always know where to join and never lose your place.
- Don't pull the yarn tight. Keep an easy, relaxed tension. Tight stitches make a stiff sleeve that won't stretch over the bowl.
- Carry colors up the inside. When you change stripes, don't cut the yarn each time. Leave the unused color resting loosely inside the tube and pick it up again when needed.
- Change color cleanly. Work the last yarn-over of the final stitch of a round in the new color so the stripe begins crisply.
- Count every round. The base must end with exactly 64 stitches. Count before you start the sides; if you're off, the tube will be lopsided.
- Try it on the bowl as you go. Slip the sleeve over your bowl after a few side rounds to check the fit before you commit to the full height.
Step-by-Step Instructions
Base (Flat Circle, Color A)
Rnd 1: With A and the 4.5 mm hook, make a magic ring, ch 1, work 8 sc into the ring, join with sl st to first sc. (8 sc)
Rnd 2: Ch 1, 2 sc in each st around, join. (16 sc)
Rnd 3: Ch 1, *2 sc in next st, sc in next st; repeat from * around, join. (24 sc)
Rnd 4: Ch 1, *2 sc in next st, sc in next 2 sts; repeat from * around, join. (32 sc)
Rnd 5: Ch 1, *2 sc in next st, sc in next 3 sts; repeat from * around, join. (40 sc)
Rnd 6: Ch 1, *2 sc in next st, sc in next 4 sts; repeat from * around, join. (48 sc)
Rnd 7: Ch 1, *2 sc in next st, sc in next 5 sts; repeat from * around, join. (56 sc)
Rnd 8: Ch 1, *2 sc in next st, sc in next 6 sts; repeat from * around, join. (64 sc)
The base now measures about 6 inches across after blocking. Do not fasten off.
Sides (Straight Tube, No Increases)
Rnd 9 (B): Ch 1, sc in each st around, join. (64 sc)
Rnd 10 (B): Ch 1, sc in each st around, join. (64 sc)
Rnd 11 (C): Ch 1, sc in each st around, join. (64 sc)
Rnd 12 (C): Ch 1, sc in each st around, join. (64 sc)
Rnd 13 (A): Ch 1, sc in each st around, join. (64 sc)
Rnd 14 (A): Ch 1, sc in each st around, join. (64 sc)
Rnd 15 (B): Ch 1, sc in each st around, join. (64 sc)
Rnd 16 (B): Ch 1, sc in each st around, join. (64 sc)
Rnd 17 (C): Ch 1, sc in each st around, join. (64 sc)
Rnd 18 (C): Ch 1, sc in each st around, join. (64 sc)
Rnd 19 (A): Ch 1, sc in each st around, join. (64 sc)
Rnd 20 (A): Ch 1, sc in each st around, join. (64 sc)
Rnd 21 (B): Ch 1, sc in each st around, join. (64 sc)
Rnd 22 (B): Ch 1, sc in each st around, join. (64 sc)
Rnd 23 (C): Ch 1, sc in each st around, join. (64 sc)
Rnd 24 (C): Ch 1, sc in each st around, join. (64 sc)
The sides now measure about 3 inches tall (16 rounds at 5 rounds per inch). Do not fasten off.
Rim (Color C)
Rnd 25: Ch 1, sc in each st around, join with sl st to first sc. (64 sc) Fasten off C and weave in the end.
Side Loop Handles (Make 2, Color B)
With B and the 4.5 mm hook, leaving a 6-inch tail, ch 12, join with sl st to first ch to form a ring (be careful not to twist the chain).
Rnd 1: Ch 1, work 14 sc evenly around the chain ring, join with sl st to first sc. (14 sc)
Rnd 2: Ch 1, sc in each st around, join. (14 sc) Fasten off, leaving a 10-inch tail.
Flatten each loop slightly. Pin one loop to the outside of the sleeve at the side, centered on Rnds 21–23, with the loop standing upright. Using the tail and the tapestry needle, whipstitch the base of the loop to the sleeve. Repeat on the opposite side. Weave in ends.
Flame Appliqués (Make 2, with 3.5 mm Hook)
Use C for the body and D for the tip.
Row 1: With C, ch 2, work 3 sc in second ch from hook. (3 sc)
Row 2: Ch 1, turn, 2 sc in first st, sc in next st, 2 sc in last st. (5 sc)
Row 3: Ch 1, turn, sc in each st across. (5 sc)
Row 4: Ch 1, turn, sc2tog, sc in next st, sc2tog. (3 sc)
Row 5: Change to D, ch 1, turn, sc2tog, sc in last st. (2 sc)
Row 6: Ch 1, turn, sc2tog. Fasten off, leaving an 8-inch tail. (1 sc)
The piece forms a small teardrop flame about 1.25 inches tall. Make a second identical flame.
Assembly and Finishing
Sew on the flames: Pin one flame appliqué to the outside of the sleeve at the front, with the base of the flame sitting on Rnd 24 and the tip rising just above the rim. Thread the 8-inch tail onto the tapestry needle and whipstitch around the flame edge, catching a little of the sleeve fabric with each stitch. Sew the second flame opposite the first, offset slightly so the two flames flank the front.
Weave in ends: Thread each loose tail onto the tapestry needle and run it through the inside of several stitches (about 1 inch), then trim close to the fabric. Never knot the ends; weaving hides them securely.
Block: Lightly mist the finished sleeve with water and shape it over a bowl of the size you'll use, smoothing the base flat and standing the handles upright. Let it dry completely. This sets the straight tube shape and relaxes the fabric to its final 6-inch diameter.
Use it: Slip the finished sleeve over a bowl; the rim should sit just below the bowl's edge, and the handles should stand out at the sides for easy lifting.
Pro Tips and Variations
- Change the stripe colors: Swap the sand, brown, and orange for any three colors you love. Just keep the two-round stripe rhythm so the tiki-torch look stays balanced.
- Adjust the size: To fit a larger bowl, add one more increase round to the base (Rnd 9: *2 sc in next st, sc in next 7 sts; repeat around = 72 sc) and work the sides with 72 stitches. For a smaller bowl, stop the base at Rnd 7 (56 sts).
- Substitute yarn: Cotton or cotton-blend yarn gives a crisper, more washable sleeve; acrylic is softer and stretchier. Always check your gauge with the new yarn before starting.
- Make it taller or shorter: Add or remove pairs of side rounds to change the height. Each pair of rounds adds about 0.4 inch, so keep the stripe sequence in twos and finish with the ember-orange rim round.


