Mocha Ripple Throw Free Pattern – Knit a Cozy Café-Inspired Wave Blanket
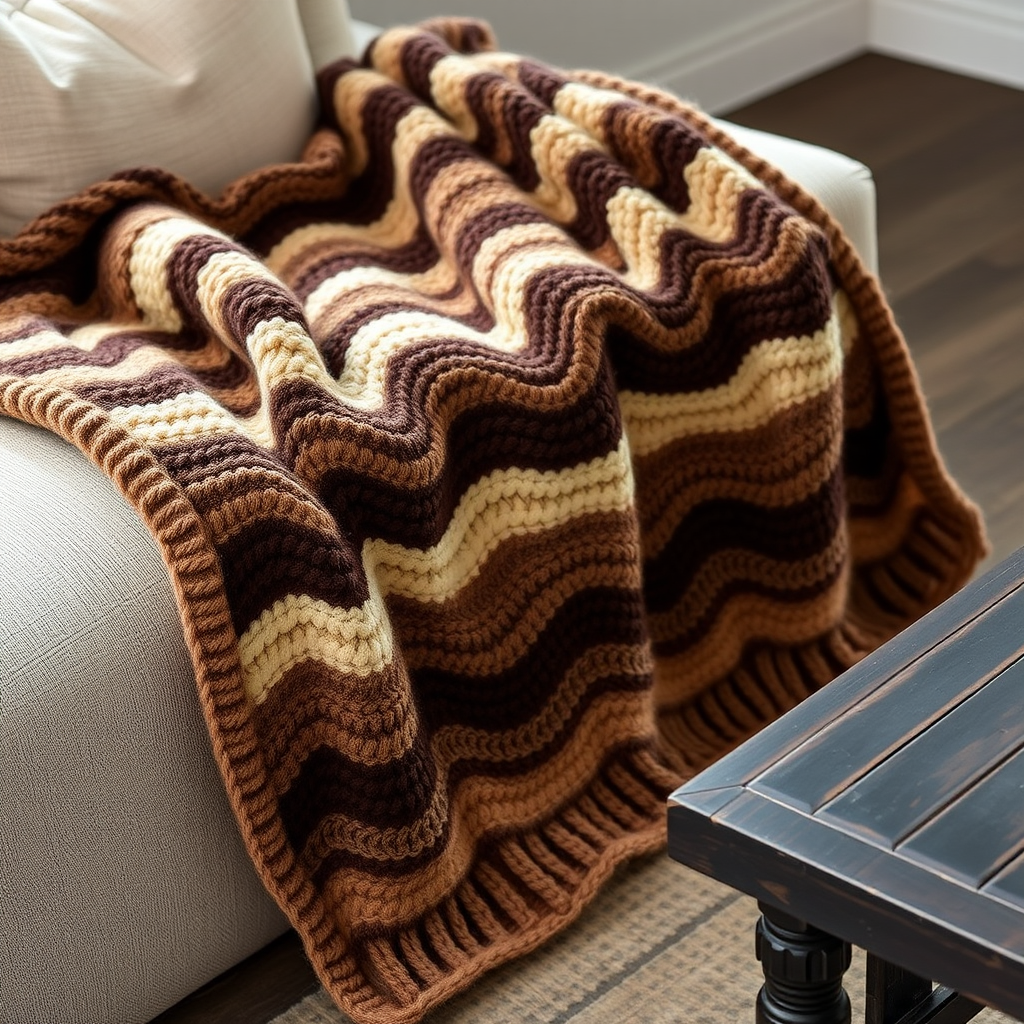
Introducing the Mocha Ripple Throw: A Café-Inspired Knitting Project
Imagine wrapping yourself in the rich, comforting hues of your favorite mocha latte. That's exactly the feeling you'll create with the Mocha Ripple Throw—a beautifully textured, wave-patterned blanket that brings warmth and sophistication to any living space. This free knitting pattern is perfect for intermediate beginners ready to tackle their first big project, featuring a dramatic ripple stitch that's surprisingly simple once you master the rhythm.
Knitted with soft, chunky yarn in three stunning shades—deep espresso, warm mocha, and soft cream—this throw is as much a statement piece as it is a cozy companion. The pronounced waves are created through a clever combination of decreases and increases, producing a plush, textured fabric with a gentle drape. Whether draped over a sofa arm or spread across a bed, this blanket evokes the earthy, inviting tones of a café and promises hours of handmade comfort.
In this comprehensive guide, I'll walk you through every step—from gathering your materials to binding off that final stitch. By the end, you'll have a gorgeous, café-inspired throw that you'll be proud to display and even prouder to say you made yourself.
Materials Needed for Your Mocha Ripple Throw
Before you begin, gather these supplies. The beauty of this pattern is its simplicity—you only need a few items, and the chunky yarn ensures your project works up faster than you might expect.
Yarn Requirements
- Super bulky weight yarn (size 6) in three shades:
- Espresso (dark brown)—for the foundation, border, and first stripe
- Mocha (medium brown)—for the second stripe
- Cream (off-white)—for the third stripe
- Total yardage: Approximately 1200 yards (you can adjust quantities based on how many stripes of each color you want; a typical distribution is 400 yards each, but feel free to customize)
Needles and Tools
- US Size 11 (8.0 mm) circular knitting needle, 32 inches long (the circular needle is essential to accommodate the width of the throw and distribute the weight comfortably)
- Stitch markers (optional but helpful for tracking pattern repeats)
- Tapestry needle for weaving in ends
- Scissors
Gauge
10 stitches and 14 rows = 4 inches in stockinette stitch (knit one row, purl one row). Achieving the correct gauge ensures your throw measures approximately 48 inches wide and 60 inches long. If your gauge is off, adjust your needle size accordingly—larger needles for fewer stitches per inch, smaller needles for more.
Step-by-Step Instructions: Knitting Your Mocha Ripple Throw
This pattern is worked in one piece from bottom to top. The ripple effect is created by a repeating sequence of decreases (k2tog) and increases (kfb), which form the characteristic peaks and valleys of the wave. Don't be intimidated—once you complete the first full repeat, the rhythm becomes second nature.
Pattern Notes Before You Begin
- The throw is worked flat, back and forth, on the circular needle.
- Color changes occur at the end of each row. You can either carry the unused yarn up the side (weaving it in later) or cut and rejoin for each stripe. For a cleaner finish, I recommend carrying the yarn up the side—it reduces ends to weave in.
- Always change colors on a wrong-side row (after purling) so the right side shows a clean color transition.
- Keep your tension consistent, especially when changing colors, to avoid puckering.
Abbreviations Used in This Pattern
- k = knit
- p = purl
- k2tog = knit two stitches together (this decreases your stitch count by 1)
- kfb = knit into the front and back of the same stitch (this increases your stitch count by 1)
- yo = yarn over (not used in this pattern, but listed for reference)
- st(s) = stitch(es)
Foundation and First Rows
Foundation Row: With Espresso, cast on 120 stitches loosely. A loose cast-on is crucial here—if it's too tight, the bottom edge will pucker and prevent the ripple from lying flat. I recommend using a long-tail cast-on or a knitted cast-on, being careful not to pull the yarn too tightly.
Row 1 (Right Side): Knit all stitches. This establishes your right side (the side that will face outward).
Row 2 (Wrong Side): Purl all stitches. This completes the first stockinette section and prepares you for the ripple pattern.
Begin the Ripple Pattern
Now comes the fun part—creating those beautiful waves! The ripple pattern is a simple 10-stitch repeat that you'll work across all 120 stitches. Here's the breakdown:
Row 3 (Right Side, Espresso): *K2tog, k2tog, k1, (kfb) twice, k1, k2tog, k2tog*; repeat from * to * across the row. (You'll maintain 120 stitches—the decreases and increases balance each other out.)
Let's break this down stitch by stitch so you understand the mechanics:
- K2tog, k2tog: Knit two stitches together, twice. This creates the descending slope of the wave (the valley). You've decreased 2 stitches.
- K1: Knit one stitch plain. This is the bottom of the valley.
- (Kfb) twice: Knit into the front and back of the next stitch, then knit into the front and back of the following stitch. This creates the ascending slope (the peak). You've increased 2 stitches.
- K1: Knit one stitch plain. This is the top of the peak.
- K2tog, k2tog: Knit two stitches together, twice, again. This creates the descending slope on the other side of the peak.
Repeat this 10-stitch sequence 12 times across the row (12 × 10 = 120 stitches). The result is a series of gentle peaks and valleys that form the ripple.
Row 4 (Wrong Side, Espresso): Purl all stitches. This row is plain purling—no increases or decreases. It locks in the shape created on Row 3.
Row 5 (Right Side, Mocha): Repeat Row 3 exactly, but with Mocha yarn. The pattern is identical; only the color changes.
Row 6 (Wrong Side, Mocha): Purl all stitches.
Row 7 (Right Side, Cream): Repeat Row 3 with Cream yarn.
Row 8 (Wrong Side, Cream): Purl all stitches.
Continuing the Pattern
Now you'll repeat Rows 3–8, continuing the color sequence of Espresso, Mocha, Cream for each 2-row stripe. This means:
- Rows 9–10: Espresso (repeat Row 3, then purl)
- Rows 11–12: Mocha
- Rows 13–14: Cream
- And so on...
Continue this sequence until the throw measures approximately 60 inches from the cast-on edge, ending after a wrong-side row (a purl row). This ensures your final stripe is complete and you're ready for the border.
Pro Tip: As you work, periodically lay the throw flat to check that the waves are forming evenly. If you notice any puckering or stretching, check your tension—especially at color changes. The yarn should flow smoothly without pulling.
Final Rows and Border
Once your throw reaches 60 inches, it's time to add the finishing border. This simple garter stitch edge in Espresso frames the blanket beautifully and prevents the edges from curling.
Final Rows: With Espresso, knit 2 rows. This creates a garter stitch border (knit every row) that contrasts subtly with the stockinette body of the throw.
Bind Off: Bind off all stitches loosely on the next right-side row. A loose bind-off is just as important as a loose cast-on—if it's too tight, the top edge will pull inward and distort the waves. I recommend using a basic bind-off but working each stitch loosely, or using a stretchy bind-off method like the "Jeny's Surprisingly Stretchy Bind-Off" if you're comfortable with it.
Finishing Touches
Now for the final steps that transform your knitted piece into a polished throw:
- Weave in all loose ends. Use your tapestry needle to thread each yarn tail through the back of the work, following the path of the stitches. Weave in at least 4–6 inches of yarn to ensure it's secure. If you carried yarn up the side, weave those strands in as well.
- Block the throw gently. Blocking is essential for this pattern—it evens out the ripple waves, opens up the stitch definition, and helps the blanket lie flat. To block:
- Fill a basin with cool water and a small amount of wool wash (if your yarn is machine-washable, you can skip this step and simply lay the throw flat).
- Submerge the throw and let it soak for 15–20 minutes. Do not agitate—this can cause felting.
- Gently press out excess water (never wring or twist).
- Lay the throw flat on a clean towel or blocking mat. Gently stretch it to its intended dimensions (approximately 48 inches wide by 60 inches long), paying special attention to the ripple waves—gently coax them into their peaks and valleys.
- Pin the edges if needed to hold the shape, and let it dry completely (this may take 24–48 hours depending on humidity).
- Enjoy your creation! Once dry, your Mocha Ripple Throw is ready to drape, snuggle, and admire.
Tips for Success
- Count your stitches regularly. The ripple pattern maintains 120 stitches, but it's easy to accidentally drop or add a stitch. Check your count at the end of each right-side row until you're confident.
- Use stitch markers. Place a marker every 10 stitches on your first repeat. This helps you track where each pattern repeat begins and ends, making it easier to spot mistakes early.
- Practice the ripple on a swatch first. If you're new to increases and decreases, knit a small swatch (cast on 20 stitches and work a few repeats) to get comfortable with the rhythm before starting the full throw.
- Choose your yarn wisely. Super bulky yarns vary in softness and drape. For a truly cozy throw, look for a wool-acrylic blend or a soft chenille-style yarn. Avoid anything too stiff, as it won't drape as beautifully.
The Mocha Ripple Throw is more than just a blanket—it's a labor of love that brings the warmth of a café into your home. With its rich, earthy palette and dramatic wave texture, it's sure to become a cherished heirloom piece. So grab your needles, pour yourself a warm drink, and let the soothing rhythm of the ripple pattern carry you to your happy place. Happy knitting!


