Plaid Check Leaf Cornucopia Mat Free Crochet Pattern
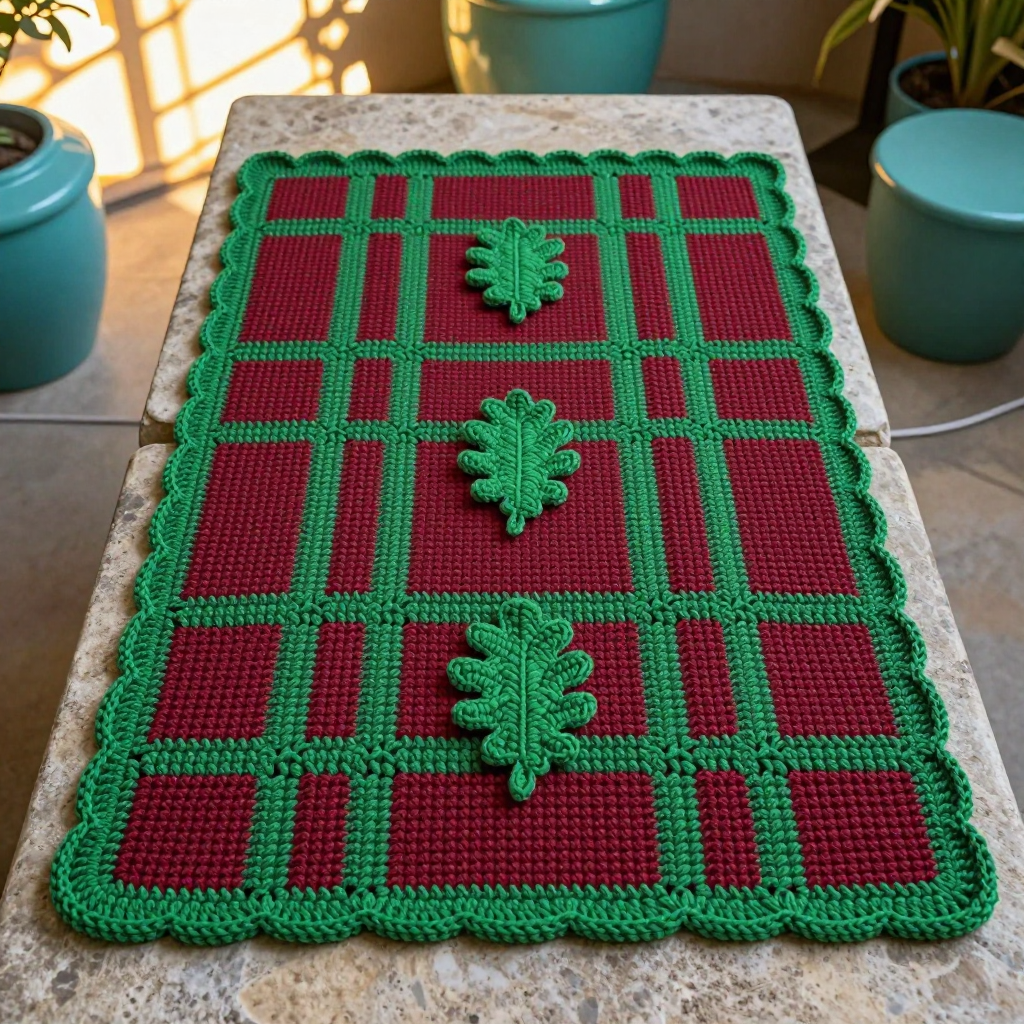
Plaid Check Leaf Cornucopia Mat: A Beginner-Friendly Crochet Table Runner
This plaid check table mat is the perfect first "real" project for someone who has just learned the single crochet stitch and wants to make something beautiful for their home. It is a flat, rectangular runner worked in rows, so there is no shaping, no increasing, and no working in the round to worry about. The magic comes from two colors of yarn crossing in simple 8-stitch blocks to create a classic tartan check, then a soft scalloped edge and three little crocheted oak leaves stitched down the center. The finished mat measures about 15 x 23 inches, lies perfectly flat on your table, and has a smooth, slightly sheeny worsted texture that looks far more complicated than it is. If you can make a single crochet, you can make this mat.
Materials Needed
- Yarn: Worsted weight (category 4) acrylic or cotton-blend yarn. You need approximately 220 yards of cranberry (Color A) and 180 yards of evergreen (Color B). The sample uses a smooth worsted with a slight sheen.
- Main hook: H/8 crochet hook (5.0 mm) for the mat body and the scalloped border.
- Small hook: G/6 crochet hook (4.0 mm) for the oak leaf appliqués.
- Stitch markers: At least 4, to mark your corners and your color-block boundaries.
- Tapestry needle: A blunt-tipped yarn needle for weaving in ends and stitching on the leaves.
- Scissors: Sharp craft scissors for cutting yarn.
- Finished size: Approximately 14 x 22 inches (35.5 x 56 cm) for the mat body before the border, and approximately 15 x 23 inches (38 x 58.5 cm) after the scalloped border is added.
Abbreviations and Beginner Glossary
Every abbreviation used in this pattern is listed below with a plain-English explanation. Read through this list once before you begin, and keep it beside you as you work.
- ch – chain. Make a loop with the yarn, pull the working yarn through the loop on your hook. That is one chain. Chains form your foundation row.
- sc – single crochet. Insert your hook into the stitch, wrap the yarn over the hook, pull up a loop (you now have 2 loops on the hook), wrap the yarn over again, and pull it through both loops. One single crochet made.
- dc – double crochet. Wrap the yarn over the hook first, insert the hook into the stitch, pull up a loop (3 loops on hook), yarn over and pull through 2 loops, yarn over and pull through the last 2 loops. This makes a taller stitch used in the scallops.
- hdc – half double crochet. Yarn over, insert hook, pull up a loop (3 loops on hook), yarn over and pull through all 3 loops at once. A medium-height stitch used in the leaves.
- sl st – slip stitch. Insert the hook into the stitch, yarn over, and pull the yarn through both the stitch and the loop on your hook in one motion. This makes a nearly invisible joining stitch.
- sc2tog – single crochet two together. A decrease that turns two stitches into one. (Not used in this pattern, but listed so you recognize it.)
- st / sts – stitch / stitches. One completed loop of yarn on your work.
- tog – together.
- yo – yarn over. Wrapping the working yarn over your hook.
- turn – flip your work over so you can work back across the row you just finished.
- fasten off – cut the yarn leaving a 6-inch tail, then pull the tail all the way through the last loop on your hook to lock it.
- join with sl st – connect the end of a round to its beginning with a slip stitch so the round closes into a circle.
- picot – a tiny bump made by chaining 3, then slip stitching into the 2nd chain from the hook.
- Color A – cranberry (your ground color).
- Color B – evergreen (your stripe and border color).
Gauge
Gauge: 16 single crochet stitches x 18 rows = 4 inches (10 cm) with the H/8 (5.0 mm) hook.
Gauge means how many stitches and rows fit into a set measurement. It matters because it is how we guarantee your mat comes out the size we planned. If your stitches are too loose, your mat will be too big and floppy; if they are too tight, it will be too small and stiff. To check your gauge, crochet a small practice square about 5 inches wide and 5 inches tall in single crochet. Lay a ruler across the middle and count how many stitches fit in 4 inches, then count how many rows fit in 4 inches. If you have more than 16 stitches, try a larger hook; if you have fewer, try a smaller hook. Always measure in the middle of the swatch, never at the edges, because edge stitches stretch.
Beginner Tips Before You Start
- Use stitch markers to track your color blocks. Place a marker every 8 stitches across your foundation chain. This means you never have to count to 224 again — you just change color at each marker.
- Do not pull your yarn too tight. Beginners tend to choke the yarn. Keep your tension relaxed so the hook slides easily. Tight stitches make a stiff mat that curls at the corners.
- Carry the unused color loosely up the side edge. When you switch colors, do not cut the yarn. Leave the resting color hanging at the side and pick it up again on the next row. Keep that carried strand a little loose so the edge does not pucker.
- Change color on the last yarn-over of the stitch. To switch from A to B, begin your last single crochet in A, but on the final "pull through both loops" step, use Color B. This makes a clean, invisible color change.
- Count your stitches at the end of every row. You should always have 224 stitches. If you are off, fix it now rather than discovering it 40 rows later.
- Work in good light and take breaks. Two-color work is easier on the eyes than it looks, but only if you can clearly see which color is which.
Step-by-Step Instructions
Understanding the Plaid Before You Begin
The plaid is built from two crossing stripe systems. Vertical stripes run up and down (created by changing color across the row). Horizontal stripes run side to side (created by changing color between rows). Both systems repeat in blocks of 8. Here is the rule for every single stitch:
- If the stitch is in a B vertical stripe AND the row is in a B horizontal stripe, work it in B (this is a crossing square).
- If the stitch is in a B vertical stripe but the row is in an A band, work it in B (a vertical stripe).
- If the stitch is in an A vertical band but the row is in a B stripe, work it in B (a horizontal stripe).
- If neither, work it in A (the ground).
Vertical stripe map (repeats every 32 stitches): Stitches 1–8 = A, stitches 9–16 = B, stitches 17–24 = A, stitches 25–32 = B. Repeat this 32-stitch sequence 7 times across 224 stitches.
Row stripe map (repeats every 32 rows): Rows 1–8 = A, rows 9–16 = B, rows 17–24 = A, rows 25–32 = B. Repeat this 32-row sequence.
Mat Body
With the H/8 (5.0 mm) hook and Color A, ch 226.
Row 1: Sc in the 2nd ch from hook and in each ch across, changing to B wherever the vertical stripe map calls for it. (224 sc) Turn.
Rows 2–8: Ch 1, sc in each st across, following the vertical stripe map and working every stitch in Color A (because rows 1–8 are an A horizontal band). (224 sc) Turn.
Rows 9–16: Ch 1, sc in each st across, following the vertical stripe map, working stitches in B wherever the row is a B horizontal stripe OR the stitch is a B vertical stripe. (224 sc) Turn.
Rows 17–24: Ch 1, sc in each st across, following the vertical stripe map, working stitches in B only where the stitch is a B vertical stripe (these rows are an A horizontal band). (224 sc) Turn.
Rows 25–32: Ch 1, sc in each st across, following the vertical stripe map, working stitches in B wherever the row is a B horizontal stripe OR the stitch is a B vertical stripe. (224 sc) Turn.
Rows 33–99: Repeat Rows 1–32 two more times (that brings you to Row 96), then work Rows 1–3 once more. (99 rows total, 224 sc each, approximately 22 inches tall.) Fasten off and weave in your ends.
Scalloped Border
Round 1: With the H/8 hook, join Color B with a sl st in any corner. Ch 1, then sc evenly around the entire mat: work 1 sc in each row end along the two long sides, and 1 sc in each stitch along the top and bottom edges, working 3 sc in each corner. Join with a sl st to the first sc.
Round 2: Ch 1, sc in each sc around, working 3 sc in each corner sc. Join with a sl st to the first sc.
Round 3 (scallops): Ch 1, then work: *skip 2 sc, 5 dc in the next sc, skip 2 sc, sl st in the next sc; repeat from * all the way around. Adjust the final repeat so the scallops sit evenly and each corner falls at the center of a scallop. Join with a sl st. Fasten off and weave in ends.
Oak Leaf Appliqués (make 3)
Work with the G/6 (4.0 mm) hook. Make two leaves in Color B and one in Color A for contrast, or all three in B if you prefer.
Row 1: Ch 12. Sc in the 2nd ch from hook, sc in the next 2 ch, hdc in the next 2 ch, dc in the next 3 ch, hdc in the next 2 ch, sc in the last ch. Do not turn. Now working along the opposite side of the foundation chain: sc in the next ch, hdc in the next 2 ch, dc in the next 3 ch, hdc in the next 2 ch, sc in the last 2 ch. Join with a sl st to the first sc. (Leaf body formed.)
Row 2 (lobes): Ch 1, sc in the first 3 sts, then *ch 3, sl st in the 2nd ch from hook, sc in the next ch (this makes a picot lobe), sc in the next 2 sts; repeat from * around the leaf, spacing the lobes evenly, and end with a sl st in the first sc. Fasten off, leaving a 10-inch tail for sewing.
Stem: With the G/6 hook and Color B, join the yarn at the base of the leaf, ch 8, sl st in the 2nd ch from hook and in each ch across, then sl st to the leaf base. Fasten off and weave in.
Assembly and Finishing
Blocking: Lightly block the mat to square the corners and open up the scallops. To block, mist the mat with cool water until damp (not soaking), lay it flat on a towel or blocking mat, and gently pat the corners square and smooth the scallops into even curves. Let it dry completely, which usually takes several hours or overnight.
Placing the leaves: Arrange the three oak leaves along the center of the mat, spacing them evenly with the center leaf sitting slightly forward of the other two. Pin each leaf in place with sewing pins or stitch markers.
Stitching the leaves down: Thread your tapestry needle with the 10-inch tail you left on each leaf. Stitch the leaf to the mat using small, even stitches around the leaf edge, catching only the surface of the mat so the back stays neat. Do not pull too hard or the leaf will pucker. Fasten off underneath.
Weaving in ends: Thread each remaining yarn tail onto the tapestry needle and weave it back and forth through the back of several stitches, then trim close to the work. Never knot your ends — weaving them in hides them securely.
Pro Tips and Variations
- Change the color story. Swap cranberry and evergreen for any two colors you love — navy and mustard, rust and cream, or charcoal and blush. The plaid logic stays exactly the same; only the colors change.
- Resize the mat. To make a longer runner, add stitches in multiples of 32 (one full stripe repeat) to your starting chain, and add rows in multiples of 32 to keep the plaid pattern balanced. To make a smaller placemat, remove one 32-stitch repeat.
- Substitute the yarn. A cotton-blend worsted gives crisp stitch definition and a mat that lies very flat. A soft acrylic is more affordable and machine washable. Always check your gauge again if you change yarn, because even the same weight can behave differently.
- Add more leaves or a leaf garland. Make five or seven leaves instead of three and arrange them in a gentle curve down the center for a fuller, more autumnal look. You can also scatter a few leaves at each end of the runner.