Santorini Blue Drawstring Pouch Free Crochet Pattern
Santorini Blue Drawstring Pouch – Free Beginner Crochet Pattern
Introduction
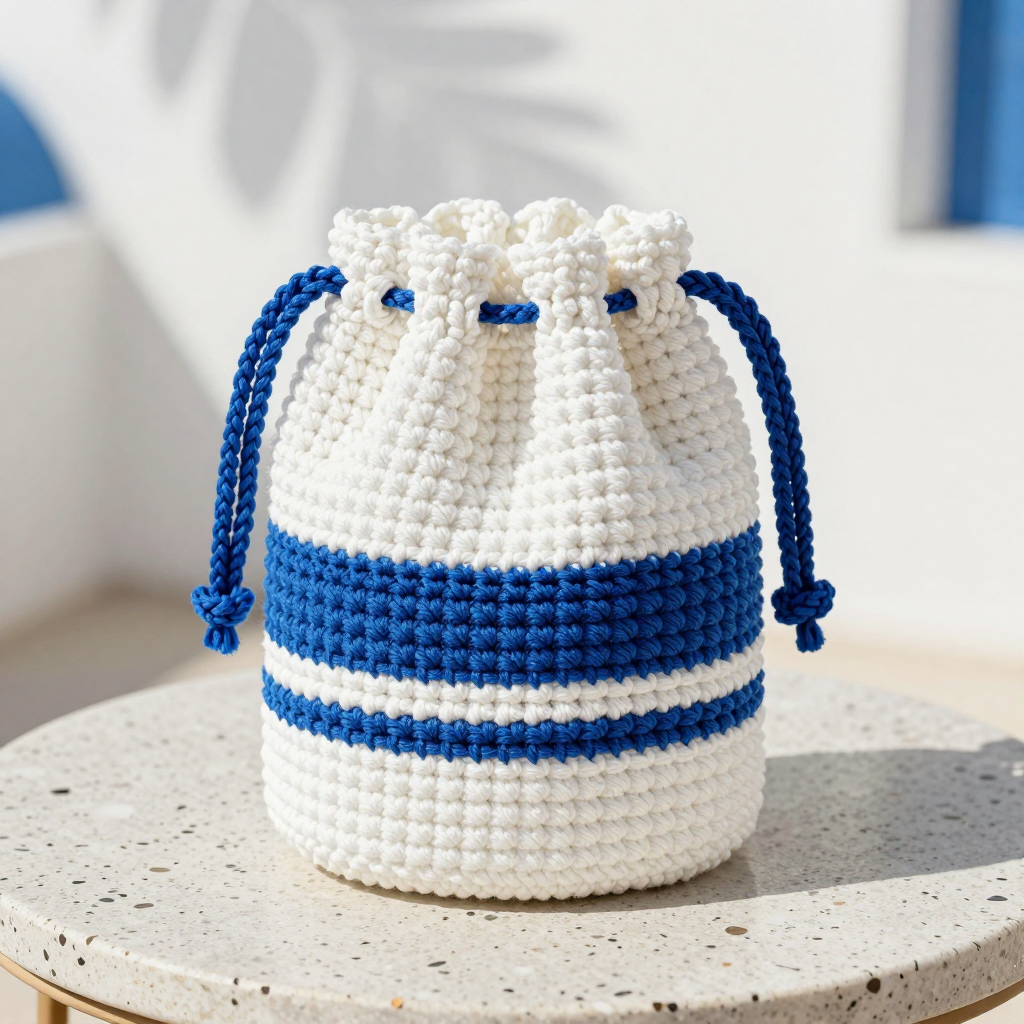
If you have never held a crochet hook before, this little pouch is the perfect first project for you. It is small, quick, and forgiving, and it teaches you the two skills every crocheter needs: working in a flat circle and working in continuous rounds. The finished pouch is a crisp little cylinder about the size of a large plum, with a flat white base, straight white sides, a wide band of cobalt blue across the middle, and a braided blue drawstring threaded through eyelet holes near the top. The single crochet fabric is dense and slightly textured, so it holds its shape beautifully and feels sturdy in your hand. Fill it with candies, jewelry, seashells, or a small gift, and it looks like a tiny piece of the Mediterranean.
Materials Needed
- Yarn: Worsted weight (category 4) acrylic or cotton yarn — approximately 60 yards white and 25 yards cobalt blue.
- Crochet hook: Size G/6 (4.0 mm).
- Stitch marker (one is enough; a safety pin or paper clip works too).
- Tapestry needle (a blunt needle with a large eye for weaving in ends).
- Scissors.
- Finished size: Approximately 3.5 inches (9 cm) in diameter x 4.5 inches (11.5 cm) tall, not counting the drawstring.
Abbreviations and Beginner Glossary
- ch – chain. Make a loop of yarn over the hook and pull it through the loop already on your hook. This creates a small link.
- sc – single crochet. Insert your hook into the stitch, wrap yarn over the hook, pull up a loop (2 loops on hook), wrap yarn over again, and pull through both loops. One loop remains.
- sl st – slip stitch. Insert hook into the stitch, wrap yarn over, and pull it through both the stitch and the loop on your hook in one motion. It joins without adding height.
- st(s) – stitch or stitches. One completed loop in your fabric.
- rnd – round. One complete circle of stitches worked around.
- BLO – back loop only. Every stitch has two top loops (a front loop and a back loop). Working in the back loop means you insert your hook under only the loop farther from you, leaving a visible ridge.
- Magic ring – an adjustable loop of yarn that you crochet into, then pull tight to close the center hole.
- [ ] – brackets mean "repeat everything inside the brackets" the number of times stated after the bracket.
- 2 sc in next st – work two single crochet stitches into the same stitch. This is an increase and makes the circle grow.
Gauge
16 single crochet stitches x 18 rounds = 4 inches (10 cm) in single crochet worked in the round.
Gauge means how big your stitches come out. If your stitches are bigger than this, your pouch will be larger than 3.5 inches across; if smaller, it will be smaller. Gauge is not critical for this project, but it does affect the finished size and whether your drawstring holes line up nicely. To check it, crochet a small flat circle of about 20 stitches for 10 rounds, lay it flat, and measure 4 inches across the middle. Count how many stitches fit in those 4 inches. If you have more than 16, try a larger hook; if fewer, try a smaller hook.
Beginner Tips Before You Start
- Use a stitch marker. Because this pouch is worked in a spiral, there is no seam to tell you where a round begins. Place the marker in the first stitch of each round and move it up every time you start a new round.
- Do not pull the yarn too tight. Keep your tension relaxed and even. Tight stitches make it hard to insert the hook and make the pouch stiff and small.
- Count your stitches at the end of every round. The number in parentheses tells you exactly how many stitches you should have. If you are off, fix it now rather than later.
- Keep the magic ring tail handy. After Round 1, pull the short tail firmly to close the center hole completely before you continue.
- Change colors on the last stitch of the round. Pull the new color through the final two loops of the last stitch so the color change is clean and invisible.
- Work loosely on the eyelet round. The chain-1 spaces need to be big enough for the braid to slide through easily.
Step-by-Step Instructions
Note: Work in continuous rounds (a spiral) unless the instructions say to join. Do not join or turn at the end of each round. Place a stitch marker in the first stitch of each round and move it up as you go.
Base (worked flat in a circle)
With WHITE, make a magic ring.
Rnd 1: 6 sc into the magic ring. Pull the tail tight to close the hole. (6 sc)
Rnd 2: 2 sc in each st around. (12 sc)
Rnd 3: [2 sc in next st, 1 sc in next st] around. (18 sc)
Rnd 4: [2 sc in next st, 1 sc in each of next 2 sts] around. (24 sc)
Rnd 5: [2 sc in next st, 1 sc in each of next 3 sts] around. (30 sc)
Rnd 6: [2 sc in next st, 1 sc in each of next 4 sts] around. (36 sc)
Rnd 7: [2 sc in next st, 1 sc in each of next 5 sts] around. (42 sc)
Rnd 8: [2 sc in next st, 1 sc in each of next 6 sts] around. (48 sc)
Rnd 9: [2 sc in next st, 1 sc in each of next 7 sts] around. (54 sc)
Rnd 10: [2 sc in next st, 1 sc in each of next 8 sts] around. (60 sc)
The base should now measure approximately 3.5 inches (9 cm) across. Do not fasten off.
Body (worked upward from the base)
Rnd 11: Working in BLO, sc in each st around. (60 sc) This creates a crisp fold edge between the base and the sides.
Rnds 12–15: Sc in each st around. (60 sc) — 4 rounds white.
Change to COBALT BLUE.
Rnds 16–23: Sc in each st around. (60 sc) — 8 rounds blue.
Change to WHITE.
Rnds 24–27: Sc in each st around. (60 sc) — 4 rounds white.
Rnd 28 (eyelet round): Ch 1, sc in first st, [ch 1, skip next st, sc in next st] around, ending with ch 1, skip last st, sl st to first sc. (30 sc, 30 ch-1 spaces)
Rnd 29: Ch 1, sc in each st and in each ch-1 space around, sl st to first sc. (60 sc)
Rnd 30: Ch 1, sc in each st around, sl st to first sc. Fasten off and weave in ends. (60 sc)
Drawstring (braided)
Cut 3 strands of COBALT BLUE yarn, each approximately 30 inches (76 cm) long. Knot the three strands together at one end, leaving a 2-inch tail. Braid the strands together until the braid measures approximately 24 inches (61 cm). Knot the other end and trim the tails evenly. Thread the braid through the eyelet round, alternating over and under the ch-1 spaces, beginning and ending at the same point. Tie the ends together in a bow or double knot.
Assembly and Finishing
Weave in ends. Thread each loose yarn tail onto the tapestry needle and pass it back and forth through the inside of the fabric for about an inch, then trim close to the fabric. Do this for every tail, including the magic ring tail and the color-change tails.
Shape the pouch. Use your fingers to gently round out the base and push the sides up straight. The BLO round at Round 11 should form a neat fold at the bottom edge.
Steam lightly (optional). Hold a steam iron a few inches above the pouch and let the steam relax the fabric, then shape it with your hands. Do not press the iron directly onto acrylic yarn, as it can melt.
Check the drawstring. Pull the braid gently to make sure it slides freely through the eyelets. Adjust the bow so both ends are even.
Your pouch is now ready to fill with small treats or treasures.
Pro Tips and Variations
- Change the colors. Swap cobalt blue for any contrast color — coral, sage green, or mustard yellow — to match a gift or a season. Keep the white base and top for that crisp Santorini look.
- Make it bigger or smaller. To make a larger pouch, continue the base increase pattern (add one more single crochet between increases each round) until the circle is the size you want, then work the sides straight without increasing. Add or remove rounds in the blue band to change the height.
- Try a different yarn. Cotton yarn gives a sturdier, more washable pouch, while acrylic is softer and stretchier. Just check your gauge again, because different fibers behave differently.
- Add a fabric lining. For a gift pouch, sew a small fabric lining and slip it inside before threading the drawstring, so small items do not poke through the stitches.