Silver Seagull Crochet Beanie Free Pattern: Ice Blue Summer Hat
Silver Seagull Crochet Beanie: An Ice-Blue Summer Hat for Absolute Beginners
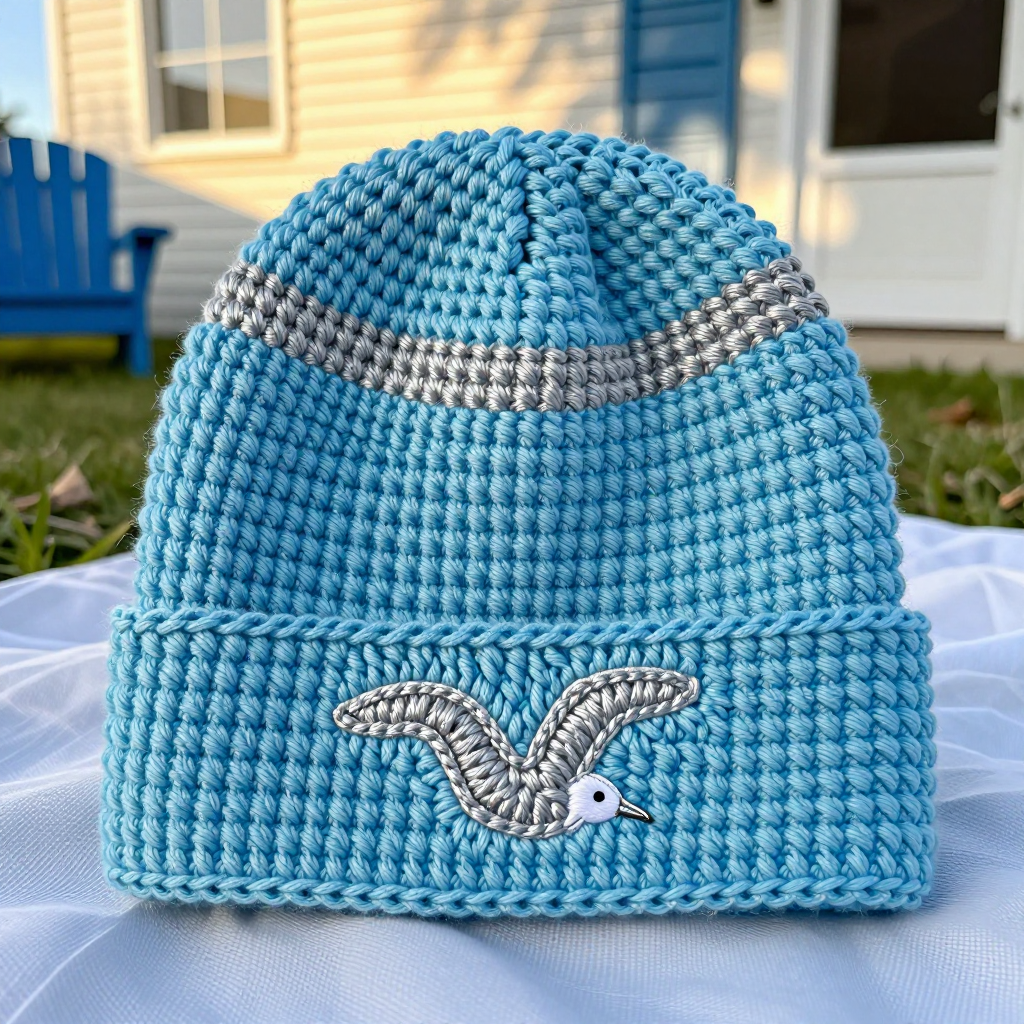
If you have never held a crochet hook before, this is the perfect first hat for you. The Silver Seagull Beanie is worked almost entirely in one simple stitch, so you can focus on learning the rhythm of crochet instead of memorizing complicated patterns. The finished hat is a close-fitting, soft beanie in a cool ice-blue shade, with a slim silver stripe circling the crown and one flat, stylized seagull appliqué stitched to the front. It looks clean, breezy, and Mediterranean-inspired, and it feels dense but soft against the head, with just enough stretch to hug your ears on a cool evening. By the time you finish, you will have made a real, wearable hat and learned the core skills that every crochet project is built on.
Materials Needed
- Yarn (main color): Worsted weight (category 4) acrylic or cotton-blend yarn, approximately 150 yd (137 m) in ice blue.
- Yarn (contrast color): Small amount of silver worsted weight yarn, approximately 15 yd (14 m), for the crown stripe and the seagull appliqué.
- Crochet hook: Size G/6 (4.0 mm), or the size needed to obtain gauge.
- Stitch marker: One removable marker (or a safety pin, or a short scrap of contrasting yarn) to mark the first stitch of each round.
- Tapestry needle: A blunt-tipped needle with a large eye, for sewing on the appliqué and weaving in ends.
- Scissors: Any sharp pair for cutting yarn.
- Optional: A spray bottle of water for light blocking, and pins if you want to pin the appliqué in place.
Finished size: Fits an average adult head circumference of 21–23 in (53–58 cm). Finished hat circumference is approximately 21 in (53 cm) unstretched, and finished height is approximately 8 in (20 cm) from crown to lower edge. The seagull appliqué measures approximately 3 in (7.5 cm) wide and 2 in (5 cm) tall.
Abbreviations and Beginner Glossary
Every abbreviation used in this pattern is listed below. Read through this list once before you begin — you do not need to memorize it, just come back whenever a term looks unfamiliar. All terms are in US crochet terms.
- ch — chain. Make a loop of yarn on your hook, then pull the yarn through that loop. Each loop you pull through is one chain. Chains look like a row of little V shapes.
- sc — single crochet. Insert your hook into the next stitch, wrap the yarn over the hook and pull up a loop (you now have 2 loops on the hook), wrap the yarn over again and pull it through both loops. One single crochet made.
- sl st — slip stitch. Insert your hook into the next stitch, wrap the yarn over and pull it through both the stitch and the loop already on your hook, all in one motion. It makes a flat, tight stitch used here for the brim.
- sc2tog — single crochet 2 stitches together. This is a decrease: it turns two stitches into one. Insert your hook into the next stitch, pull up a loop, insert your hook into the following stitch, pull up a loop (3 loops on hook), wrap yarn over and pull through all 3 loops. One stitch is removed.
- 2 sc in next st — work two single crochets into the same stitch. This is an increase: it turns one stitch into two and is how the crown grows wider.
- st(s) — stitch or stitches. One completed loop on your work.
- rnd — round. One complete circle of stitches worked around the hat.
- magic ring — an adjustable loop of yarn used to start working in the round. You wrap the yarn into a loop, work your first stitches into it, then pull the tail to close the hole tightly.
- [ ] — brackets. Everything inside the brackets is repeated as many times as stated after the bracket.
- fasten off — cut the yarn a few inches from your work, pull the tail all the way through the last loop, and tighten so it does not unravel.
- weave in ends — thread a yarn tail onto a tapestry needle and run it back and forth through the inside of the fabric so it is hidden and secure.
Gauge
Gauge: 16 single crochet stitches x 18 rounds = 4 in (10 cm) in single crochet worked in the round.
Gauge simply means how big your stitches turn out. If your stitches are bigger than the pattern expects, the hat will be too large; if they are smaller, the hat will be too tight. To check, crochet a small practice circle: make a magic ring, work 6 sc into it, then increase as in Rounds 2–6 of the hat (this gives you 36 stitches). Measure across the middle of your swatch. If 16 stitches measure 4 in (10 cm), you are right on target. If your swatch is wider, try a smaller hook; if it is narrower, try a larger hook. It is worth the ten minutes — a hat that fits is a hat you will actually wear.
Beginner Tips Before You Start
- Use a stitch marker every single round. Because this hat is worked in a continuous spiral, there is no seam to tell you where a round begins. Place the marker in the first stitch of each round and move it up as you go. This is the number one way beginners lose their place.
- Do not pull your yarn too tight. Hold the yarn with gentle tension. Tight stitches make a stiff, small hat and make it hard to insert your hook. Relaxed, even stitches are the goal.
- Count your stitches at the end of every increase round. The stitch count in parentheses is your checkpoint. If it does not match, undo that round and try again — it is much easier to fix now than after 30 rounds.
- Carry the silver yarn loosely. When you change color for the stripe, leave the unused color resting inside the hat with a little slack. If you pull it tight, the hat will pucker there.
- Work the appliqué after the hat is finished. It is small and fiddly, and it is much easier to concentrate on it once the main hat is done and you feel confident.
- Take breaks. Single crochet in the round is repetitive. Rest your hands every 15 minutes so your tension stays even and your wrists stay happy.
Step-by-Step Instructions
Notes: The hat is worked in the round from the crown down to the brim. Do not join rounds unless instructed — work in a continuous spiral and use a stitch marker to mark the first stitch of each round. The silver stripe is made by changing color for a band of rounds near the crown, then changing back to ice blue; carry the unused color loosely up the inside of the hat, or fasten off and rejoin if you prefer.
Body: The Crown (Increase Rounds)
With ice blue, make a magic ring.
Rnd 1: Work 6 sc into the ring. Pull the ring closed. Place a stitch marker in the first st. (6 sc)
Rnd 2: 2 sc in each st around. (12 sc)
Rnd 3: [2 sc in next st, 1 sc in next st] around. (18 sc)
Rnd 4: [2 sc in next st, 1 sc in each of next 2 sts] around. (24 sc)
Rnd 5: [2 sc in next st, 1 sc in each of next 3 sts] around. (30 sc)
Rnd 6: [2 sc in next st, 1 sc in each of next 4 sts] around. (36 sc)
Rnd 7: [2 sc in next st, 1 sc in each of next 5 sts] around. (42 sc)
Rnd 8: [2 sc in next st, 1 sc in each of next 6 sts] around. (48 sc)
Rnd 9: [2 sc in next st, 1 sc in each of next 7 sts] around. (54 sc)
Rnd 10: [2 sc in next st, 1 sc in each of next 8 sts] around. (60 sc)
Rnd 11: [2 sc in next st, 1 sc in each of next 9 sts] around. (66 sc)
Rnd 12: [2 sc in next st, 1 sc in each of next 10 sts] around. (72 sc)
Rnd 13: [2 sc in next st, 1 sc in each of next 11 sts] around. (78 sc)
Rnd 14: [2 sc in next st, 1 sc in each of next 12 sts] around. (84 sc)
The crown now measures approximately 6.5 in (16.5 cm) in diameter, which gives a hat circumference of about 21 in (53 cm).
Body: The Sides and Silver Stripe
Rnds 15–18: Sc in each st around in ice blue. (84 sc)
Change to silver.
Rnds 19–21: Sc in each st around in silver. (84 sc)
Change back to ice blue.
Rnds 22–33: Sc in each st around in ice blue. (84 sc)
The hat now measures approximately 7.5 in (19 cm) from the crown.
Brim
Rnd 34: Sc in each st around. (84 sc)
Rnd 35: Sl st in each st around. Fasten off, leaving a 6 in (15 cm) tail. Weave in the end on the inside of the hat.
The brim measures approximately 0.5 in (1.3 cm) and brings the total hat height to approximately 8 in (20 cm).
Seagull Appliqué (make 1 in silver)
Worked flat in rows. Turn your work at the end of each row.
Row 1: Ch 10. Sc in the 2nd ch from the hook and in each ch across. (9 sc) Turn.
Row 2: Ch 1, sc in each st across. (9 sc) Turn.
Row 3: Ch 1, sc in each of the first 3 sts, ch 4, skip 3 sts, sc in each of the last 3 sts. (6 sc, 1 ch-4 space) Turn.
Row 4: Ch 1, sc in each of the first 3 sts, 4 sc in the ch-4 space, sc in each of the last 3 sts. (10 sc) Turn.
Row 5: Ch 1, sc in each st across. (10 sc) Turn.
Row 6: Ch 1, sc2tog, sc in each of the next 6 sts, sc2tog. (8 sc) Turn.
Row 7: Ch 1, sc2tog, sc in each of the next 4 sts, sc2tog. (6 sc) Turn.
Row 8: Ch 1, sc2tog, sc in each of the next 2 sts, sc2tog. (4 sc) Turn.
Row 9: Ch 1, sc2tog twice. (2 sc) Turn.
Row 10: Ch 1, sc2tog. (1 sc) Fasten off, leaving a 12 in (30 cm) tail for sewing.
The finished appliqué measures approximately 3 in (7.5 cm) wide and 2 in (5 cm) tall, with a small notch at the top edge that suggests the gull's head and wing profile.
Assembly and Finishing
1. Weave in the ends. Thread each yarn tail onto your tapestry needle and run it back and forth through the inside of the fabric for about 1 in (2.5 cm), then snip it close. Do this for every tail on the hat and the appliqué, except the long 12 in (30 cm) tail on the appliqué — you need that one for sewing.
2. Block the hat lightly. Mist the hat with water until it is slightly damp, then shape it over a round object such as a bowl, a balloon, or a hat form. Smooth the brim flat and let it dry completely. This evens out your stitches and helps the hat hold its shape.
3. Position the appliqué. Lay the hat flat with the silver stripe horizontal. Place the seagull on the front, centered horizontally and about 1.5 in (4 cm) above the lower edge. Pin it in place, checking that it sits straight.
4. Stitch it down. Thread the long appliqué tail onto your tapestry needle. Sew small, even stitches all the way around the outer edge of the appliqué, catching just the surface of the hat beneath. Do not pull the stitches too tightly — the hat needs to keep its stretch, so keep the sewing thread relaxed.
5. Finish. Weave in the remaining tail on the inside of the hat. If the appliqué edges curl, hold them briefly over steam (or mist them) and press flat with your fingers. Your hat is complete.
Pro Tips and Variations
- Change the colors. Swap the ice blue for sandy beige, soft grey, or navy, and make the stripe and seagull in white or cream. The same pattern gives you a completely different hat with every palette.
- Adjust the size. For a smaller hat, stop the crown increases at Round 12 (72 sc) and work the sides and brim with 72 stitches instead of 84. For a larger hat, add one more increase round: Rnd 15: [2 sc in next st, 1 sc in each of next 13 sts] around (90 sc), then work the sides and brim with 90 stitches. Each extra round adds roughly 1 in (2.5 cm) of circumference.
- Try a different yarn. Cotton gives a crisp, summery hat with beautiful stitch definition; acrylic is softer and springier. Any worsted weight (category 4) yarn works — just check your gauge again, because every yarn behaves a little differently.
- Make the stripe your own. Widen the silver band to five rounds, add a second thin stripe lower down, or work the entire brim in silver for a bolder look. Keep the appliqué in the same color as the stripe so the hat looks intentional and coordinated.