Pierced By Starlight Bonnet: Free Crochet Pattern
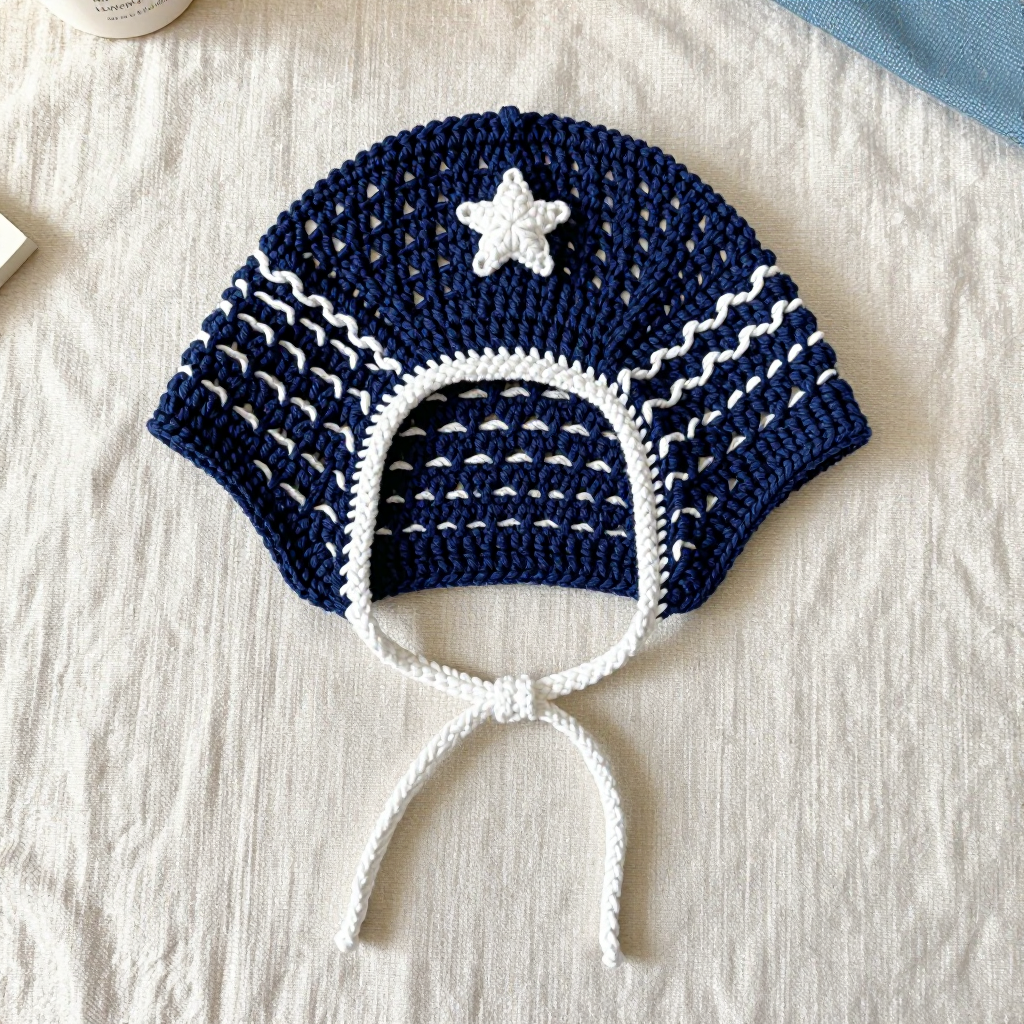
Pierced By Starlight Bonnet: A Dreamy First Crochet Project
If you have ever looked at a crocheted bonnet and thought "I could never make that," this pattern is for you. The Pierced By Starlight Bonnet is a vintage-style hood worked flat as one simple rectangle, then folded and seamed into shape — no complicated shaping, no working in the round, and no experience required. It is perfect for a complete beginner who knows (or is ready to learn) a few basic stitches and wants a finished piece that looks far more intricate than it is. The finished bonnet is a deep navy hood with soft horizontal bands of openwork that let light peek through like tiny stars, finished with a single white crocheted star on the front and two long white chin ties. It feels soft, cozy, and just a little bit magical — like something from a storybook.
Materials Needed
- Yarn: Worsted weight (Category 4) acrylic or acrylic-wool blend — approximately 220 yards navy and 40 yards white.
- Crochet hook: 5.5 mm (US size I/9).
- Stitch markers: At least 2, to mark the corners of your front opening.
- Tapestry needle (yarn needle): A large-eyed, blunt-tipped needle for seaming and weaving in ends.
- Scissors: Sharp craft scissors for cutting yarn.
- Measuring tape: For checking gauge and finished size.
- Pins: For holding the star appliqué in place and for blocking.
Finished size: Fits a head circumference of 20–22 inches. Bonnet height at the back is 9 inches, width across the front opening is 8 inches, and each chin tie is 18 inches long.
Abbreviations and Beginner Glossary
- ch — chain: wrap the yarn over your hook and pull it through the loop on your hook. This creates one chain stitch.
- sc — single crochet: insert your hook into the stitch, yarn over, pull up a loop (2 loops on hook), yarn over, pull through both loops. One single crochet made.
- hdc — half double crochet: yarn over first, insert hook into the stitch, yarn over, pull up a loop (3 loops on hook), yarn over, pull through all 3 loops at once.
- dc — double crochet: yarn over, insert hook into the stitch, yarn over, pull up a loop (3 loops on hook), yarn over and pull through 2 loops, yarn over and pull through the last 2 loops.
- sl st — slip stitch: insert hook into the stitch, yarn over, and pull the yarn straight through both the stitch and the loop on your hook. It makes a nearly invisible joining stitch.
- st(s) — stitch(es): one completed loop of yarn in your work.
- sk — skip: do not work into the next stitch; leave it empty and move to the one after it.
- ch-1 sp — chain-1 space: the small gap created in the previous row when you chained 1 and skipped a stitch. You will work into this gap, not into a stitch.
- rep — repeat: do the instruction again.
- RS — right side: the "public" side of your work that will face outward when finished.
- WS — wrong side: the back, inside-facing side of your work.
- magic ring — an adjustable loop of yarn you crochet into, then pull tight to close the center hole.
- turn — flip your work over so you can crochet back across the row you just finished.
- fasten off — cut the yarn a few inches from your work and pull the tail all the way through the last loop to lock it.
Gauge
14 sts x 16 rows = 4 inches in half double crochet (hdc).
Gauge means how many stitches and rows fit into a 4-inch square. It matters because if your stitches are bigger or smaller than mine, your bonnet will come out too large or too small to fit a head. To check your gauge: crochet a small practice square of about 20 hdc stitches and 18 rows, lay it flat, and measure 4 inches across the middle. Count how many stitches fit in those 4 inches. If you have more than 14, your stitches are tight — try a larger hook. If you have fewer than 14, your stitches are loose — try a smaller hook. Always make a swatch before starting; it takes ten minutes and saves hours.
Beginner Tips Before You Start
- Count every row. The bonnet is a rectangle, so every row should have exactly 30 stitches. Count at the end of each row until you trust your rhythm.
- Do not pull your yarn too tight. Tension is the number one beginner struggle. Hold the yarn gently — tight stitches make a stiff, small bonnet and make it hard to insert your hook.
- Use stitch markers. Place one marker at each bottom corner of the front opening before you begin the edging and ties, so you always know exactly where to attach them.
- Remember the turning chain. The ch 1 at the start of each row does not count as a stitch. Your first hdc goes into the very first stitch below it.
- Keep your skipped stitches loose. On the openwork rows, the ch-1 spaces create the "starlight" holes. If you chain tightly, the holes close up.
- Work in good light. Navy yarn is dark, and dark yarn hides stitches. Bright, direct light makes every stitch easy to see.
Step-by-Step Instructions
Main Bonnet (worked flat in navy)
Row 1 (RS): Ch 31. Sc in 2nd ch from hook and in each ch across. Turn. (30 sc)
Row 2: Ch 1, hdc in each st across. Turn. (30 hdc)
Row 3: Ch 1, hdc in each st across. Turn. (30 hdc)
Row 4: Ch 1, hdc in first 2 sts, *ch 1, sk next st, hdc in next st; rep from * to last 3 sts, ch 1, sk next st, hdc in last 2 sts. Turn. (20 hdc, 10 ch-1 sps)
Row 5: Ch 1, hdc in each hdc and in each ch-1 sp across. Turn. (30 hdc)
Rows 6–9: Repeat Rows 2–5 once more. (30 hdc)
Rows 10–13: Repeat Rows 2–5 once more. (30 hdc)
Rows 14–17: Repeat Rows 2–5 once more. (30 hdc)
Rows 18–21: Repeat Rows 2–5 once more. (30 hdc)
Rows 22–25: Repeat Rows 2–5 once more. (30 hdc)
Rows 26–29: Repeat Rows 2–5 once more. (30 hdc)
Rows 30–33: Repeat Rows 2–5 once more. (30 hdc)
Rows 34–37: Repeat Rows 2–5 once more. (30 hdc)
Row 38: Ch 1, hdc in each st across. Turn. (30 hdc)
Row 39: Ch 1, hdc in each st across. Turn. (30 hdc)
Row 40: Ch 1, hdc in each st across. Turn. (30 hdc)
Do not fasten off.
Crescent Neck Shaping (navy)
This section gently rounds the front opening by using shorter sc stitches at the edges and taller hdc in the middle. Every row still has 30 stitches.
Row 41 (WS): Ch 1, sc in first 10 sts, hdc in next 10 sts, sc in last 10 sts. Turn. (30 sts)
Row 42: Ch 1, sc in first 8 sts, hdc in next 14 sts, sc in last 8 sts. Turn. (30 sts)
Row 43: Ch 1, sc in first 6 sts, hdc in next 18 sts, sc in last 6 sts. Turn. (30 sts)
Row 44: Ch 1, sc in first 4 sts, hdc in next 22 sts, sc in last 4 sts. Turn. (30 sts)
Row 45: Ch 1, sc in first 2 sts, hdc in next 26 sts, sc in last 2 sts. Turn. (30 sts)
Row 46: Ch 1, hdc in each st across. Turn. (30 hdc)
Row 47: Ch 1, hdc in each st across. Turn. (30 hdc)
Row 48: Ch 1, hdc in each st across. Turn. (30 hdc)
Fasten off navy, leaving a 24-inch tail for seaming.
Folding and Seaming
Step 1: Lay the rectangle flat with the RS facing up. The crescent-shaped neck edge is the bottom front opening.
Step 2: Fold the rectangle in half widthwise so the short ends meet, with RS together. The crescent neck edge forms the front opening.
Step 3: Thread the navy tail onto your tapestry needle. Whipstitch (bring the needle through both layers from front to back, over the edge, and repeat) the two short ends together from the top edge down to the crescent neck edge. This creates the back seam of the hood.
Step 4: Turn the bonnet RS out. The crescent neck edge now forms the front opening of the hood.
Front Edging (navy)
With RS facing, join navy at the bottom right corner of the front opening. Ch 1, work sc evenly around the entire front opening edge, working 1 sc in each row end and 1 sc in each st along the crescent neck. Join with sl st to first sc. Fasten off. Weave in ends.
Chin Ties (white, make 2)
Tie 1: Join white at the bottom right corner of the front opening. Ch 55. Sl st in 2nd ch from hook and in each ch across. Sl st in the same corner st. Fasten off.
Tie 2: Join white at the bottom left corner of the front opening. Ch 55. Sl st in 2nd ch from hook and in each ch across. Sl st in the same corner st. Fasten off. Weave in ends.
Star Appliqué (white, make 1)
Use the white yarn and 5.5 mm hook. Work in joined rounds.
Round 1: Make a magic ring. Ch 1, work 10 sc into ring. Join with sl st to first sc. (10 sc)
Round 2: Ch 1, sc in same st, *ch 3, sk next st, sc in next st; rep from * around, ending with ch 3, join with sl st to first sc. (5 ch-3 sps)
Round 3: Sl st into first ch-3 sp, ch 1, (sc, hdc, dc, hdc, sc) in same ch-3 sp, *(sc, hdc, dc, hdc, sc) in next ch-3 sp; rep from * around. Join with sl st to first sc. Fasten off, leaving a 10-inch tail. (5 points)
Assembly and Finishing
1. Attach the star. Position the star appliqué centered on the front of the bonnet, about 1 inch above the front opening edge. Pin it in place so it does not shift.
2. Sew the star. Thread the white tail onto your tapestry needle. Sew the star securely to the bonnet, catching the center and each of the five points with a few small stitches. Do not pull too tight or the star will pucker.
3. Weave in ends. Thread each loose yarn tail onto the tapestry needle and run it back and forth through the inside of the work for about 2 inches, then trim close to the fabric. Never knot your ends — knots work loose and create lumps.
4. Block. Lightly mist the bonnet with water (or soak it for 15 minutes and gently squeeze out the excess in a towel). Lay it flat on a towel, gently pat the crescent neck edge into a smooth curve, and pin the star points flat. Allow it to dry completely — usually overnight — before removing the pins.
Pro Tips and Variations
- Change the colors. Try a dusty rose bonnet with a cream star, or a soft gray with a mustard star. Any worsted weight yarn in the same gauge will work beautifully.
- Make it bigger or smaller. To fit a larger head, add 4 chains to your starting chain (each 4 chains adds roughly 1 inch of width) and add extra repeats of Rows 2–5 to lengthen the hood. To fit a smaller head, remove 4 chains and one repeat.
- Substitute the yarn. A soft acrylic-wool blend gives extra warmth, while a cotton blend gives a crisper, more defined stitch. Just check your gauge again — every yarn behaves differently.
- Add more stars. Scatter three small stars across the back of the hood, or swap the single star for a tiny moon appliqué for a nighttime theme.