Ravenclaw Study Beanie Free Pattern: A Dark Academia Crochet Hat
Ravenclaw Study Beanie: A Beginner-Friendly Dark Academia Hat
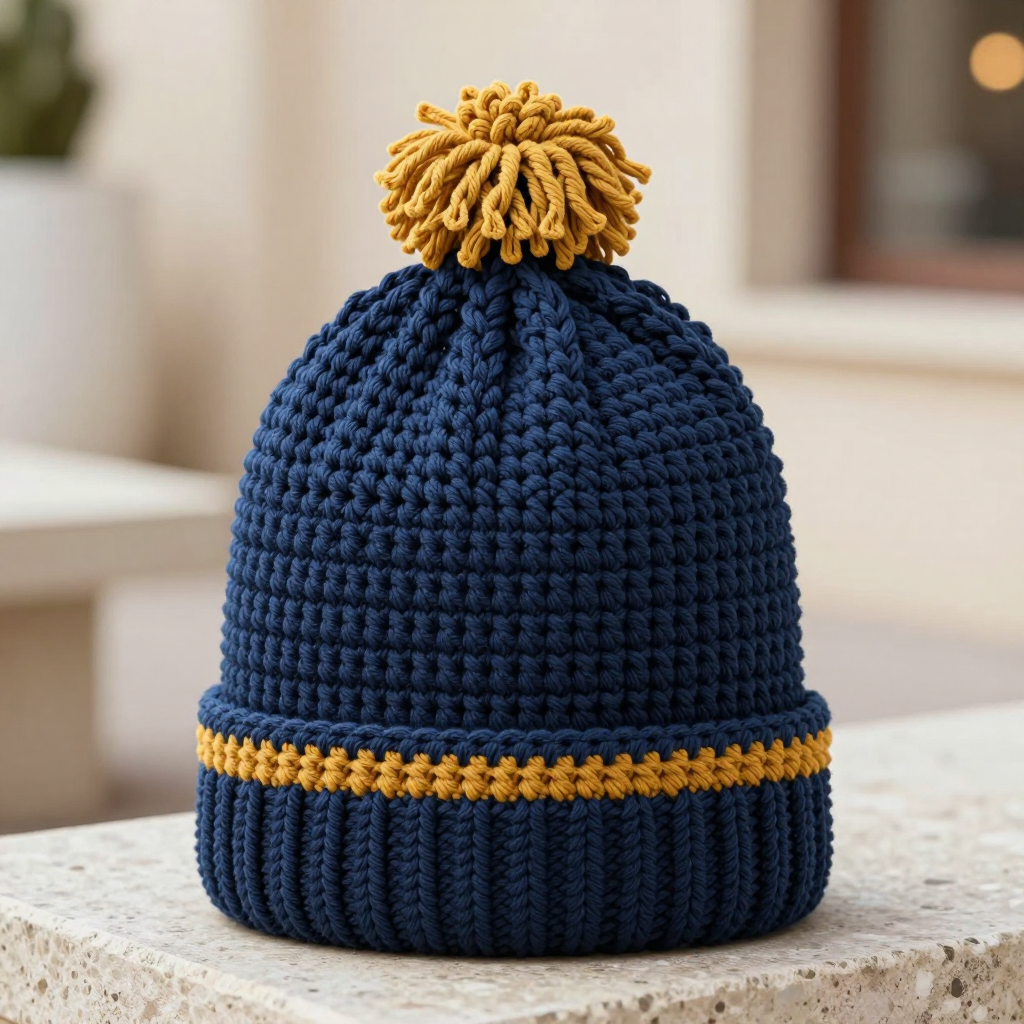
This cozy navy beanie with its single ochre stripe and tiny tassel is the perfect first "real" project for anyone who has just learned a few basic crochet stitches. It looks like something a scholarly student would wear in a candlelit library, yet it is built from the simplest shapes: a stretchy ribbed brim and a straight tube of half double crochet. The finished hat is soft, matte, and gently tapered toward the crown, with a folded brim that hugs your ears and a raised mustard band that adds just the right touch of magic. Because the body is worked in continuous rounds of one easy stitch, you can relax into a soothing rhythm while you practice. By the end you will have a warm, wearable hat you will actually want to show off.
Materials Needed
- Yarn: Worsted weight (category 4) acrylic or wool-blend yarn. Approximately 180–200 yards (165–185 m) navy blue and 10–15 yards (9–14 m) ochre/mustard yellow.
- Main hook: 5.0 mm (US H/8) crochet hook for the hat body.
- Brim hook: 4.5 mm (US G/7) crochet hook for the ribbed brim and the tassel.
- Stitch markers: At least one, ideally several, to mark the first stitch of each round.
- Tapestry needle: A blunt-tipped yarn needle for seaming and weaving in ends.
- Scissors: Sharp craft scissors for cutting yarn.
- Measuring tape: For checking gauge and the brim length.
Finished size: Fits an average adult head circumference of 21–23 inches (53–58 cm). The finished hat circumference is approximately 20 inches (51 cm) unstretched (the ribbed brim stretches to fit), and the finished height with the brim folded up is approximately 9 inches (23 cm).
Abbreviations and Beginner Glossary
- ch – chain: Yarn over the hook and pull the loop through the loop on your hook. This makes a small link; a row of chains is your starting foundation.
- sl st – slip stitch: Insert your hook into the stitch, yarn over, and pull the loop straight through both the stitch and the loop on your hook. It makes a nearly invisible join.
- sc – single crochet: Insert hook into the stitch, yarn over, pull up a loop (2 loops on hook), yarn over again, pull through both loops. One loop remains.
- hdc – half double crochet: Yarn over first, insert hook into the stitch, yarn over, pull up a loop (3 loops on hook), yarn over, pull through all 3 loops at once. One loop remains.
- hdc2tog – half double crochet two together (a decrease): Yarn over, insert hook into the first stitch, yarn over, pull up a loop (3 loops on hook), yarn over, insert hook into the next stitch, yarn over, pull up a loop (5 loops on hook), yarn over, pull through all 5 loops. This turns two stitches into one.
- sc2tog – single crochet two together (a decrease): Insert hook into the first stitch, yarn over, pull up a loop (2 loops), insert hook into the next stitch, yarn over, pull up a loop (3 loops), yarn over, pull through all 3 loops.
- BLO – back loop only: Every stitch has two top loops (a front loop facing you and a back loop behind it). Working in the BLO means you insert your hook only under the back loop, which creates a stretchy ribbed texture.
- FLO – front loop only: Insert your hook only under the front loop (the one closest to you). This leaves the back loop free and makes the new stitch sit slightly raised.
- st(s) – stitch(es): A single completed loop/unit in your fabric.
- rnd – round: One complete circle of stitches worked around the hat.
- turn – flip your work over so you can work back along the row you just made.
- fasten off – Cut the yarn a few inches from the work, then pull the tail all the way through the last loop to lock it.
Gauge
16 stitches and 14 rounds = 4 inches (10 cm) in half double crochet (hdc) with the 5.0 mm hook.
Why gauge matters: Gauge is how many stitches and rounds fit into a set measurement. If your stitches are bigger than the pattern's, your hat will come out too large; if they are smaller, the hat will be too tight. Checking first saves you hours of work.
How to make a gauge swatch: With your 5.0 mm hook and navy yarn, chain 20. Work 1 hdc in the second chain from the hook and in each chain across (19 hdc). Work 15 more rows of hdc, chaining 1 and turning at the end of each row. Lay the swatch flat, place a ruler across the middle, and count how many stitches fit in 4 inches and how many rows fit in 4 inches. If you have more stitches than 16, try a larger hook; if you have fewer, try a smaller hook.
Beginner Tips Before You Start
- Mark your first stitch every round. Because the body is worked in continuous rounds, it is easy to lose your place. Place a stitch marker in the very first stitch of each round and move it up as you go.
- Do not pull your yarn too tight. Tension is the number one beginner struggle. Keep your loops relaxed and even; tight stitches make a stiff, small hat.
- Count your stitches at the end of every round. If a round should have 80 stitches, count them. Catching a mistake right away is far easier than fixing it later.
- Keep the brim ribbing loose. The brim is worked in single crochet back-loop ribbing, which naturally pulls in. Work it gently so it stays stretchy enough to fit over your head.
- Read the whole round before you begin it. Especially on the crown shaping rounds, know where your decreases fall before you pick up your hook.
- Practice the two decrease stitches on scrap yarn first. Try hdc2tog and sc2tog a few times so they feel natural before you reach the crown.
Step-by-Step Instructions
Brim (worked flat in ribbing)
Use the 4.5 mm (G/7) hook and navy blue.
Row 1: Ch 13. Sc in the 2nd ch from hook and in each ch across. Turn. (12 sc)
Row 2: Ch 1, sc in the BLO of each st across. Turn. (12 sc)
Repeat Row 2 until the ribbed strip measures approximately 20 inches (51 cm) unstretched, ending after a wrong-side row. Do not fasten off.
Join the short ends: Bring the two short ends together, ch 1, and work sl st through both thicknesses across to seam the brim into a ring. Turn the ring so the seam is on the inside. Fasten off, leaving a 6-inch tail.
Hat Body
Switch to the 5.0 mm (H/8) hook. Join navy blue with a sl st to the top edge of the brim ring (the edge with the visible ridges facing out).
Rnd 1: Ch 1, work 1 sc in each row-end around the brim edge, spacing evenly to reach 80 sc. Join with a sl st to the first sc. (80 sc)
Rnd 2: Ch 1, hdc in each st around. Join with a sl st to the first hdc. (80 hdc)
Rnds 3–14: Ch 1, hdc in each st around. Join with a sl st to the first hdc. (80 hdc)
The body should measure approximately 5 inches (13 cm) from the brim join.
Ochre Stripe
Rnd 15: Change to ochre. Ch 1, hdc in the FLO of each st around. Join with a sl st to the first hdc. (80 hdc)
Rnd 16: Change back to navy blue. Ch 1, hdc in each st around, working into the back loops of the previous round so the ochre round sits as a raised band. Join with a sl st to the first hdc. (80 hdc)
Crown Shaping
Rnd 17: Ch 1, hdc in each st around. Join. (80 hdc)
Rnd 18: Ch 1, *hdc2tog, hdc in each of the next 6 sts; repeat from * around. Join. (70 hdc)
Rnd 19: Ch 1, hdc in each st around. Join. (70 hdc)
Rnd 20: Ch 1, *hdc2tog, hdc in each of the next 5 sts; repeat from * around. Join. (60 hdc)
Rnd 21: Ch 1, hdc in each st around. Join. (60 hdc)
Rnd 22: Ch 1, *hdc2tog, hdc in each of the next 4 sts; repeat from * around. Join. (50 hdc)
Rnd 23: Ch 1, *hdc2tog, hdc in each of the next 3 sts; repeat from * around. Join. (40 hdc)
Rnd 24: Ch 1, *hdc2tog, hdc in each of the next 2 sts; repeat from * around. Join. (30 hdc)
Rnd 25: Ch 1, *hdc2tog, hdc in the next st; repeat from * around. Join. (20 hdc)
Rnd 26: Ch 1, hdc2tog around. Join. (10 hdc)
Fasten off, leaving a long tail. Thread the tail through the remaining 10 sts and pull tight to close the crown. Weave in the end on the inside.
Crocheted Tassel
Use the 4.5 mm (G/7) hook and ochre.
Rnd 1: Ch 4 and join with a sl st to form a small ring. Ch 1, work 8 sc into the ring. Join with a sl st to the first sc. (8 sc)
Rnds 2–3: Ch 1, sc in each st around. Join. (8 sc)
Rnd 4: Ch 1, sc2tog around. Join. (4 sc)
Fasten off, leaving a 6-inch tail. Thread the tail through the remaining 4 sts and pull tight to form a small rounded tassel head. Use the starting tail to attach the tassel securely to the center of the crown, sewing through the closed top of the hat several times. Weave in all ends.
Assembly and Finishing
Fold the brim: Fold the ribbed brim up approximately 2 inches (5 cm) to the outside so the ridges show.
Weave in ends: Thread each yarn tail onto your tapestry needle and weave it back and forth through the inside of the fabric for about an inch, then trim close to the work. Never knot your ends; weaving hides them securely.
Attach the tassel: If you have not already, sew the tassel firmly to the very center of the crown, passing the needle through the closed top several times so it cannot wobble.
Blocking: Gently steam-block the hat to settle the stitches. Hold a steam iron a few inches above the fabric (never press it down) and let the steam relax the yarn, then let the hat air-dry. Take care not to flatten the ribbing or the raised ochre stripe.
Pro Tips and Variations
- Change the stripe color: Swap the ochre for deep burgundy, forest green, or silver grey to match a different house or a favorite coat. You only need 10–15 yards, so a scrap is plenty.
- Adjust the size: For a smaller hat, work the brim to about 18 inches (46 cm) and start the body with 72 sc instead of 80, then follow the same crown decreases. For a larger hat, work the brim to 22 inches (56 cm) and start with 88 sc.
- Substitute the yarn: A soft wool-blend will be warmer and block beautifully, while acrylic is easy to wash and great for beginners. Just check your gauge again, since different fibers behave differently.
- Add a second stripe: Work another ochre round in the FLO about 1 inch (2.5 cm) below the first for a double-banded look, then continue in navy as written.