Huntsman Riding Hood Free Crochet Pattern: A Victorian Romantic Hooded Cape-Hat
Introduction
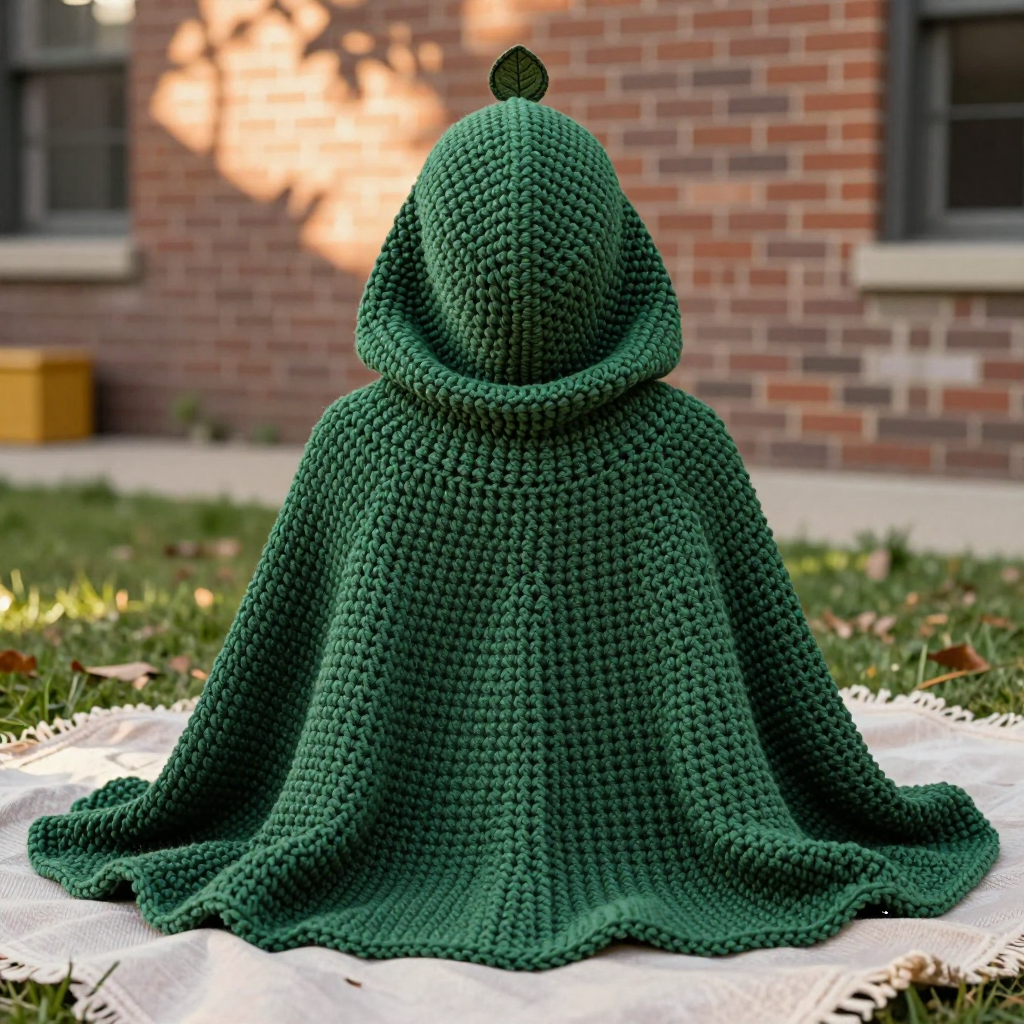
Welcome to the Huntsman Riding Hood, a romantic hooded cape-hat that slips over your head like a hood and drapes over your shoulders like a little riding cape. It is worked as one flat triangle in soft half double crochet, beginning at the front opening and traveling down to a pointed, medieval-inspired tip at the back, finished with a tiny crocheted leaf at the peak. This project is perfect for a confident beginner who has learned the basic stitches and wants to make something that looks far more dramatic than it is difficult. The finished piece is cozy and slightly ridged, in a deep forest green that feels like a walk through an old storybook wood. If you can chain and work a half double crochet, you can make this.
Materials Needed
- Yarn: Worsted weight (category 4) acrylic or wool-blend yarn, approx. 380–420 yds (350–385 m) of forest green.
- Leaf yarn: A small amount (approx. 10 yds) of dark olive worsted weight yarn.
- Main hook: US H/8 (5.0 mm) crochet hook.
- Leaf hook: US G/6 (4.0 mm) crochet hook.
- Stitch markers: At least 4, to mark the first stitch of a row and the unworked stitches of the short rows.
- Tapestry needle: A blunt-tipped yarn needle for weaving in ends and sewing on the leaf.
- Scissors: Sharp craft scissors for cutting yarn.
- Measuring tape: For checking gauge and finished measurements.
- Finished size: Hood depth (front opening to back crown) approx. 13 in (33 cm); cape width across the shoulders approx. 22 in (56 cm); cape length from crown to point approx. 20 in (51 cm). Fits an average adult head of 21–23 in (53–58 cm) circumference.
Abbreviations and Beginner Glossary
- ch – chain: wrap the yarn over the hook and pull it through the loop on your hook. This makes a small link.
- sl st – slip stitch: insert the hook into the stitch, yarn over, and pull the loop straight through both the stitch and the loop on your hook. It makes a flat, tight join.
- sc – single crochet: insert the hook into the stitch, yarn over, pull up a loop (2 loops on hook), yarn over, pull through both loops. One loop remains.
- hdc – half double crochet: yarn over first, insert the hook into the stitch, yarn over, pull up a loop (3 loops on hook), yarn over, pull through all 3 loops at once. One loop remains.
- dc – double crochet: yarn over, insert the hook into the stitch, yarn over, pull up a loop (3 loops on hook), yarn over, pull through 2 loops, yarn over, pull through the last 2 loops.
- hdc2tog – half double crochet two together (a decrease): yarn over, insert the hook into the first stitch, yarn over, pull up a loop (3 loops on hook), yarn over, insert the hook into the next stitch, yarn over, pull up a loop (5 loops on hook), yarn over, pull through all 5 loops at once. Two stitches become one.
- 2 hdc in next st – an increase: work two separate half double crochets into the same stitch, making one extra stitch.
- st(s) – stitch(es): one completed loop or "V" in your fabric.
- ch-2 sp – chain-2 space: the little gap made by two chain stitches in a previous row.
- turn – flip your work over so you can work back across the row you just finished.
- fasten off – cut the yarn a few inches from the work and pull the tail all the way through the last loop to lock it.
- work even – work one stitch into each stitch with no increases or decreases.
Gauge
Gauge: 14 hdc x 12 rows = 4 in (10 cm) with the 5.0 mm hook in half double crochet.
Gauge matters because it is how we make sure your cape ends up the same size as the pattern. If your stitches are bigger than the gauge, the hood will be too large and droopy; if they are smaller, it will be too tight. To check, crochet a small square about 6 in (15 cm) wide in hdc, then lay it flat and measure 4 in (10 cm) across the middle. Count how many stitches fit in that 4 in and how many rows fit in 4 in vertically. If you have more stitches than 14, your tension is tight — try a larger hook. If you have fewer, your tension is loose — try a smaller hook. Always measure in the middle of the swatch, never at the edges.
Beginner Tips Before You Start
- Mark your first stitch. Place a stitch marker in the first stitch of every row. The turning chain can look like a stitch and cause you to gain or lose stitches without noticing.
- Do not pull the yarn too tight. Keep your loops relaxed and even. Tight tension makes the fabric stiff and shrinks the finished size.
- Count every row. Because this pattern increases and decreases, count your stitches at the end of each row and compare to the number in parentheses. Catching a mistake early saves a lot of unraveling.
- Use markers for the short rows. In the crown section you will leave stitches unworked. Pop a marker into each unworked stitch so you can find it again on Row 37.
- Work the turning chain correctly. The ch 1 at the start of each row does not count as a stitch. Work your first hdc into the very first stitch, not into the chain.
- Keep your leaf separate. Make the leaf last with the smaller hook so it stays crisp and small, then sew it on once the cape is finished.
Step-by-Step Instructions
Hood (worked flat, turning at the end of each row)
Row 1: Ch 3, hdc in 2nd ch from hook, hdc in last ch. (2 hdc)
Row 2: Ch 1, turn. 2 hdc in each st across. (4 hdc)
Row 3: Ch 1, turn. Hdc in each st across. (4 hdc)
Row 4: Ch 1, turn. Hdc in first st, 2 hdc in next st, hdc in each of next 2 sts. (5 hdc)
Row 5: Ch 1, turn. Hdc in each st across. (5 hdc)
Row 6: Ch 1, turn. Hdc in first 2 sts, 2 hdc in next st, hdc in last 2 sts. (6 hdc)
Row 7: Ch 1, turn. Hdc in each st across. (6 hdc)
Row 8: Ch 1, turn. Hdc in first 2 sts, 2 hdc in next st, hdc in each st to end. (7 hdc)
Rows 9–28: Repeat Row 8, increasing 1 st every other row, until you have 17 hdc. Then work even on 17 hdc for 2 rows. (17 hdc) The hood front opening should now measure approx. 13 in (33 cm) deep and approx. 5 in (13 cm) wide at the base.
Rounded Crown (short-row wedges worked into the back edge of the hood)
Row 29 (short row): Ch 1, turn. Hdc in first 12 sts, leaving last 5 sts unworked. (12 hdc)
Row 30: Ch 1, turn. Hdc in each st across. (12 hdc)
Row 31: Ch 1, turn. Hdc in first 9 sts, leaving last 3 sts unworked. (9 hdc)
Row 32: Ch 1, turn. Hdc in each st across. (9 hdc)
Row 33: Ch 1, turn. Hdc in first 6 sts, leaving last 3 sts unworked. (6 hdc)
Row 34: Ch 1, turn. Hdc in each st across. (6 hdc)
Row 35: Ch 1, turn. Hdc in first 3 sts, leaving last 3 sts unworked. (3 hdc)
Row 36: Ch 1, turn. Hdc in each st across. (3 hdc)
Row 37: Ch 1, turn. Hdc in each st across, then work 3 hdc evenly along the side edge of the wedge, then hdc in each of the 5 unworked sts from Row 29. (11 hdc)
Row 38: Ch 1, turn. Hdc in each st across, working 1 hdc in each side-edge st of the wedge. (17 hdc)
Row 39: Ch 1, turn. Hdc in each st across. (17 hdc)
The crown should now be rounded and sit smoothly at the back of the head.
Cape Triangle (widening from the hood base)
Row 40: Ch 1, turn. Hdc in first st, 2 hdc in next st, hdc in each st across, 2 hdc in last st. (19 hdc)
Row 41: Ch 1, turn. Hdc in each st across. (19 hdc)
Row 42: Ch 1, turn. Hdc in first st, 2 hdc in next st, hdc in each st across, 2 hdc in last st. (21 hdc)
Rows 43–70: Repeat Rows 41–42, increasing 2 sts every other row, until you have 49 hdc. Then work even on 49 hdc for 2 rows. (49 hdc) The cape should measure approx. 22 in (56 cm) wide across the shoulders and approx. 20 in (51 cm) from crown to point.
Pointed Medieval Tip
Row 71: Ch 1, turn. Hdc2tog, hdc in each st across to last 2 sts, hdc2tog. (47 hdc)
Row 72: Ch 1, turn. Hdc in each st across. (47 hdc)
Rows 73–94: Repeat Rows 71–72, decreasing 2 sts every other row, until 3 hdc remain. (3 hdc)
Row 95: Ch 1, turn. Hdc2tog, hdc in last st. (2 hdc)
Row 96: Ch 1, turn. Hdc2tog. (1 hdc) Fasten off, leaving a 6-in (15 cm) tail. Weave the tail through the final st and pull to close the point.
Leaf (make 1 with dark olive and the 4.0 mm hook)
Row 1: Ch 7. Sc in 2nd ch from hook, hdc in next ch, dc in next ch, hdc in next ch, sc in next ch, sl st in last ch. (6 sts)
Row 2: Ch 1, turn. Sl st in first st, sc in next st, hdc in next st, dc in next st, hdc in next st, sc in last st. Fasten off, leaving a 6-in (15 cm) tail.
Sew the leaf to the pointed tip of the cape with the leaf tail, positioning it so the leaf points upward along the tip.
Assembly and Finishing
Weave in the ends. Thread each yarn tail onto the tapestry needle and run it back and forth through the wrong side of the fabric for about 2 in (5 cm), following the path of the stitches. Trim the excess close to the fabric. Never knot your ends — weaving hides them neatly.
Sew on the leaf. Place the leaf at the very tip of the point, pointing upward. Using the leaf tail and the tapestry needle, take a few small stitches through the base of the leaf and into the cape, then weave the tail into the back of the cape and trim.
Optional edging. If you would like a neat border, join your forest green yarn at the bottom edge of the front opening with a sl st. Work one round of sc evenly around the entire outer edge of the hood and cape — about 1 sc in every stitch along the straight edges and 1 sc in every row-end along the slanted edges. Join with a sl st to the first sc, fasten off, and weave in the end.
Blocking. Lightly mist the finished cape with cool water and lay it flat on a towel, shaping the hood round and smoothing the point. Pin the edges gently if you like and leave it to dry completely. Blocking relaxes the stitches so the fabric hangs softly and the leaf sits flat.
Pro Tips and Variations
- Change the color story. Try deep burgundy, charcoal, or oatmeal for a different fairy-tale mood. Work the leaf in a contrasting shade so it pops against the cape.
- Adjust the size. To make it larger, add extra increase rows in the cape triangle before beginning the point. To make it smaller, stop the increases a few stitches earlier. Each extra increase row adds about 2 stitches of width.
- Substitute yarn. A worsted wool or wool-blend gives a warmer, more rustic fabric; a soft acrylic is easy to wash and great for beginners. Always check your gauge with the new yarn before you begin.
- Add a tie or clasp. Crochet a simple chain of about 20 in (51 cm) and thread it through the front opening as a tie, or sew on a decorative button and loop for a Victorian finishing touch.