The Azure Dune Crochet Blanket Free Pattern – A Wavy Blue Oasis
The Azure Dune Crochet Blanket Free Pattern – A Wavy Blue Oasis
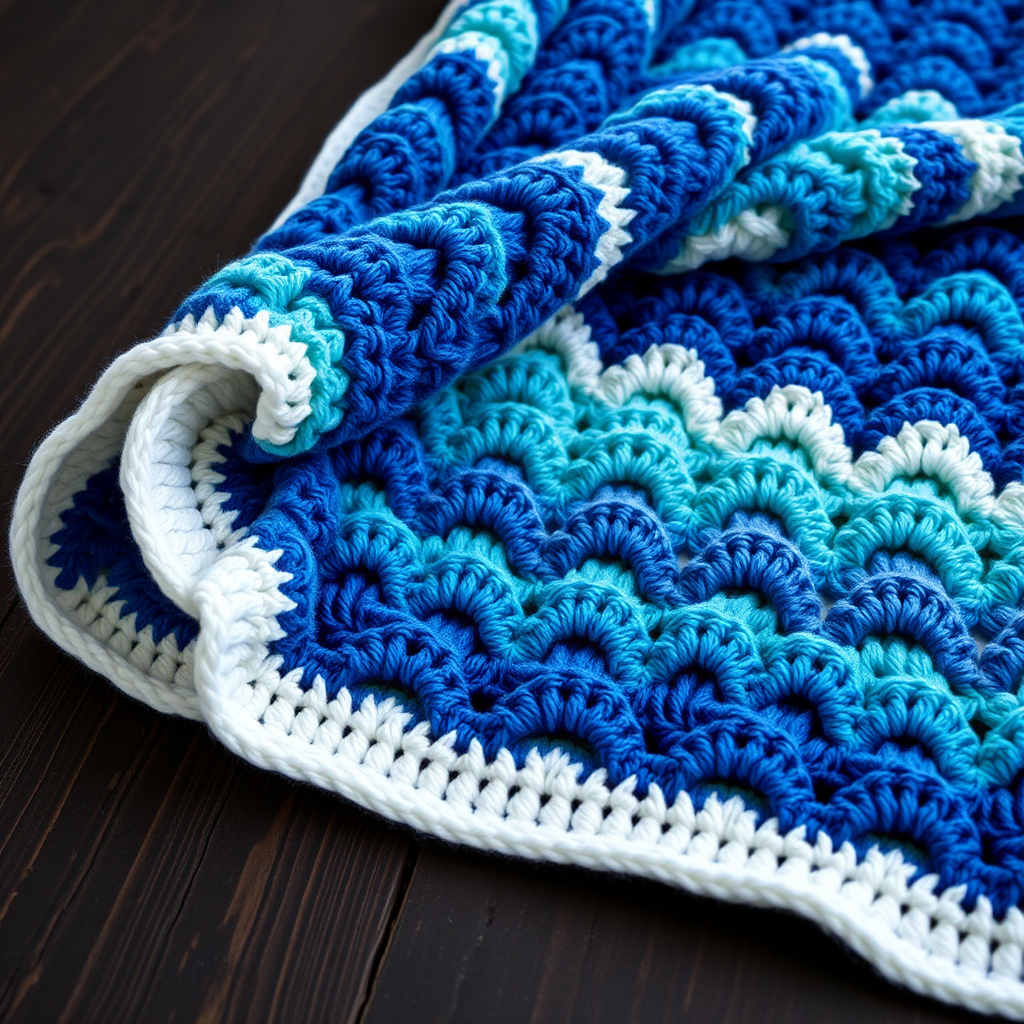
Imagine wrapping yourself in the soothing rhythm of ocean waves, the gentle ebb and flow of a tranquil sea captured in every stitch. The Azure Dune Crochet Blanket brings that serene coastal calm directly into your living space. This modern throw features a uniquely textured ripple stitch that creates gentle peaks and valleys across its surface, evoking the look of waves rolling onto a sandy shore. With a palette flowing from deep royal blue through bright turquoise and light blue, accented by white wave crests, this blanket is a cozy, handmade masterpiece that feels like a deep breath of sea air. Whether you're an experienced crocheter or a confident beginner ready for a rewarding project, this pattern is designed to guide you through creating a stunning, drapey throw that will become a cherished heirloom.
Materials Needed
Before you begin your journey to crafting this wavy oasis, gather the following materials. The quality of your yarn and tools will directly impact the final look and feel of your blanket, so choose supplies that you love.
- Yarn: Red Heart Super Saver (or any worsted weight acrylic yarn) in 4 shades of blue – 2 skeins each of 'Blue', 'Turqua', 'Light Blue', and 'Royal'. You will also need 1 skein of 'White' for the wave crests and border.
- Crochet Hook: 5.5 mm (I-9) crochet hook. This size is perfect for achieving the dense, cozy texture of the wave stitch.
- Other Tools: A yarn needle for weaving in ends, a pair of scissors, and a stitch marker (optional, but helpful for keeping track of your rows).
Gauge: 14 stitches x 8 rows = 4 inches in wave stitch pattern. While gauge is important for size, this blanket is forgiving. If your blanket is slightly larger or smaller, it will still be beautiful and functional.
Step-by-Step Instructions
This pattern is built on a simple, repetitive ripple stitch that creates the beautiful wave effect. The key is to maintain consistent tension and follow the color changes carefully. Let's dive in!
Foundation Row
With your 'Blue' yarn, chain 122 loosely. This chain should feel relaxed and not tight, as it forms the base of your blanket. (Remember: The pattern is a multiple of 12 + 2, so 122 chains gives you 120 stitches for your first row.)
Row 1: Establishing the Wave Pattern
Single crochet (sc) in the 2nd chain from your hook. Now, follow this sequence across the row:
- Sc in the next 5 chains.
- Work 3 sc in the next chain (this creates the peak of your wave).
- Sc in the next 5 chains.
- Skip the next 2 chains (this creates the valley of your wave).
Repeat this sequence from * across the row, ending with a sc in the very last chain. Turn your work. You should have 120 stitches total.
Row 2: Building the Ripple
Chain 1 (this counts as your turning chain, but does not count as a stitch). Sc in the first stitch. Now, repeat the same sequence as Row 1:
- Sc in the next 5 stitches.
- Work 3 sc in the next stitch.
- Sc in the next 5 stitches.
- Skip the next 2 stitches.
Repeat from * across, ending with a sc in the last stitch. Turn your work.
Row 3: Introducing the First Color Change
Repeat Row 2, but here's the crucial part: change to 'Turqua' in the last yarn over of the final single crochet. This means when you are working the very last sc of the row, you will insert your hook, yarn over with 'Blue', pull through, then yarn over with 'Turqua' and pull through both loops on your hook to complete the stitch. This creates a seamless color transition. Turn your work.
Rows 4–18: The Color Sequence
Continue repeating Row 2, following this color sequence. Remember to always make the color change on the last yarn over of the final sc of the row.
- Row 4: With 'Turqua', repeat Row 2.
- Row 5: Repeat Row 2, but change to 'Light Blue' at the end.
- Row 6: With 'Light Blue', repeat Row 2.
- Row 7: Repeat Row 2, but change to 'Royal' at the end.
- Row 8: With 'Royal', repeat Row 2.
- Row 9: Repeat Row 2, but change to 'White' at the end.
- Row 10: With 'White', repeat Row 2.
- Row 11: Repeat Row 2, but change to 'Royal' at the end.
- Row 12: With 'Royal', repeat Row 2.
- Row 13: Repeat Row 2, but change to 'Light Blue' at the end.
- Row 14: With 'Light Blue', repeat Row 2.
- Row 15: Repeat Row 2, but change to 'Turqua' at the end.
- Row 16: With 'Turqua', repeat Row 2.
- Row 17: Repeat Row 2, but change to 'Blue' at the end.
- Row 18: With 'Blue', repeat Row 2.
Rows 19–100: Repeating the Sequence
Now that you've completed one full color sequence (Rows 3–18), you will repeat this exact sequence five more times. This means you will continue working Rows 3 through 18 again and again, maintaining the color changes precisely as written. This will give you a total of 100 rows, or you can continue until you reach your desired length. The blanket in the example is approximately 65 inches long, but you can easily adjust this to make a smaller lap blanket or a larger bedspread.
Adding the Finishing Border
Once you've reached your desired length, it's time to add a clean, polished edge. With your 'White' yarn, single crochet evenly around the entire blanket. When you reach each corner, work 3 single crochet stitches into the corner stitch to ensure the border lays flat and turns the corner neatly. Join with a slip stitch to the first single crochet of the round. Fasten off and weave in all loose ends with your yarn needle.
Your Azure Dune Crochet Blanket is now complete! Lay it out, admire the beautiful waves, and enjoy the cozy, handmade warmth it brings to your home. This pattern is a wonderful way to practice color changes and create a stunning piece of decor that reflects the calm beauty of the ocean.


