The Celestial Mosaic Kippah Free Pattern – A Modern Crocheted Yarmulke with Starry Texture
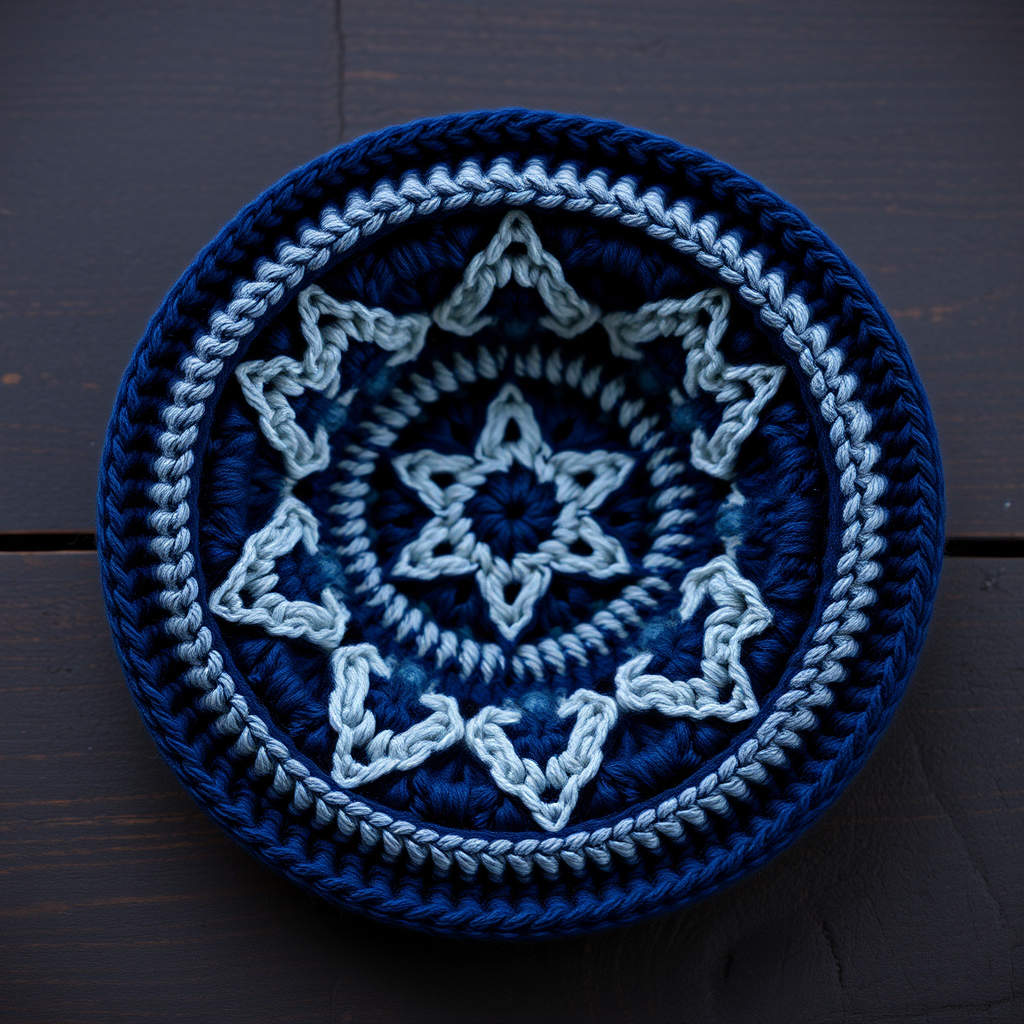
The Celestial Mosaic Kippah: A Modern Crochet Masterpiece
Elevate the traditional yarmulke with a contemporary mosaic-inspired design featuring subtle star motifs and a soft, luxurious feel. This crochet pattern creates a beautifully textured kippah that honors heritage while embracing modern style. Whether you're crafting for a special occasion, a daily mitzvah, or simply exploring new crochet techniques, this pattern offers a rewarding project that blends tradition with artistic innovation.
The Celestial Mosaic Kippah is more than just a head covering—it's a statement piece. The deep navy and silver color palette evokes a starry night sky, while the raised, textured star pattern catches the light beautifully. This pattern is perfect for intermediate crocheters ready to expand their skills, but with clear instructions, even confident beginners can achieve stunning results.
Why You'll Love This Pattern
- Unique Design: The mosaic star pattern is visually striking and unlike typical kippah designs
- Premium Feel: Worsted-weight cotton yarn creates a soft, durable, and breathable fabric
- Customizable: Choose any two contrasting colors to match your personal style or occasion
- Practical: The ribbed edge ensures a snug, comfortable fit that stays in place
Materials Needed
Before you begin, gather the following supplies to ensure a smooth crafting experience:
| Item | Specification |
|---|---|
| Yarn | Worsted weight cotton or cotton-blend yarn in two contrasting colors (e.g., deep navy and soft silver, or forest green and cream). You'll need approximately 150-200 yards of main color (MC) and 50-75 yards of contrasting color (CC). |
| Crochet Hook | US G/6 (4.0 mm) crochet hook |
| Notions | Stitch markers, tapestry needle for weaving ends, scissors |
| Gauge | 16 sc x 18 rows = 4 inches (10 cm) in single crochet |
Note: Adjust hook size if needed to achieve the correct gauge. A tighter gauge will result in a smaller kippah, while a looser gauge will make it larger.
Step-by-Step Instructions
Understanding the Pattern
Finished Size: Fits average adult head circumference (approx. 21-22 inches). Adjust hook size to achieve desired fit.
Abbreviations:
- ch = chain
- sc = single crochet
- hdc = half double crochet
- dc = double crochet
- sl st = slip stitch
- st(s) = stitch(es)
- rnd = round
- MC = main color
- CC = contrasting color
Important Notes:
- Work in continuous spiral unless otherwise indicated. This means you won't join rounds with a slip stitch—you'll simply continue working in the round.
- Use a stitch marker to mark the beginning of each round. Move the marker up as you complete each round.
- When working the mosaic pattern, "front loop only" means you insert your hook only under the front loop of the stitch (the loop closest to you), leaving the back loop unworked. This creates the raised, textured effect.
Part 1: The Crown (Top of Kippah)
The crown is worked in a continuous spiral, increasing evenly each round to create a flat, circular top. Follow these rounds carefully, counting your stitches as you go:
Rnd 1: With MC, make a magic ring, ch 1, work 8 sc into ring. Pull tight to close. (8 sts)
Rnd 2: Work 2 sc in each st around. (16 sts)
Rnd 3: *Sc in next st, 2 sc in next st; repeat from * around. (24 sts)
Rnd 4: *Sc in next 2 sts, 2 sc in next st; repeat from * around. (32 sts)
Rnd 5: *Sc in next 3 sts, 2 sc in next st; repeat from * around. (40 sts)
Rnd 6: *Sc in next 4 sts, 2 sc in next st; repeat from * around. (48 sts)
Rnd 7: *Sc in next 5 sts, 2 sc in next st; repeat from * around. (56 sts)
Rnd 8: *Sc in next 6 sts, 2 sc in next st; repeat from * around. (64 sts)
Rnd 9: *Sc in next 7 sts, 2 sc in next st; repeat from * around. (72 sts)
Rnd 10: *Sc in next 8 sts, 2 sc in next st; repeat from * around. (80 sts)
Rnd 11: *Sc in next 9 sts, 2 sc in next st; repeat from * around. (88 sts)
Rnd 12: *Sc in next 10 sts, 2 sc in next st; repeat from * around. (96 sts)
Rnd 13: *Sc in next 11 sts, 2 sc in next st; repeat from * around. (104 sts)
Rnd 14: *Sc in next 12 sts, 2 sc in next st; repeat from * around. (112 sts)
Rnd 15: *Sc in next 13 sts, 2 sc in next st; repeat from * around. (120 sts)
Rnd 16: *Sc in next 14 sts, 2 sc in next st; repeat from * around. (128 sts)
Rnd 17: *Sc in next 15 sts, 2 sc in next st; repeat from * around. (136 sts)
Rnd 18: *Sc in next 16 sts, 2 sc in next st; repeat from * around. (144 sts)
Rnd 19: *Sc in next 17 sts, 2 sc in next st; repeat from * around. (152 sts)
Rnd 20: *Sc in next 18 sts, 2 sc in next st; repeat from * around. (160 sts)
Pro Tip: The magic ring technique creates a seamless, tight center. If you're new to magic rings, practice a few times before starting—it's worth mastering for a professional finish.
Part 2: The Body (Sides)
Now we'll shape the sides of the kippah. The increases become less frequent as we transition from the flat crown to the curved sides. This gradual shaping creates the domed silhouette that sits comfortably on the head.
Rnd 21-24: Sc in each st around. (160 sts)
Rnd 25: *Sc in next 19 sts, 2 sc in next st; repeat from * around. (168 sts)
Rnd 26-28: Sc in each st around. (168 sts)
Rnd 29: *Sc in next 20 sts, 2 sc in next st; repeat from * around. (176 sts)
Rnd 30-32: Sc in each st around. (176 sts)
Rnd 33: *Sc in next 21 sts, 2 sc in next st; repeat from * around. (184 sts)
Rnd 34-36: Sc in each st around. (184 sts)
Rnd 37: *Sc in next 22 sts, 2 sc in next st; repeat from * around. (192 sts)
Rnd 38-40: Sc in each st around. (192 sts)
Note: The body should now measure approximately 4-5 inches from the center of the crown. If it's significantly larger or smaller, adjust your hook size accordingly.
Part 3: The Mosaic Star Pattern
This is where the magic happens! The mosaic pattern creates eight-pointed stars using a clever combination of single crochet and front-loop-only double crochet. The front-loop technique creates raised "bars" that form the star outlines against the contrasting background.
Rnd 41: With MC, *sc in next 3 sts, dc in next st (worked in front loop only), sc in next 3 sts; repeat from * around. (192 sts)
Rnd 42: With CC, *sc in next 2 sts, dc in next st (front loop only), sc in next 3 sts, dc in next st (front loop only), sc in next 2 sts; repeat from * around. (192 sts)
Rnd 43: With MC, *sc in next st, dc in next st (front loop only), sc in next 5 sts, dc in next st (front loop only), sc in next st; repeat from * around. (192 sts)
Rnd 44: With CC, *dc in next st (front loop only), sc in next 7 sts, dc in next st (front loop only), sc in next st; repeat from * around. (192 sts)
Rnd 45: With MC, *sc in next 3 sts, dc in next st (front loop only), sc in next 3 sts; repeat from * around. (192 sts)
Rnd 46: With CC, *sc in next 2 sts, dc in next st (front loop only), sc in next 3 sts, dc in next st (front loop only), sc in next 2 sts; repeat from * around. (192 sts)
Rnd 47: With MC, *sc in next st, dc in next st (front loop only), sc in next 5 sts, dc in next st (front loop only), sc in next st; repeat from * around. (192 sts)
Rnd 48: With CC, *dc in next st (front loop only), sc in next 7 sts, dc in next st (front loop only), sc in next st; repeat from * around. (192 sts)
Pro Tip: When changing colors, work the last yarn-over of the final stitch of the old color with the new color. This creates a seamless transition without a visible "step."
Visual Guide: The pattern repeats every 8 stitches. In Rnd 41, you'll have a raised dc, then 3 sc, then another raised dc, then 3 sc—this creates the star points. As you progress through the rounds, the raised stitches shift position to form the star shapes.
Part 4: The Ribbed Edge
The ribbed edge provides a stretchy, comfortable band that helps the kippah stay securely on the head. The alternating sc and hdc creates a subtle texture that complements the star pattern above.
Rnd 49-52: With MC, *sc in next st, hdc in next st; repeat from * around. (192 sts)
Rnd 53: Sl st in each st around. Fasten off and weave in ends.
Note: The slip stitch round creates a clean, finished edge that won't stretch out of shape.
Part 5: Finishing Touches
Blocking: Block the kippah lightly to shape. To block, wet the kippah with lukewarm water, gently squeeze out excess (don't wring!), and shape it over a small bowl or balloon to dry. This helps the stitches settle and the star pattern to pop.
Optional Lining: If desired, add a small fabric lining to the inside for extra comfort and durability. Cut a circle of soft fabric slightly smaller than the kippah, sew it in place with a needle and thread, and enjoy the added softness against your head.
Weaving Ends: Use a tapestry needle to weave in all loose ends securely. Make sure to weave them through the wrong side of the work so they're invisible from the outside.
Tips for Success
- Count Your Stitches: Especially during the increase rounds, counting ensures your kippah stays flat and even.
- Use Stitch Markers: Place a marker at the beginning of each round to track your progress, especially during the mosaic pattern.
- Practice the Front Loop Technique: If you're new to front-loop-only stitches, practice on a small swatch first to get comfortable with the technique.
- Choose Quality Yarn: Cotton yarn holds its shape beautifully and gets softer with each wash. It's the perfect choice for a kippah that will be worn regularly.
- Customize Your Colors: While navy and silver create a celestial look, don't be afraid to experiment with other combinations. Forest green and cream evoke a woodland feel, while burgundy and gold add a regal touch.
Wearing and Caring for Your Kippah
Your Celestial Mosaic Kippah is designed for everyday wear. The cotton yarn is breathable and comfortable, making it suitable for all-day use. To care for your kippah, hand wash in cold water with a gentle detergent and lay flat to dry. Avoid wringing or twisting, which can distort the shape.
This kippah also makes a thoughtful gift for bar mitzvahs, weddings, or other special occasions. Consider making one in the recipient's favorite colors or to match a specific outfit.
Share Your Creation
We'd love to see your Celestial Mosaic Kippah! Share your finished project on social media with the hashtag #CelestialMosaicKippah and tag us so we can admire your handiwork. Whether you're a seasoned crocheter or new to the craft, this pattern offers a beautiful way to create something meaningful and unique.
Happy crocheting, and may your kippah bring you comfort, style, and a touch of celestial beauty!


