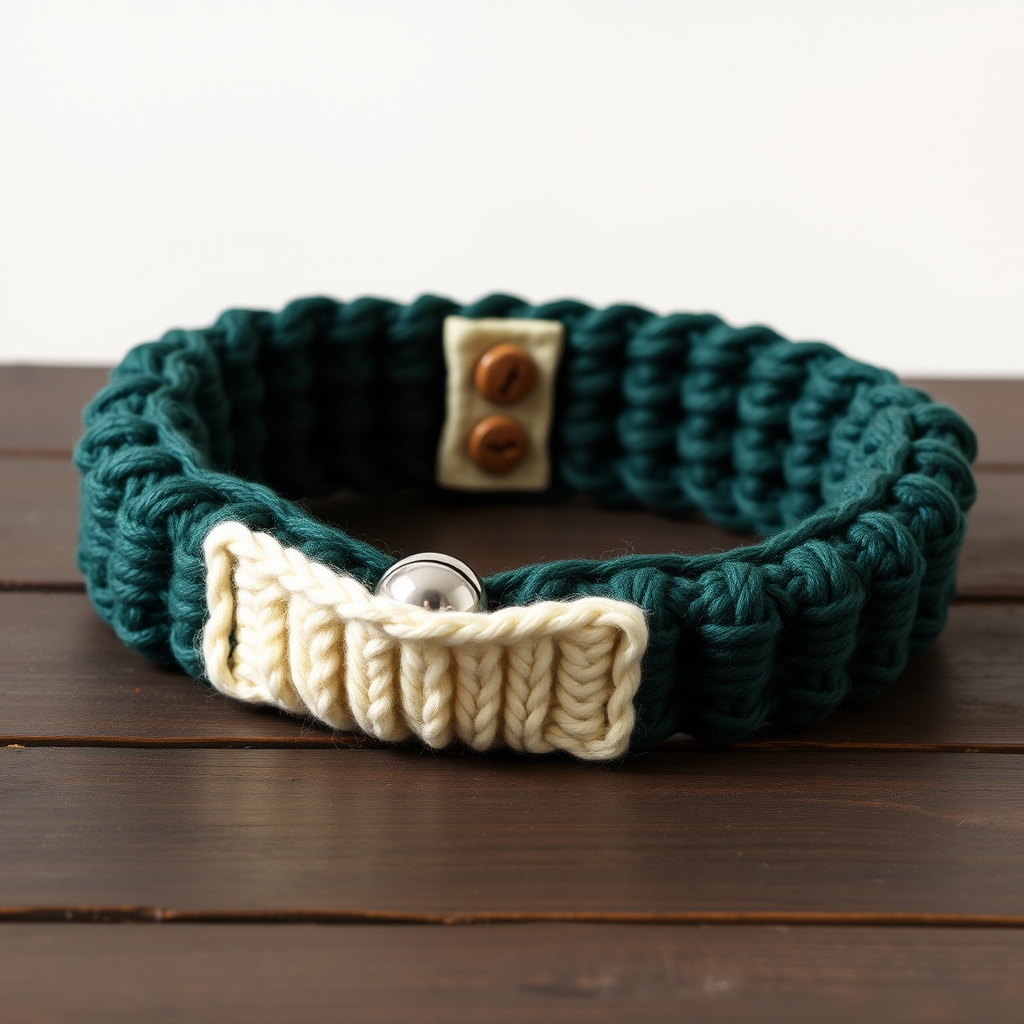
The Cloverfield Canine Collar Free Pattern – A Knitted Meadow for Your Pup

Introducing The Cloverfield Canine Collar: A Knitted Meadow for Your Pup
Imagine a leisurely walk through a sun-dappled meadow, the scent of fresh clover in the air, and your loyal companion trotting happily beside you. Now, imagine capturing that serene, nature-loving spirit in a handcrafted accessory that’s as unique as your furry friend. That’s the magic of the Cloverfield Canine Collar.
This isn’t just a dog collar; it’s a statement piece. Knitted with soft, durable cotton yarn, this pattern combines the timeless elegance of twisted cables with the playful texture of bobble stitches, creating a lush, dimensional surface that mimics a field of clovers. The rich forest green base is accented with three delicate, cream-colored clover appliqués, adding a touch of whimsy and charm that will make your pup the envy of the dog park.
Whether you’re a seasoned knitter looking for a quick, satisfying project or a brave beginner ready to tackle a few new techniques, this free pattern is designed to guide you every step of the way. The result is a sturdy, comfortable, and utterly adorable collar that’s perfect for everyday adventures. Let’s get those needles clicking!
Materials Needed: Gathering Your Knitting Meadow
Before we dive into the stitches, let’s gather our supplies. This project is wonderfully portable and requires only a few essential items, most of which you likely already have in your knitting bag.
Yarn
- Worsted weight cotton yarn (e.g., Lion Brand 24/7 Cotton) in two colors:
- Main Color (MC): Forest Green – approximately 100-150 yards, depending on the final length.
- Contrast Color (CC): Cream – a small amount for the clover appliqués (about 20 yards).
Why cotton? Cotton is an excellent choice for pet accessories. It’s durable, washable, and breathable, making it comfortable for your dog to wear all day long. The 24/7 Cotton line is particularly smooth and has excellent stitch definition, which will make your cables and bobbles really pop.
Needles & Notions
- US Size 6 (4.0 mm) knitting needles – straight or circular, whichever you prefer for flat knitting.
- Tapestry needle – for weaving in ends and sewing on the appliqués and button.
- Stitch markers – to help you keep track of your pattern repeats.
- Cable needle – for the C4B and C4F stitches.
- One button – approximately ¾ inch in diameter, in a matching green or a contrasting wood tone.
- Optional: A D-ring and a small piece of fabric or ribbon for a leash attachment loop.
Gauge
20 stitches and 28 rows = 4 inches in stockinette stitch (blocked).
While gauge isn’t critical for a collar’s fit (since it’s adjustable), it’s always a good practice to check. A correct gauge ensures your fabric is the right density – not too stiff, not too flimsy. If your gauge is off, simply adjust your needle size up or down.
Step-by-Step Instructions: Knitting Your Cloverfield Collar
Now for the fun part! We’ll break this down into manageable sections. The pattern is worked flat, back and forth, and is composed of the main collar body, a buttonhole tab, and the adorable clover embellishments. Don’t be intimidated by the special stitches – we’ll walk through each one clearly.
Special Stitches & Abbreviations
- k: knit
- p: purl
- k2tog: knit two stitches together (decrease)
- yo: yarn over (increase)
- MB (Make Bobble): Knit into the front and back of the same stitch 3 times (you'll have 6 stitches on your right needle). Turn your work, purl these 6 stitches. Turn again, knit these 6 stitches. Now, pass the 2nd, 3rd, 4th, 5th, and 6th stitches over the 1st stitch, one at a time. You'll be left with 1 stitch. This creates a lovely, raised bobble.
- C4B (Cable 4 Back): Slip 2 stitches onto your cable needle and hold it to the back of your work. Knit the next 2 stitches from your left needle, then knit the 2 stitches from the cable needle.
- C4F (Cable 4 Front): Slip 2 stitches onto your cable needle and hold it to the front of your work. Knit the next 2 stitches from your left needle, then knit the 2 stitches from the cable needle.
Finished Size
This pattern creates a collar that fits neck sizes 12–16 inches. The length is easily adjustable by adding or removing repeats of the 8-row pattern, so you can customize it perfectly for your dog.
Knitting the Collar Body
The collar begins and ends with a stretchy, comfortable ribbed section, with the beautiful clover pattern in the middle.
- Cast On: With your Main Color (MC), cast on 20 stitches.
- Ribbing:
- Row 1 (RS): *K2, p2; repeat from * across (ending with k2).
- Row 2 (WS): *P2, k2; repeat from * across (ending with p2).
- Repeat Rows 1 and 2 until the ribbing measures 1 inch (about 6 rows).
- Begin the Clover Pattern: Now we’ll start the main pattern. Work the following 8 rows, which form the core of the design.
- Row 1 (RS): K2, p2, k2, p2, MB, p2, k2, p2, k2.
- Row 2 (WS): P2, k2, p2, k2, p2, k2, p2, k2, p2.
- Row 3 (RS): K2, p2, C4B, p2, k2, p2, C4F, p2, k2.
- Row 4 (WS): P2, k2, p2, k2, p2, k2, p2, k2, p2.
- Row 5 (RS): K2, p2, k2, p2, MB, p2, k2, p2, k2.
- Row 6 (WS): P2, k2, p2, k2, p2, k2, p2, k2, p2.
- Row 7 (RS): K2, p2, C4F, p2, k2, p2, C4B, p2, k2.
- Row 8 (WS): P2, k2, p2, k2, p2, k2, p2, k2, p2.
- Repeat: Continue repeating Rows 1–8 until the collar measures your desired length. For a 12-inch neck, knit until the piece measures about 10 inches from the cast-on edge (the ribbing and button tab will add the extra length). For a 16-inch neck, knit until it measures about 14 inches. Always end after completing a WS row (Row 2, 4, 6, or 8).
- Finishing Ribbing: Work in the same k2, p2 ribbing as before for 1 inch (about 6 rows). Bind off all stitches in pattern (knit the knits and purl the purls as you bind off).
Creating the Buttonhole Tab
This small tab is what secures the collar around your dog’s neck. It’s worked perpendicular to the main body at one end.
- With MC, pick up and knit 8 stitches along the end of the collar where you began (the cast-on edge). This will be the end that wraps under your dog’s neck.
- Row 1 (WS): Purl all 8 stitches.
- Row 2 (RS): K3, k2tog, yo, k3. (This creates the buttonhole.)
- Row 3 (WS): Purl all 8 stitches.
- Row 4 (RS): Knit all 8 stitches.
- Bind off all stitches loosely. Weave in this yarn end.
Knitting the Clover Embellishments (Make 3)
These little clovers are the heart of the design. They’re simple to knit and add so much charm. We’ll use the Contrast Color (CC) for these.
- With CC, cast on 3 stitches.
- Row 1 (RS): K1, yo, k1, yo, k1. (You now have 5 stitches.)
- Row 2 (WS): Purl all.
- Row 3 (RS): K2, yo, k1, yo, k2. (7 stitches.)
- Row 4 (WS): Purl all.
- Row 5 (RS): K3, yo, k1, yo, k3. (9 stitches.)
- Row 6 (WS): Purl all.
- Row 7 (RS): K2tog, k5, k2tog. (7 stitches.)
- Row 8 (WS): Purl all.
- Row 9 (RS): K2tog, k3, k2tog. (5 stitches.)
- Row 10 (WS): Purl all.
- Row 11 (RS): K2tog, k1, k2tog. (3 stitches.)
- Row 12 (WS): Purl all.
- Row 13 (RS): K3tog (knit three stitches together). (1 stitch remains.)
- Cut the yarn, leaving a long tail (about 8 inches). Thread the tail through the remaining stitch and pull tight to secure.
Assembly: Bringing It All Together
You’ve knitted all the pieces – now it’s time to create the final masterpiece.
- Sew on the Clovers: Using the long tails from the clovers, sew them onto the center of the collar at even intervals. Position them along the area where the cable pattern is, so they sit nicely between the bobbles. Use the CC yarn to create a small, simple stem for each clover using a chain stitch or a few straight stitches.
- Attach the Button: Sew the button onto the end of the collar opposite the buttonhole tab. Make sure it aligns perfectly with the buttonhole you created. The button will go through the hole, and the tab will wrap under the collar to secure it.
- Weave in Ends: Carefully weave in all remaining yarn ends with your tapestry needle, making sure they are secure and hidden.
- Block Gently: To shape the collar and even out your stitches, gently wet block it. Soak the collar in lukewarm water with a drop of mild soap, then gently squeeze out the excess water (don’t wring!). Lay it flat on a towel, shape it to the correct dimensions, and let it dry completely.
- Add a D-Ring (Optional): For a leash attachment, you can sew a small fabric loop to the center of the collar’s underside. Fold a small piece of ribbon or fabric in half, sew it securely to the inside of the collar, and slide a D-ring through it.
And there you have it – a beautiful, handcrafted Cloverfield Canine Collar that’s ready for adventure! This project is a joy to knit and an even greater joy to see on your beloved pet. The combination of texture, color, and love makes it a truly special accessory. Happy knitting, and enjoy your walks through the clover fields!