The Enchanted Forest House Scarf: A Free Crochet Pattern for a Textured, Whimsical Winter Accessory
Wrap Yourself in Magic: The Enchanted Forest House Scarf Crochet Pattern
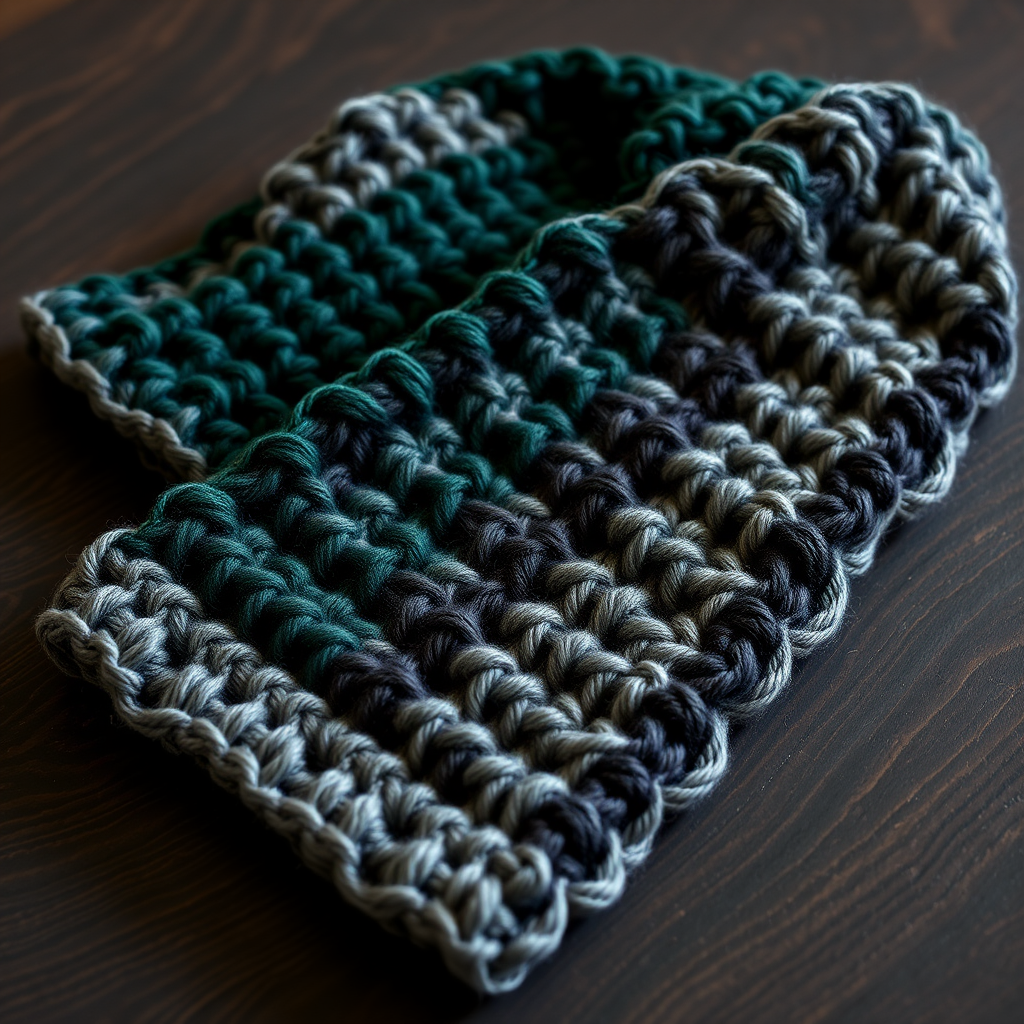
There’s something truly special about a scarf that feels like it was pulled straight from a storybook. The Enchanted Forest House Scarf is exactly that—a deeply textured, whimsical winter accessory that captures the moody, ancient beauty of a forbidden forest. With its interplay of deep emerald, charcoal, and silver, this oversized scarf uses a mesmerizing architectural stitch pattern to create a dense, warm fabric with a beautiful drape. Whether you’re a seasoned crocheter or a confident beginner looking for a rewarding project, this free pattern will guide you through every step to create a unique, handmade treasure that feels both magical and cozy.
Materials Needed
Before you begin, gather the following supplies. Using the exact yarn weight and hook size is essential to achieve the correct gauge and the lush, textured look of the scarf.
- Yarn: Worsted weight (#4) yarn in three colors:
- Color A (Deep Forest Green): 350 yards (e.g., Lion Brand Wool-Ease in 'Forest')
- Color B (Charcoal Grey): 250 yards (e.g., Lion Brand Wool-Ease in 'Charcoal')
- Color C (Silver/Grey): 150 yards (e.g., Lion Brand Wool-Ease in 'Silver Grey')
- Hook: Size J/10 (6.0 mm) crochet hook, or size needed to obtain gauge.
- Gauge: 14 stitches x 8 rows = 4 inches in pattern stitch (after blocking). Always make a gauge swatch to ensure your finished scarf matches the dimensions.
- Other: Yarn needle for weaving in ends, scissors, blocking mats and pins (optional but recommended).
Step-by-Step Instructions
Pattern Notes
The scarf is worked lengthwise in a repeating pattern of textured blocks. The stitch pattern creates a dense, warm fabric with a beautiful drape. The scarf is worked flat, back and forth. Read through all instructions before beginning.
Special Stitches
- Front Post Double Crochet (FPdc): Yarn over, insert hook from front to back around the post of the next stitch (going around the vertical part of the stitch, not through the top loops), yarn over, pull up a loop, yarn over, pull through 2 loops, yarn over, pull through remaining 2 loops.
- Back Post Double Crochet (BPdc): Yarn over, insert hook from back to front around the post of the next stitch, yarn over, pull up a loop, yarn over, pull through 2 loops, yarn over, pull through remaining 2 loops.
- Cluster (Cl): (Yarn over, insert hook in indicated stitch, yarn over, pull up a loop, yarn over, pull through 2 loops) 3 times in the same stitch, yarn over, pull through all 4 loops on hook. This creates a small, bumpy cluster.
Instructions
Row 1 (Right Side): With Color A, chain 35. Double crochet (dc) in the 4th chain from the hook and in each chain across. Turn. (You should have 33 double crochet stitches.)
Row 2 (Wrong Side): Chain 3 (this counts as the first double crochet here and throughout the pattern). *Front Post Double Crochet (FPdc) around the next stitch, Back Post Double Crochet (BPdc) around the next stitch; repeat from * across until you reach the last stitch. Double crochet in the top of the turning chain from the previous row. Turn.
Row 3: Chain 3. *BPdc around the next stitch, FPdc around the next stitch; repeat from * across to the last stitch. Double crochet in the top of the turning chain. Turn.
Row 4: Repeat Row 2 exactly.
Row 5: Chain 3. *FPdc around the next stitch, BPdc around the next stitch; repeat from * across to the last stitch. Double crochet in the top of the turning chain. Turn. Fasten off Color A. Join Color B with a slip stitch.
Row 6 (Wrong Side): With Color B, chain 3. Double crochet in the next stitch and in each stitch across. Turn. (33 double crochet stitches)
Row 7: Chain 3. *Skip the next stitch, work a Cluster (Cl) in the next stitch, chain 1; repeat from * across until you have 2 stitches left. Skip the next stitch, double crochet in the top of the turning chain. Turn.
Row 8: Chain 3. *Double crochet in the next chain-1 space, double crochet in the next Cluster; repeat from * across until you reach the last chain-1 space. Double crochet in the last chain-1 space, double crochet in the top of the turning chain. Turn. (33 double crochet stitches)
Row 9: Repeat Row 7.
Row 10: Repeat Row 8. Fasten off Color B. Join Color C with a slip stitch.
Row 11 (Right Side): With Color C, chain 3. Double crochet in the next stitch and in each stitch across. Turn. (33 double crochet stitches)
Row 12: Chain 3. *FPdc around the next stitch, BPdc around the next stitch; repeat from * across to the last stitch. Double crochet in the top of the turning chain. Turn.
Row 13: Chain 3. *BPdc around the next stitch, FPdc around the next stitch; repeat from * across to the last stitch. Double crochet in the top of the turning chain. Turn.
Row 14: Repeat Row 12. Fasten off Color C. Join Color A with a slip stitch.
Repeat Rows 1-14 until the scarf measures approximately 60 inches from the beginning, or until you reach your desired length. End with a complete repeat of the 14-row pattern (ending after a Row 14). Fasten off and weave in all ends securely using a yarn needle.
Finishing
Block the scarf gently to open up the stitch pattern and even out the edges. To block, soak the scarf in lukewarm water for 15 minutes, gently squeeze out excess water (do not wring), lay it flat on a towel, and roll to remove more moisture. Then, lay it flat on blocking mats, gently pinning the edges to the desired dimensions (approximately 8 inches wide and 60 inches long). Allow to dry completely. Trim any loose ends.
Your Enchanted Forest House Scarf is now ready to wear! The rich, dimensional texture and moody color palette will make it a standout piece in any winter wardrobe—a true handmade treasure that feels like a piece of ancient magic.