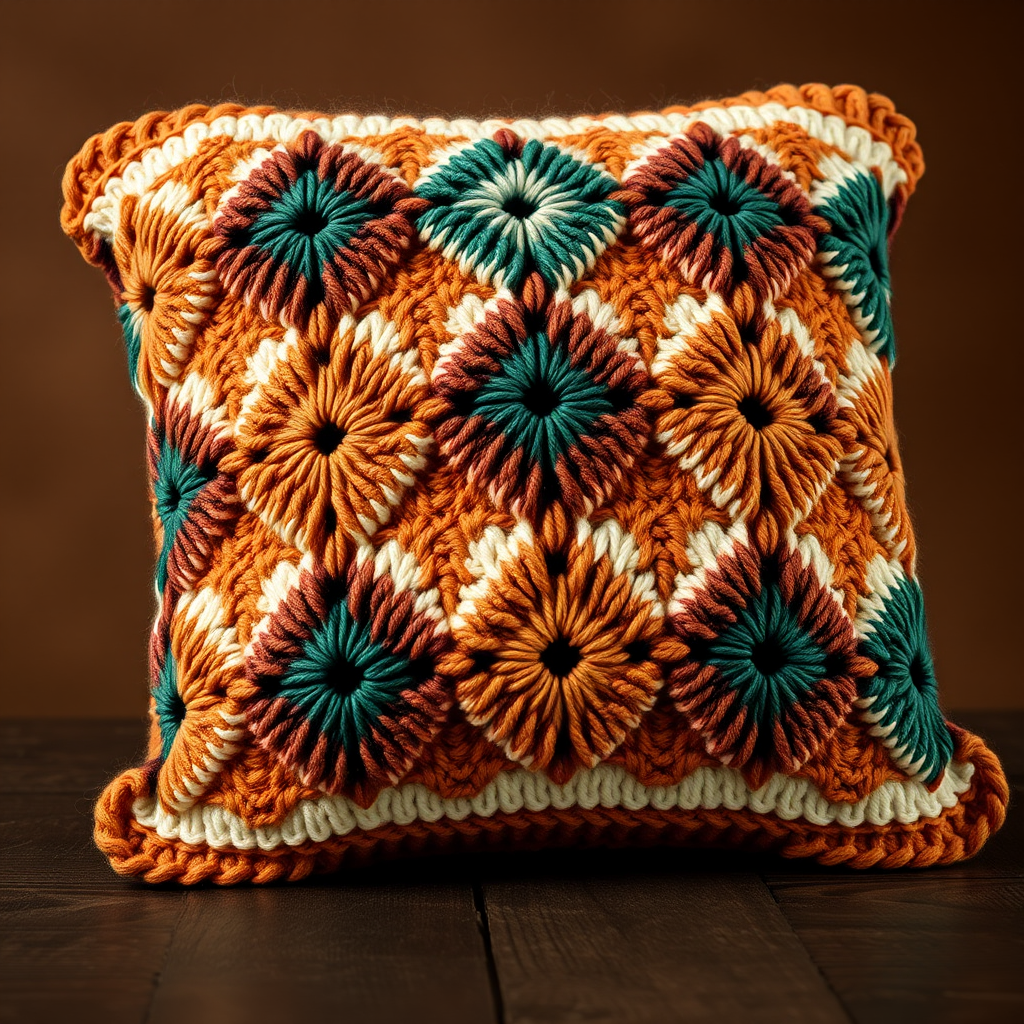
The Fractal Fern Pillow Free Pattern – Knit a Geometric Diamond Cushion
The Fractal Fern Pillow Free Pattern – Knit a Geometric Diamond Cushion
Bring a touch of modern botanical geometry to your living space with this striking knit pillow cover, featuring a repeating diamond motif that mimics the fractal patterns of fern fronds. The textured stitch work and earthy palette create a cozy, sophisticated accent for any room. This free pattern is perfect for intermediate knitters looking to expand their skills with yarn overs and decreases, while still being accessible to confident beginners who want to tackle a rewarding project.
This geometric cushion cover is worked flat in one piece, making it incredibly portable and easy to manage. The diamond pattern emerges through a clever combination of simple increases, decreases, and yarn overs that create delicate eyelet holes at the heart of each motif. The result is a dense, plush fabric with a beautiful raised texture that will elevate your home decor.
Materials Needed
Before you begin, gather the following supplies to ensure a smooth knitting experience:
- Yarn: Worsted weight yarn in three colors:
- Color A: Forest Green – approximately 100g
- Color B: Cream – approximately 75g
- Color C: Terracotta – approximately 75g
- Needles: US 7 (4.5mm) knitting needles
- Extras: Yarn needle for weaving in ends, scissors, stitch markers (optional), and an 18-inch pillow form
Gauge: 20 stitches and 28 rows = 4 inches in stockinette stitch. Always check your gauge to ensure your finished pillow measures correctly.
Step-by-Step Instructions
Finished Size
18 x 18 inches (fits an 18-inch pillow form)
Abbreviations
- K = knit
- P = purl
- K2tog = knit two stitches together (right-leaning decrease)
- SSK = slip, slip, knit (left-leaning decrease)
- YO = yarn over (creates an eyelet hole)
- St(s) = stitch(es)
- Rep = repeat
Pattern Notes
- The pillow cover is worked flat in one piece, then seamed.
- The diamond motif is created using simple increases and decreases combined with yarn overs to form eyelet holes.
- Carry unused yarn loosely up the side of the work. Do not cut yarn between color changes – simply pick up the new color and let the old one travel up the edge.
- The first and last 4 stitches of every row form a garter stitch border that keeps the edges neat and prevents curling.
Getting Started
Cast On: With Color A (Forest Green), cast on 90 stitches using your preferred method (long-tail cast on works well).
Border
Rows 1-6: Knit all stitches. This creates a garter stitch border at the bottom of the pillow cover.
Main Body – Diamond Pattern
Row 7 (RS): With Color A, knit all stitches.
Row 8 (WS): With Color A, purl all stitches.
Row 9 (RS): Switch to Color B (Cream). K4, *K2tog, YO, K1, YO, SSK, K3; rep from * to last 4 sts, K4.
Row 10 (WS): With Color B, purl all stitches.
Row 11 (RS): Switch to Color A. K4, *K1, K2tog, YO, K1, YO, SSK, K2; rep from * to last 4 sts, K4.
Row 12 (WS): With Color A, purl all stitches.
Row 13 (RS): Switch to Color C (Terracotta). K4, *K2, K2tog, YO, K1, YO, SSK, K1; rep from * to last 4 sts, K4.
Row 14 (WS): With Color C, purl all stitches.
Row 15 (RS): Switch to Color A. K4, *K3, K2tog, YO, K1, YO, SSK; rep from * to last 4 sts, K4.
Row 16 (WS): With Color A, purl all stitches.
Row 17 (RS): Switch to Color B. K4, *K2, YO, SSK, K1, K2tog, YO, K1; rep from * to last 4 sts, K4.
Row 18 (WS): With Color B, purl all stitches.
Row 19 (RS): Switch to Color A. K4, *K1, YO, SSK, K3, K2tog, YO; rep from * to last 4 sts, K4.
Row 20 (WS): With Color A, purl all stitches.
Row 21 (RS): Switch to Color C. K4, *YO, SSK, K5, K2tog; rep from * to last 4 sts, K4.
Row 22 (WS): With Color C, purl all stitches.
Row 23 (RS): Switch to Color A. K4, *K1, K2tog, YO, K3, YO, SSK; rep from * to last 4 sts, K4.
Row 24 (WS): With Color A, purl all stitches.
Row 25 (RS): Switch to Color B. K4, *K2, K2tog, YO, K1, YO, SSK, K1; rep from * to last 4 sts, K4.
Row 26 (WS): With Color B, purl all stitches.
Row 27 (RS): Switch to Color A. K4, *K3, K2tog, YO, K1, YO, SSK; rep from * to last 4 sts, K4.
Row 28 (WS): With Color A, purl all stitches.
Row 29 (RS): Switch to Color C. K4, *K2, YO, SSK, K1, K2tog, YO, K1; rep from * to last 4 sts, K4.
Row 30 (WS): With Color C, purl all stitches.
Row 31 (RS): Switch to Color A. K4, *K1, YO, SSK, K3, K2tog, YO; rep from * to last 4 sts, K4.
Row 32 (WS): With Color A, purl all stitches.
Repeating the Pattern
Repeat Rows 9-32 two more times (for a total of three full diamond repeats), then repeat Rows 9-16 once more. This will give you the correct length for an 18-inch pillow form.
Final Border
Rows 1-6: With Color A, knit all stitches. This creates the garter stitch border at the top of the pillow cover.
Bind Off
Bind off all stitches loosely with Color A. To avoid a tight edge, use a needle one size larger for the bind-off row, or bind off in pattern (knit the knits and purl the purls as they appear).
Finishing
- Weave in all ends using a yarn needle. Be sure to weave in the loose ends from your color changes securely, but avoid pulling too tightly so the fabric stays even.
- Fold the piece in half with right sides together, matching the cast-on and bind-off edges. The garter stitch borders should align at the top and bottom.
- Sew the side seams using a mattress stitch or whip stitch, leaving one side completely open for inserting the pillow form.
- Turn the cover right side out and insert the 18-inch pillow form.
- Sew the final seam closed using a mattress stitch for an invisible finish. This seam will be on the inside, so it doesn't need to be perfect, but a mattress stitch will give the cleanest result.
Tips for Success
- Count your stitches after each repeat to ensure you haven't accidentally dropped or added a stitch. Each pattern repeat should maintain the same stitch count.
- Keep your tension consistent when switching colors. The carried yarn along the side can pull if you're not careful – give it a gentle tug after each row to keep the edge even.
- Block your work before seaming if desired. This will help even out the stitches and make the diamond pattern pop.
- Use stitch markers between pattern repeats if you find it helpful to track your place.
This geometric diamond pillow is a stunning addition to any modern home. The combination of forest green, cream, and terracotta creates a warm, earthy palette that complements both neutral and bold interiors. The textured pattern is visually striking yet surprisingly simple to execute once you get into the rhythm of the repeats. Enjoy your new handmade accent piece, and don't forget to share your finished creation with fellow knitters!


