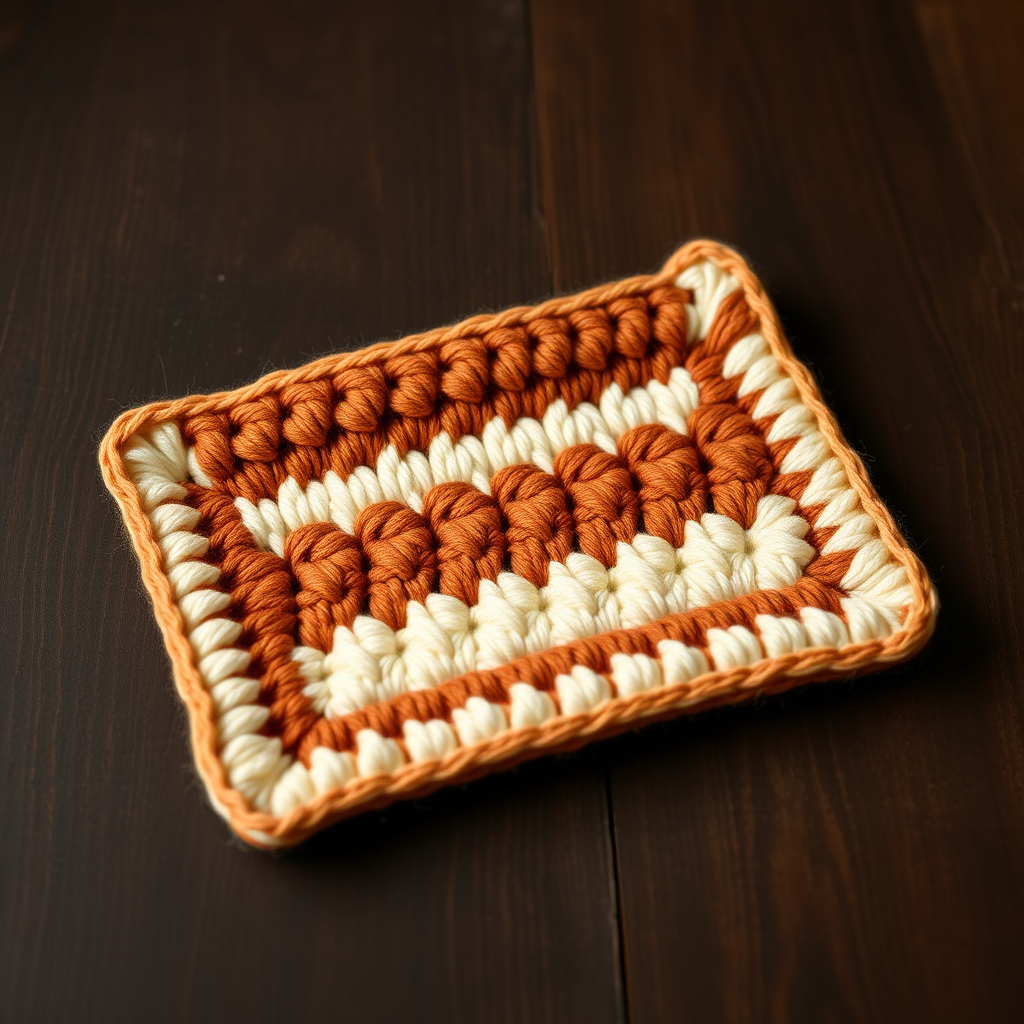
The Harvest Hearth Pot Holder Free Pattern – A Textured Crochet Square with Woven Charm

The Harvest Hearth Pot Holder Free Pattern – A Textured Crochet Square with Woven Charm
Bring rustic warmth to your kitchen with this beautifully textured crochet pot holder, featuring a woven center and a sturdy hanging loop. It's a quick, satisfying project that adds handcrafted charm to any home. Whether you're a seasoned crocheter or just starting your yarn journey, this pattern is designed to be accessible, rewarding, and genuinely useful. The combination of warm terracotta and soft cream creates a farmhouse-inspired aesthetic that looks stunning on any countertop or hook.
This pattern teaches you the classic front post and back post double crochet techniques, which create that gorgeous basketweave-like texture. You'll be amazed at how easily these stitches come together to form a dimensional, professional-looking piece. Plus, because it's made with 100% cotton yarn, it's heat-resistant and practical for everyday use—not just a pretty decoration!
Materials Needed
Before you begin, gather the following supplies. Using the exact materials will ensure your pot holder matches the intended size and texture, but feel free to experiment with colors that speak to your personal style.
Yarn
- Main Color (MC): 100% cotton worsted weight yarn (e.g., Lily Sugar'n Cream) in Terracotta – approximately 100 yards
- Contrast Color (CC): 100% cotton worsted weight yarn in Cream – approximately 30 yards
Hook & Notions
- 5.0 mm (H-8) crochet hook
- Yarn needle for weaving in ends
- Scissors
- Stitch markers (optional, but helpful for counting)
Gauge
4 inches = 16 sc and 18 rows in single crochet. Gauge is important for achieving the correct finished size, so take a moment to check your tension before starting. If your swatch is too small, try a larger hook; if too large, switch to a smaller one.
Step-by-Step Instructions
This pattern is worked flat in rows, then finished with a simple border and hanging loop. The woven texture is created by alternating front post and back post double crochet stitches, which wrap around the posts of stitches from previous rows. Don't worry if it feels a bit fiddly at first—after a few repeats, you'll find a rhythm!
Special Stitches
Before you begin, familiarize yourself with these two essential stitches:
- Front Post Double Crochet (fpdc): Yarn over, insert hook from front to back around the post of the stitch in the row below, yarn over, pull up a loop, yarn over, pull through two loops, yarn over, pull through remaining two loops.
- Back Post Double Crochet (bpdc): Yarn over, insert hook from back to front around the post of the stitch in the row below, yarn over, pull up a loop, yarn over, pull through two loops, yarn over, pull through remaining two loops.
Pro tip: The "post" of a stitch is the vertical part, not the V-shaped top where you normally insert your hook. When working post stitches, you're wrapping around this vertical column, which pushes the stitch forward or backward to create texture.
Foundation & First Rows
Foundation: With MC, ch 26.
Row 1: Sc in 2nd ch from hook and in each ch across. Turn. (25 sc)
Row 2: Ch 1, sc in each sc across. Turn.
Your foundation is now complete. You should have a neat rectangle of 25 single crochet stitches. This will be the base upon which we build the woven texture.
Creating the Woven Texture
Now we begin the magical part—building the raised basketweave pattern. Pay close attention to where you insert your hook for the post stitches; this is what creates the dimensional effect.
Row 3 (MC): Ch 1, sc in first 2 sc, *fpdc around the post of the sc two rows below (skip the sc directly above it), sc in next sc*, repeat from * to * until 2 sc remain, sc in last 2 sc. Turn.
Explanation: You'll work a front post double crochet around the post of the single crochet from Row 1 (two rows below). Skip the stitch directly above it in Row 2—this is important! Then work a regular sc in the next stitch of Row 2. Continue alternating across. You will have 21 sc and 4 fpdc in this row.
Row 4: Ch 1, sc in each sc across, working sc in the top of each fpdc as well. Turn. (25 sc)
This row smooths everything out, bringing you back to a flat row of 25 single crochets. The fpdc stitches from the previous row will now have a "bar" across them that we'll use in the next row.
Row 5: Ch 1, sc in first 2 sc, *bpdc around the post of the fpdc from Row 3 (insert hook from back to front), sc in next sc*, repeat from * to * until 2 sc remain, sc in last 2 sc. Turn.
Explanation: Now you're working a back post double crochet around the post of the fpdc you made in Row 3. This pulls the stitch backward, creating the opposite side of the weave. Again, skip the sc directly above the fpdc and work into the next sc.
Row 6: Repeat Row 4.
You've now completed one full "woven" repeat! The fpdc from Row 3 and the bpdc from Row 5 work together to create a raised, braided effect.
Continuing the Pattern
Rows 7-18: Repeat Rows 3-6 three more times. You will have a total of 4 raised rows of fpdc/bpdc, creating a woven texture.
Here's a breakdown of what you'll be doing:
- Rows 7, 11, 15: Work fpdc around the post of the bpdc from two rows below (the previous raised row).
- Rows 8, 12, 16: Sc across all stitches.
- Rows 9, 13, 17: Work bpdc around the post of the fpdc from two rows below.
- Rows 10, 14, 18: Sc across all stitches.
As you work, you'll see the basketweave pattern emerge beautifully. The alternating front and back post stitches create a reversible fabric that's thick, sturdy, and perfect for protecting your hands from hot pots and pans.
Adding the Border & Hanging Loop
Once you've completed Row 18, you're ready to finish your pot holder with a clean, polished edge.
Border: Do not fasten off. Ch 1, work 2 sc in each corner, sc evenly around all four edges, working 3 sc in each corner.
Tips for a neat border:
- Along the top and bottom edges, work one sc in each stitch (25 stitches per side).
- Along the side edges, work approximately 2 sc for every row of sc, and 1 sc for each row of post stitches. This will give you a straight, even edge.
- At each corner, work 3 sc into the corner stitch to create a smooth, rounded turn.
When you reach the starting corner, ch 12 for a hanging loop, slip stitch into the same corner to form a loop. Fasten off and weave in ends.
Note: The hanging loop is worked in MC (terracotta). If you'd like a cream loop for extra contrast, simply fasten off after completing the border, join CC at the corner, ch 12, and slip stitch to close.
Finishing Touches
Blocking: Block lightly to shape if desired. Since this is a cotton project, a gentle steam block or a light mist with water and a flat dry will help even out the stitches and give your pot holder a professional finish. However, this step is optional—the pot holder will lie flat naturally thanks to the dense cotton fabric.
Weave in any remaining ends with your yarn needle, and your Harvest Hearth Pot Holder is complete!
Tips for Success
- Count your stitches: It's easy to lose track with post stitches. Use stitch markers at the beginning and end of each repeat to help you stay on track.
- Keep tension consistent: Cotton yarn doesn't have much give, so try to keep your tension even throughout. This will ensure your pot holder lies flat and looks neat.
- Practice post stitches: If you're new to fpdc and bpdc, practice on a small swatch first. Once you get the hang of wrapping around the post, it becomes second nature!
- Customize your colors: While terracotta and cream are gorgeous together, this pattern works beautifully in any color combination. Try navy and white for a nautical vibe, or sage green and ivory for a more muted, organic feel.
This pot holder makes a wonderful gift for housewarmings, weddings, or holiday hostesses. It's also a fantastic stash-buster—perfect for using up those partial skeins of cotton yarn you've been saving. The finished piece measures approximately 8 inches square, making it the ideal size for grabbing hot dishes straight from the oven.
We hope you enjoy crocheting your Harvest Hearth Pot Holder! Share your finished creations with us—we'd love to see your color choices and how the woven texture turned out for you. Happy crocheting!