The Heritage Berry Bunting Free Pattern – Knit a Vintage Orchard Garland
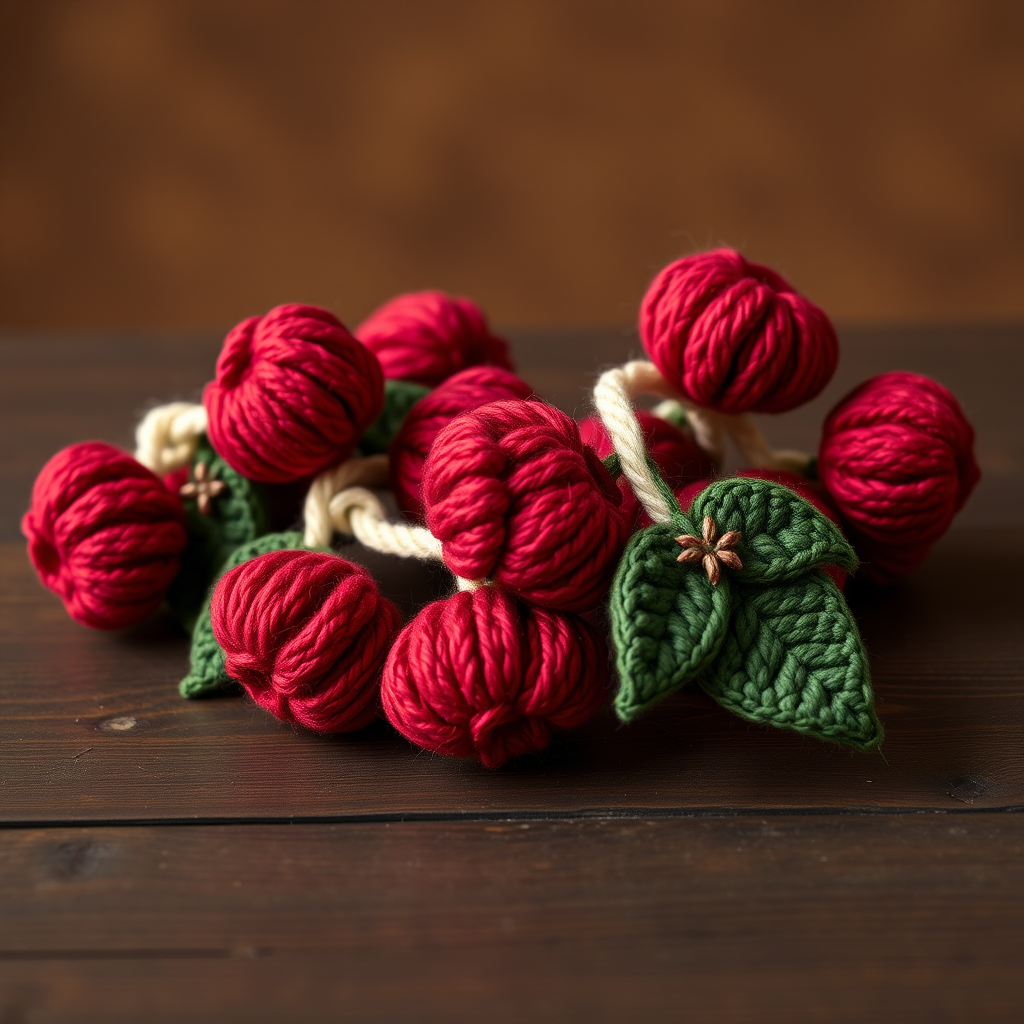
The Heritage Berry Bunting Free Pattern – Knit a Vintage Orchard Garland
There’s something deeply comforting about heirloom-style decor—pieces that look like they’ve been passed down through generations, carrying stories of cozy autumn evenings and handcrafted love. The Heritage Berry Bunting is exactly that kind of project. This free knitting and crochet pattern lets you string together a nostalgic garland of plump berries and delicate leaves, inspired by vintage orchard aesthetics. Whether draped across a mantel, framing a doorway, or adding warmth to a nursery shelf, this garland brings a handcrafted touch that store-bought decorations simply can’t replicate.
With its deep cranberry red, forest green, and soft cream palette, this bunting evokes the muted, earthy tones of a fall harvest. The combination of knitted berries and crocheted leaves creates beautiful texture and dimension, while the twisted cord adds a rustic, rope-like finish. Best of all, this pattern is beginner-friendly—if you can knit, purl, increase, decrease, and do basic crochet stitches, you can create this heirloom-worthy piece. Let’s dive in!
Materials Needed
Before you begin, gather the following supplies. This project is wonderfully portable and requires minimal materials, making it perfect for crafting on the go.
Yarn
- Worsted weight yarn in deep cranberry red (for berries) – approx. 50g
- Worsted weight yarn in forest green (for leaves) – approx. 50g
- Worsted weight yarn in cream (for twisted cord) – approx. 50g
Note: These amounts are sufficient for a 6-foot garland. Feel free to substitute with your favorite worsted weight yarns—just keep the gauge consistent for best results.
Needles & Hooks
- US 6 (4.0 mm) knitting needles – for the berries
- US 6 (4.0 mm) crochet hook – for the leaves and assembly
Additional Supplies
- Fiberfill or polyester stuffing (a small amount for each berry)
- Yarn needle for sewing and weaving in ends
- Scissors
- Stitch markers (optional, but helpful)
- A fixed hook or a friend to help with twisting the cord
Gauge
20 stitches and 28 rows = 4 inches in stockinette stitch. Gauge is not critical for this project, but maintaining consistent tension will help your berries look uniform and professional.
Step-by-Step Instructions
This pattern creates a 6-foot garland with 12 berries and 12 leaves, alternating along a twisted cord. Follow each section carefully, and you’ll have a stunning heirloom piece in no time.
Part 1: Knitted Berries (Make 12)
Each berry is worked flat in stockinette stitch, then seamed and gathered to create a plump, round shape. The increases and decreases create a subtle teardrop silhouette that looks beautiful when stuffed.
Step 1: Cast On
Using the long-tail method, cast on 6 stitches with your cranberry red yarn. Leave a 6-inch tail for weaving in later.
Step 2: Work the Base Rows
- Row 1 (RS): Knit all 6 stitches.
- Row 2 (WS): Purl all 6 stitches.
Step 3: Increase Rows
- Row 3 (RS): K1, make 1 (m1), K4, m1, K1 – you now have 8 stitches.
- Row 4 (WS): Purl all 8 stitches.
- Row 5 (RS): K1, m1, K6, m1, K1 – you now have 10 stitches.
- Row 6 (WS): Purl all 10 stitches.
Tip: To make an m1 increase, pick up the horizontal strand between stitches from front to back and knit into the back loop. This creates an invisible increase.
Step 4: Decrease Rows
- Row 7 (RS): K2tog (knit two together), K6, K2tog – you now have 8 stitches.
- Row 8 (WS): Purl all 8 stitches.
- Row 9 (RS): K2tog, K4, K2tog – you now have 6 stitches.
- Row 10 (WS): Purl all 6 stitches.
- Row 11 (RS): K2tog, K2, K2tog – you now have 4 stitches.
- Row 12 (WS): Purl all 4 stitches.
Step 5: Gather and Close
Cut the yarn, leaving a 12-inch tail. Thread the tail through a yarn needle and pass it through the remaining 4 stitches on your needle. Pull tight to gather the stitches together, creating the top of the berry. Secure with a knot.
Step 6: Seam the Berry
Using the same tail, sew the side seam of the berry from the gathered top down to the cast-on edge. Use a mattress stitch or whip stitch for a neat, invisible seam. Leave the bottom open.
Step 7: Stuff and Close
Gently stuff the berry with a small amount of fiberfill. You want it plump but not overstuffed—the fabric should stretch slightly but not distort. Once stuffed, sew the bottom opening closed using the same tail. Weave in all ends securely.
Repeat these steps to make 12 berries total.
Part 2: Crocheted Leaves (Make 12)
The leaves are worked in a simple oval shape with a pointed tip, creating a classic leaf silhouette. The optional center vein adds a lovely detail that makes each leaf look hand-finished.
Step 1: Foundation Chain
With forest green yarn, chain 8 (ch 8).
Step 2: First Side of the Leaf
Starting in the 2nd chain from the hook:
- Single crochet (sc) in the next 2 chains
- Half double crochet (hdc) in the next 2 chains
- Double crochet (dc) in the next 2 chains
- Work 3 double crochet (3 dc) in the last chain – this creates the pointed tip of the leaf.
Step 3: Second Side of the Leaf
Now working on the other side of the foundation chain (the underside):
- Double crochet (dc) in the next 2 chains
- Half double crochet (hdc) in the next 2 chains
- Single crochet (sc) in the next 2 chains
- Slip stitch (sl st) to the first single crochet to close the round.
Step 4: Finish and Shape
Fasten off, leaving a 10-inch tail for assembly. Gently shape the leaf by folding it along the center—this creates a subtle ridge that mimics a natural leaf.
Step 5: Optional Vein Detail
Using the tail, thread it through a yarn needle and sew a small straight line down the center of the leaf from the tip to the base. This creates a visible vein and adds to the heirloom aesthetic. Weave in the end securely.
Repeat these steps to make 12 leaves total.
Part 3: Twisted Cord (Make 1)
The twisted cord is what ties the whole garland together. It’s simple to make and creates a beautiful, rope-like texture that complements the berries and leaves perfectly.
Step 1: Cut Strands
Cut 4 strands of cream yarn, each 8 feet long. Hold them together as one thick strand.
Step 2: Secure Ends
Tie a knot at each end of the bundle. Attach one end to a fixed hook, doorknob, or have a friend hold it firmly.
Step 3: Twist
Twist the strands tightly in one direction. Continue twisting until the yarn starts to kink and curl back on itself—this usually takes 20-30 twists depending on your yarn.
Step 4: Fold and Let Twist
Carefully fold the twisted cord in half, bringing the two knotted ends together. Release the cord and let the two halves twist together naturally. This creates the classic twisted rope effect.
Step 5: Secure and Trim
Tie a knot at the folded end to secure the twist. Trim the ends evenly, leaving a small loop at the folded end if desired for hanging.
Part 4: Assembly
Now comes the fun part—bringing all your pieces together to create the finished garland.
Step 1: Lay Out the Cord
Lay the twisted cord flat on a clean surface. Starting 6 inches from one end, mark where you’ll attach your first berry.
Step 2: Attach the First Berry
Using the berry’s tail, sew its base securely to the cord. Make several passes through the cord to ensure it’s firmly attached. Knot and weave in the end.
Step 3: Attach the First Leaf
Measure 2 inches from the berry and attach a leaf by sewing its base to the cord. Ensure the leaf points upward while the berry hangs downward—this creates a natural, organic look.
Step 4: Continue Alternating
Continue attaching berries and leaves every 2 inches, alternating between the two. You should have 12 berries and 12 leaves total, ending 6 inches from the other end of the cord.
Step 5: Check Direction
As you work, periodically check that all berries are pointing down and all leaves are pointing up. This ensures a cohesive, polished appearance.
Step 6: Weave in Ends
Once all pieces are attached, weave in any remaining yarn tails securely. Trim any excess.
Step 7: Add Hanging Loops
At each end of the cord, create a small loop of yarn for easy hanging. Simply thread a 6-inch piece of cream yarn through the end of the cord, tie it into a loop, and secure with a knot.
Final Thoughts
Your Heritage Berry Bunting is now complete! Hang it on a mantel, drape it across a doorway, or add it to a nursery shelf for a touch of vintage charm. The muted, earthy colors and handcrafted texture make it a timeless piece that will be treasured for years to come.
This pattern is wonderfully customizable—try swapping the cranberry red for a soft blush pink, or the forest green for a muted sage. You could even add a few extra berries for a fuller garland. The possibilities are endless, and each version will be uniquely yours.
We’d love to see your finished bunting! Share your creation on social media with the hashtag #HeritageBerryBunting and tag us so we can admire your handiwork. Happy crafting, and may your home be filled with the cozy warmth of heirloom-inspired decor.


