The Olivette Cable Crochet Christmas Stocking: A Free Pattern for a Modern Heirloom
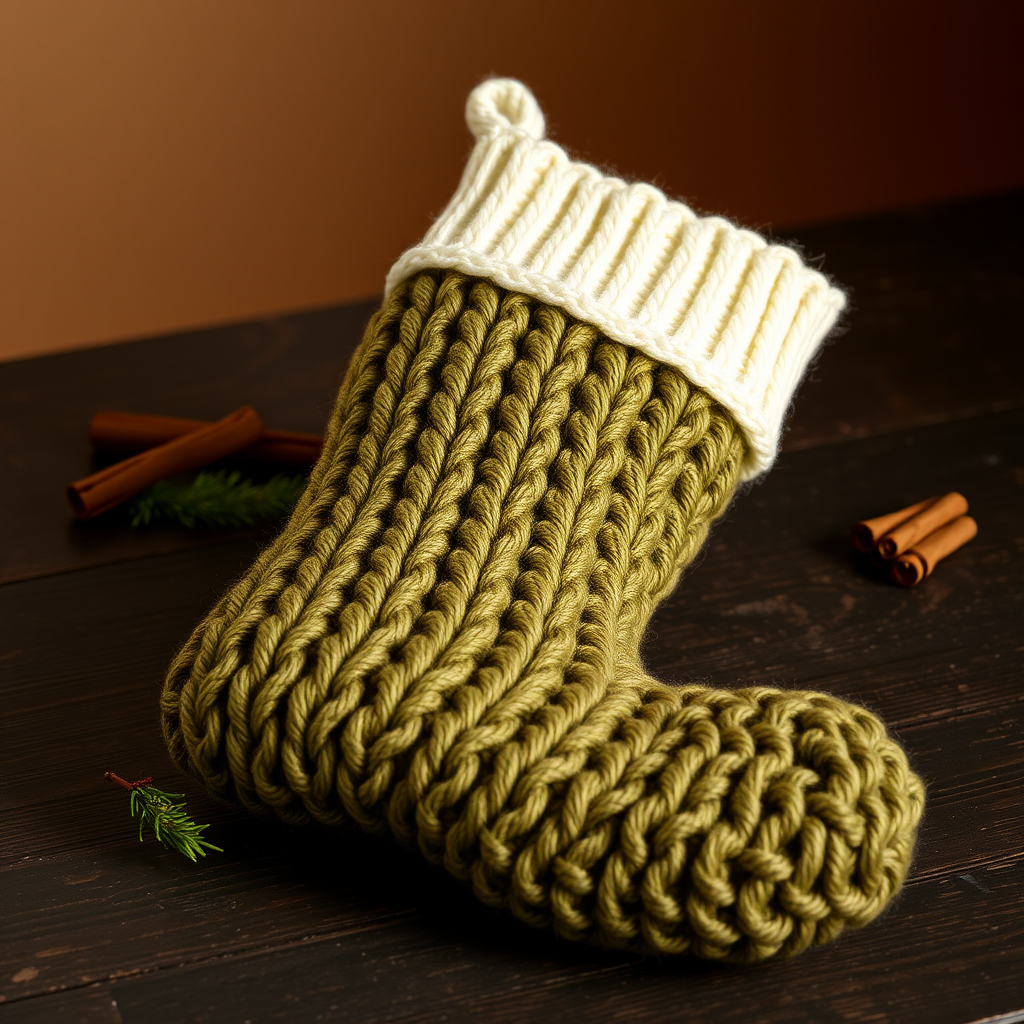
Introducing the Olivette Cable Crochet Christmas Stocking
Elevate your holiday decor this year with a truly special handmade treasure. The Olivette Cable Crochet Christmas Stocking is designed to be a modern heirloom, blending the timeless elegance of cable-knit textures with the cozy satisfaction of crochet. Its sophisticated palette of deep olive green and creamy white creates a rich, textured surface that feels both rustic and refined. Whether you're an experienced crocheter looking for a rewarding project or a dedicated beginner ready to learn new stitches, this pattern will guide you through creating a stunning stocking that will be cherished for many Christmases to come. The intricate stitchwork, achieved through front and back post double crochet, mimics the look of knitted cables, giving your stocking a beautifully braided, dimensional appearance.
Materials Needed
Before you begin, gather the following materials to ensure a smooth and enjoyable crocheting experience.
Yarn
- Main Color (MC): Worsted weight yarn in Olive Green – approximately 250 yards. Suggested: Lion Brand Wool-Ease in 'Olive'.
- Contrast Color (CC): Worsted weight yarn in Cream – approximately 100 yards. Suggested: Lion Brand Wool-Ease in 'Fisherman'.
Hook & Notions
- Crochet Hook: Size H/8 (5.0 mm), or size needed to obtain gauge.
- Tapestry Needle: For weaving in ends and sewing seams.
- Stitch Markers (optional): Helpful for keeping track of rounds and pattern repeats.
Gauge
- Single Crochet Gauge: 14 sc x 16 rows = 4 inches (10 cm).
- Cable Pattern Gauge: 12 stitches x 8 rows = 3.5 inches wide x 2.5 inches tall.
Step-by-Step Instructions
Important Notes: The stocking is worked from the top down in joined rounds, with the heel and toe worked flat. The cable pattern is created using front post double crochet (fpdc) and back post double crochet (bpdc) stitches. Stitch counts are provided in brackets at the end of each round or row.
Special Stitches
- Cable Cross (CC): Skip next 2 stitches, fpdc around the next 2 stitches, then fpdc around the 2 skipped stitches (working behind the first 2 fpdc). This creates the cable twist.
- Front Post Double Crochet (fpdc): Yarn over, insert hook from front to back around the post of the indicated stitch, yarn over, pull up a loop, (yarn over, pull through 2 loops) twice.
- Back Post Double Crochet (bpdc): Yarn over, insert hook from back to front around the post of the indicated stitch, yarn over, pull up a loop, (yarn over, pull through 2 loops) twice.
Stocking Body (Worked in Rounds)
- With MC, chain 48. Join with a slip stitch to form a ring, being careful not to twist the chain.
- Round 1: Chain 1, single crochet in each chain around. Join with a slip stitch to the first single crochet. (48 sc)
- Round 2: Chain 3 (counts as a double crochet), double crochet in the next 2 stitches, *fpdc around the next 2 stitches, bpdc around the next 2 stitches; repeat from * around. Join with a slip stitch to the top of the beginning chain-3. (48 sts)
- Round 3: Chain 3, double crochet in the next 2 stitches, *bpdc around the next 2 stitches, fpdc around the next 2 stitches; repeat from * around. Join.
- Rounds 4-5: Repeat Rounds 2 and 3.
- Round 6 (Cable Setup): Chain 3, double crochet in the next 2 stitches, *Cable Cross (CC) over the next 4 stitches, bpdc around the next 2 stitches; repeat from * around. Join. (12 cables formed)
- Round 7: Chain 3, double crochet in the next 2 stitches, *fpdc around the next 2 stitches, bpdc around the next 2 stitches, fpdc around the next 2 stitches; repeat from * around. Join.
- Round 8: Chain 3, double crochet in the next 2 stitches, *bpdc around the next 2 stitches, fpdc around the next 2 stitches, bpdc around the next 2 stitches; repeat from * around. Join.
- Rounds 9-10: Repeat Rounds 7 and 8.
- Rounds 11-22: Repeat Rounds 6 through 10 twice more. You will have a total of 3 cable crosses in height.
- Round 23: Chain 1, single crochet in each stitch around. Join with a slip stitch to the first single crochet. (48 sc)
Heel (Worked Flat)
- Row 1: Chain 1, single crochet in the next 24 stitches. Turn your work. (24 sc)
- Row 2: Chain 1, single crochet 2 together (sc2tog), single crochet in the next 20 stitches, sc2tog. Turn. (22 sc)
- Row 3: Chain 1, sc2tog, single crochet in the next 18 stitches, sc2tog. Turn. (20 sc)
- Row 4: Chain 1, sc2tog, single crochet in the next 16 stitches, sc2tog. Turn. (18 sc)
- Row 5: Chain 1, sc2tog, single crochet in the next 14 stitches, sc2tog. Turn. (16 sc)
- Row 6: Chain 1, sc2tog, single crochet in the next 12 stitches, sc2tog. Turn. (14 sc)
- Row 7: Chain 1, sc2tog, single crochet in the next 10 stitches, sc2tog. Turn. (12 sc)
- Row 8: Chain 1, sc2tog, single crochet in the next 8 stitches, sc2tog. Turn. (10 sc)
- Row 9: Chain 1, sc2tog, single crochet in the next 6 stitches, sc2tog. Turn. (8 sc)
- Row 10: Chain 1, sc2tog, single crochet in the next 4 stitches, sc2tog. Turn. (6 sc)
- Fasten off, leaving a long tail (about 12 inches). Fold the heel piece in half and use the tail to sew the short edges together, forming the heel cup. Weave in the end securely.
Foot (Worked in Rounds)
- Rejoin MC with a slip stitch at the center of the heel (where you just sewed). Work 24 single crochets evenly around the opening of the foot – 12 single crochets on each side of the heel seam. (24 sc)
- Round 1: Chain 1, single crochet in each single crochet around. Join with a slip stitch to the first single crochet. (24 sc)
- Round 2: Chain 3, double crochet in the next 2 stitches, *fpdc around the next 2 stitches, bpdc around the next 2 stitches; repeat from * around. Join.
- Round 3: Chain 3, double crochet in the next 2 stitches, *bpdc around the next 2 stitches, fpdc around the next 2 stitches; repeat from * around. Join.
- Rounds 4-5: Repeat Rounds 2 and 3.
- Round 6 (Cable): Chain 3, double crochet in the next 2 stitches, *Cable Cross (CC) over the next 4 stitches, bpdc around the next 2 stitches; repeat from * around. Join. (6 cables)
- Rounds 7-10: Repeat Rounds 2 and 3 twice.
- Rounds 11-14: Repeat Rounds 6 through 10 once more.
- Round 15: Chain 1, single crochet in each stitch around. Join with a slip stitch to the first single crochet. (24 sc)
Toe (Worked Flat)
- Row 1: Chain 1, single crochet in the next 12 stitches. Turn. (12 sc)
- Row 2: Chain 1, sc2tog, single crochet in the next 8 stitches, sc2tog. Turn. (10 sc)
- Row 3: Chain 1, sc2tog, single crochet in the next 6 stitches, sc2tog. Turn. (8 sc)
- Row 4: Chain 1, sc2tog, single crochet in the next 4 stitches, sc2tog. Turn. (6 sc)
- Row 5: Chain 1, sc2tog, single crochet in the next 2 stitches, sc2tog. Turn. (4 sc)
- Row 6: Chain 1, sc2tog twice. Turn. (2 sc)
- Fasten off, leaving a long tail (about 10 inches). Thread the tail through a tapestry needle and sew the toe closed by weaving through the remaining stitches. Pull tight to close and secure.
Cuff (Worked in Rounds)
- With CC, join with a slip stitch at the top edge of the stocking body.
- Round 1: Chain 1, single crochet in each stitch around. Join with a slip stitch to the first single crochet. (48 sc)
- Round 2: Chain 3, double crochet in the next 2 stitches, *fpdc around the next 2 stitches, bpdc around the next 2 stitches; repeat from * around. Join.
- Round 3: Chain 3, double crochet in the next 2 stitches, *bpdc around the next 2 stitches, fpdc around the next 2 stitches; repeat from * around. Join.
- Rounds 4-5: Repeat Rounds 2 and 3.
- Round 6: Chain 1, single crochet in each stitch around. Join with a slip stitch to the first single crochet. Fasten off CC and weave in the end.
Hanging Loop
- With MC, chain 15. Slip stitch in the first chain to form a loop.
- Attach the loop to the inside of the stocking at the top back corner using a tapestry needle and the yarn tails. Weave in all remaining ends securely.
Your Olivette Cable Crochet Christmas Stocking is now complete! Admire your beautiful, modern heirloom and enjoy the cozy, sophisticated touch it brings to your holiday home.


