Velvet Dusk Puff Stitch Headband Free Pattern – Crochet a Plush Twilight Wrap
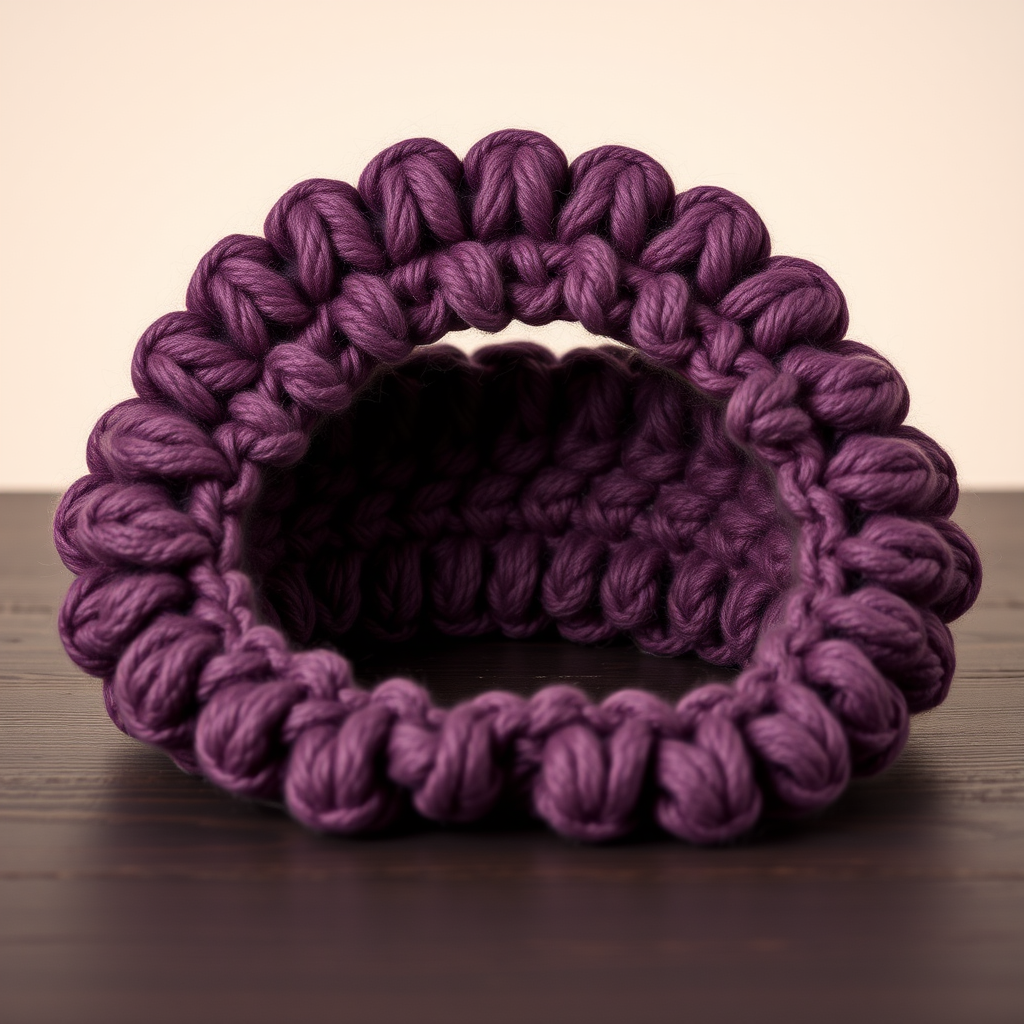
Wrap Your Evenings in Softness: The Velvet Dusk Puff Stitch Headband
There is a certain magic that happens when the sun dips below the horizon and the air turns crisp. It is the time for cozy layers, warm drinks, and accessories that feel as good as they look. If you are searching for a quick, satisfying project that delivers both warmth and a touch of bohemian elegance, look no further than the Velvet Dusk Puff Stitch Headband. This free crochet pattern is designed to keep your ears toasty while adding a plush, textured statement to your autumn and winter wardrobe. The dense, squishy puff stitches create a luxurious feel, while the gradient of twilight hues—from deep plum to dusty rose and soft mauve—makes this a truly unique handmade accessory. Best of all, it is beginner-friendly, using only basic stitches and simple color changes to create a stunning result.
This pattern is perfect for using up small amounts of worsted weight yarn from your stash. Whether you are a seasoned crocheter looking for a quick gift or a beginner ready to tackle your first textured project, the Velvet Dusk headband is a rewarding and enjoyable make. Let’s gather our supplies and get started on creating your own plush twilight wrap.
Materials Needed: Your Crochet Kit for the Velvet Dusk Headband
Before you begin, it is essential to gather all your materials. This project is wonderfully portable and requires very little to get started. Here is everything you will need to create your own Velvet Dusk headband.
Yarn
You will need worsted weight yarn (Category 4) in three beautiful shades to create the gradient effect:
- Color A (Deep Plum): Approximately 50 grams (for the ends of the headband).
- Color B (Dusty Rose): Approximately 30 grams (for the middle sections).
- Color C (Soft Mauve): Approximately 20 grams (for the center of the headband).
In total, you will need about 100 grams of yarn. Choose a soft, plush yarn with good stitch definition to make your puff stitches really pop. A yarn with a subtle sheen will enhance the luxurious look of the finished piece.
Hook and Notions
- Crochet Hook: US Size H/8 (5.0 mm) crochet hook. It is crucial to check your gauge and adjust your hook size if necessary to achieve the correct dimensions.
- Yarn Needle: A tapestry needle with a large eye for weaving in ends and seaming the headband together.
- Scissors: For cutting your yarn.
Gauge
To ensure your headband fits perfectly, it is important to match the gauge: 4 puff stitches x 4 rows = 4 inches (10 cm) in pattern. If your gauge is off, simply switch to a different hook size. A smaller hook will create a tighter, smaller fabric, while a larger hook will make it looser and wider.
Step-by-Step Instructions: Crafting Your Plush Twilight Wrap
This headband is worked flat in rows and then seamed at the back, creating a seamless, professional-looking finish. The pattern is a simple repetition of puff stitch rows and single crochet rows, making it easy to memorize and relaxing to work. Let’s dive into the detailed instructions.
Stitch Abbreviations
Before you begin, familiarize yourself with the following abbreviations used in this pattern:
- ch: chain
- sc: single crochet
- puff st: puff stitch (see detailed instructions below)
- sl st: slip stitch
How to Make a Puff Stitch
The puff stitch is the star of this pattern. It creates a beautiful, squishy bobble. Here is how to make it:
- Yarn over (yo) your hook.
- Insert your hook into the designated stitch.
- Yarn over and pull up a loop. You should now have 3 loops on your hook.
- Yarn over again, insert your hook into the same stitch, yarn over and pull up a loop. You now have 5 loops on your hook.
- Repeat this process two more times. You will have a total of 9 loops on your hook.
- Yarn over one final time and pull through all 9 loops on your hook.
- Chain 1 (ch 1) to close and secure the puff stitch. This ch-1 space is important for the next row.
Foundation and First Color Section (Color A)
We will start with the deep plum color (Color A) to create the base of the headband.
Foundation: With Color A, make a slip knot and chain 12 (ch 12).
Row 1: Work a single crochet (sc) into the 2nd chain from your hook. Work 1 sc into each of the remaining chains across. You should have 11 sc stitches total. Turn your work.
Row 2: Chain 1 (this does not count as a stitch). Work 1 sc into the first stitch. *Work 1 puff stitch into the next stitch, then 1 sc into the next stitch.* Repeat from * to * across the row. You will have 5 puff stitches and 6 sc stitches. Turn your work.
Row 3: Chain 1. Work 1 sc into each stitch across the row. This means you will work 1 sc into each sc from the previous row, and 1 sc into the ch-1 space at the top of each puff stitch. You will have 11 sc stitches total. Turn your work.
Row 4: Repeat Row 2 (the puff stitch row).
Row 5: Repeat Row 3 (the single crochet row). At the end of Row 5, fasten off Color A, leaving a small tail to weave in later.
Color Transition and Middle Sections
Now we will introduce the dusty rose (Color B) and soft mauve (Color C) to create the beautiful gradient.
Joining Color B: With the right side of your work facing you, join Color B with a slip stitch (sl st) into the first stitch of the row.
Rows 6-10: Now we will alternate the rows again. Work Row 6 as a puff stitch row (like Row 2), Row 7 as a single crochet row (like Row 3), Row 8 as a puff stitch row, Row 9 as a single crochet row, and Row 10 as a puff stitch row. At the end of Row 10, fasten off Color B and join Color C (Soft Mauve) with a sl st in the first stitch.
Rows 11-15: For this center section, we will start with a single crochet row. Work Row 11 as a sc row, Row 12 as a puff stitch row, Row 13 as a sc row, Row 14 as a puff stitch row, and Row 15 as a sc row. At the end of Row 15, fasten off Color C and join Color B again.
Rows 16-20: This section mirrors the first Color B section. Work Row 16 as a puff stitch row, Row 17 as a sc row, Row 18 as a puff stitch row, Row 19 as a sc row, and Row 20 as a puff stitch row. At the end of Row 20, fasten off Color B and join Color A (Deep Plum) for the final section.
Final Color Section and Finishing
We will now complete the headband with the deep plum color, mirroring the beginning.
Rows 21-25: This section starts with a sc row. Work Row 21 as a sc row, Row 22 as a puff stitch row, Row 23 as a sc row, Row 24 as a puff stitch row, and Row 25 as a sc row. At the end of Row 25, fasten off, leaving a long tail (at least 12 inches) for seaming.
Seaming the Headband: Fold your headband in half with the right sides facing each other, matching the short ends. Thread your yarn needle with the long tail. Using a whip stitch, carefully sew the two short ends together. Make sure to catch the top and bottom loops of the stitches to create a secure seam. Once sewn, weave in the tail securely.
Weaving in Ends: Use your yarn needle to weave in all the other loose ends from your color changes. Weave them in on the wrong side of the work, going back and forth through the stitches to secure them. Trim any excess yarn.
Final Touch: Turn your headband right side out. Gently shape it with your hands. The finished headband should measure approximately 18 inches (46 cm) around, which fits most adult heads comfortably. If you need a smaller size, simply reduce the number of rows in the middle section. For a larger size, add a few more rows to the center.
Congratulations! You have just completed your very own Velvet Dusk Puff Stitch Headband. This plush, textured accessory is perfect for adding a touch of handmade luxury to any outfit. Wear it on your next evening stroll, gift it to a loved one, or simply enjoy the cozy satisfaction of creating something beautiful with your own hands.


