Whimsical Woodland Hoot Owl Hat Free Pattern – A Cozy Crocheted Forest Friend
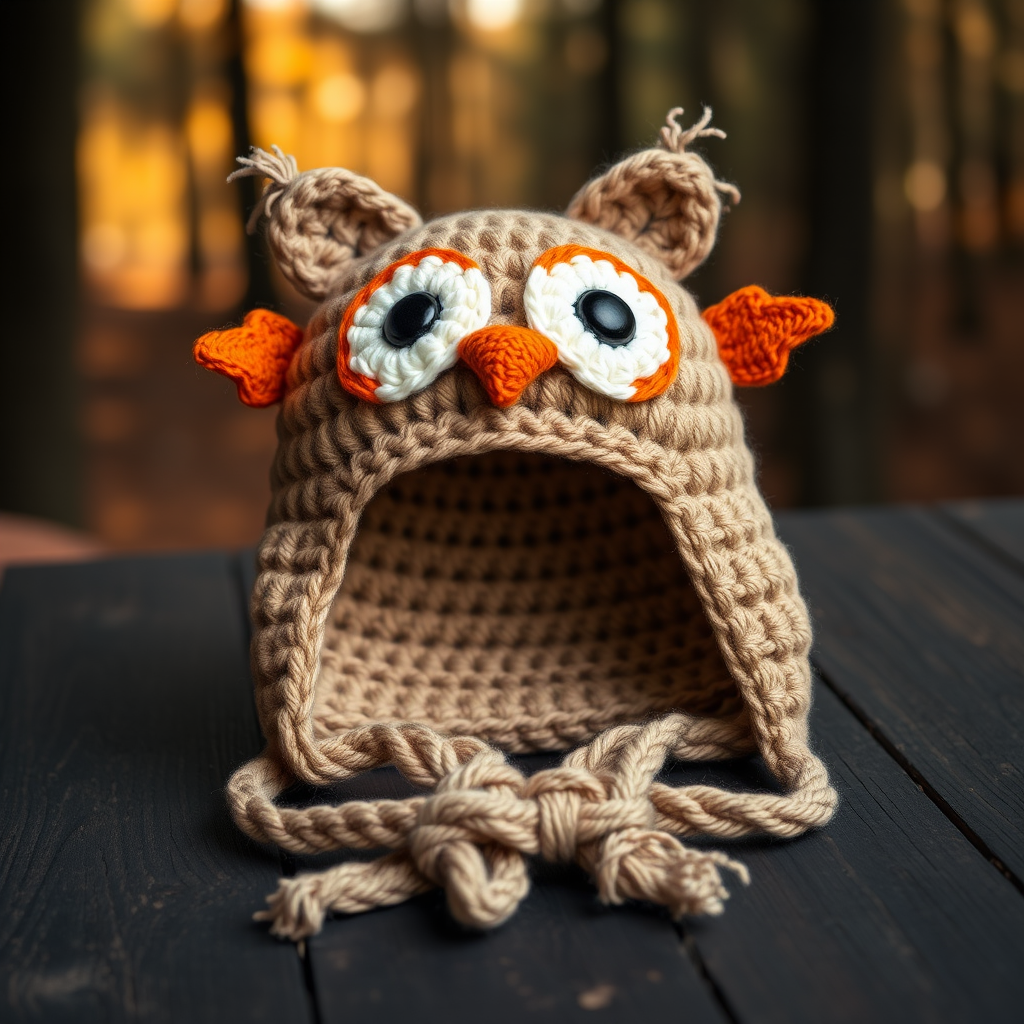
Whimsical Woodland Hoot Owl Hat Free Pattern – A Cozy Crocheted Forest Friend
Wrap your little one—or yourself!—in the charm of the forest with this adorable owl hat, complete with oversized eyes and feathery wings. This crochet pattern is perfect for beginners and seasoned makers alike, bringing a touch of whimsy to chilly days. Whether you're crafting for a baby shower, a winter birthday, or just because, this hoot of a hat is sure to be a favorite. The thick, worsted weight yarn creates a warm and sturdy fabric, while the playful owl features make it an instant classic. Let's get started on making this cozy woodland companion!
Materials Needed
Before you begin, gather the following supplies. All yarn amounts are approximate for a child's size; adjust as needed for larger sizes.
- Yarn: Worsted weight yarn in three colors:
- Main Color (MC): Warm taupe (approx. 150-200 yards)
- Contrast Color 1 (CC1): Cream (small amount, for eyes)
- Contrast Color 2 (CC2): Burnt orange (small amount, for beak and eye rims)
- Details: Small amounts of black (for pupils) and yellow (optional, for extra detail)
- Hook: 5.0 mm (H) crochet hook
- Notions: Yarn needle, stitch marker, scissors
- Optional: Two black buttons (for pupils, instead of embroidery), pom-pom maker for the top
Gauge: 16 sc x 18 rows = 4 x 4 inches (10 x 10 cm) in single crochet. Always check your gauge to ensure the correct fit.
Step-by-Step Instructions
This hat is worked in the round from the top down. Use a magic ring for a seamless crown. The pattern includes instructions for multiple sizes—please read carefully!
Hat Body (MC)
Worked in continuous rounds; do not join unless specified. Place a stitch marker at the beginning of each round.
- Round 1: Make a magic ring, work 6 sc into the ring. (6 sts)
- Round 2: 2 sc in each st around. (12 sts)
- Round 3: *Sc in next st, 2 sc in next st* repeat around. (18 sts)
- Round 4: *Sc in next 2 sts, 2 sc in next st* repeat around. (24 sts)
- Round 5: *Sc in next 3 sts, 2 sc in next st* repeat around. (30 sts)
- Round 6: *Sc in next 4 sts, 2 sc in next st* repeat around. (36 sts)
- Round 7: *Sc in next 5 sts, 2 sc in next st* repeat around. (42 sts)
- Round 8: *Sc in next 6 sts, 2 sc in next st* repeat around. (48 sts)
- Round 9: *Sc in next 7 sts, 2 sc in next st* repeat around. (54 sts)
- Round 10: *Sc in next 8 sts, 2 sc in next st* repeat around. (60 sts)
- Rounds 11-20: Sc in each st around. (60 sts) – This creates the hat depth.
- For a toddler size: Stop after Round 18 (total depth approx. 5.5 inches).
- For a child size: Stop after Round 20 (total depth approx. 6.5 inches).
- For an adult size: Continue to Round 22 (total depth approx. 7.5 inches).
- Round 21 (adult only): Sc in each st around. (60 sts)
- Round 22 (adult only): Sc in each st around. (60 sts)
Fasten off and weave in the end securely. The hat body is complete!
Ear Flaps (Make 2, MC)
These flaps are worked in rows, not rounds. They are attached directly to the bottom edge of the hat.
- Row 1: Place the hat with the seam (if any) at the back. Find the center front of the hat. Count 10 stitches to the right of the center front. Join yarn with a slip stitch in that stitch. Ch 1, sc in the same stitch and in the next 9 stitches. (10 sts) You are now working on the bottom edge of the hat.
- Row 2: Ch 1, turn. Sc2tog (decrease), sc in next 6 sts, sc2tog. (8 sts)
- Row 3: Ch 1, turn. Sc2tog, sc in next 4 sts, sc2tog. (6 sts)
- Row 4: Ch 1, turn. Sc2tog, sc in next 2 sts, sc2tog. (4 sts)
- Row 5: Ch 1, turn. Sc2tog twice. (2 sts)
- Row 6: Ch 1, turn. Sc2tog. (1 st)
Fasten off, leaving a long tail (approx. 12 inches) for sewing. Repeat the entire process to create the second ear flap on the opposite side of the hat, 10 stitches to the left of the center front.
Owl Eyes (Make 2, CC1 and CC2)
These are worked in the round, starting with cream and finishing with burnt orange.
- Round 1: With CC1 (cream), make a magic ring, work 6 sc into the ring. (6 sts)
- Round 2: 2 sc in each st around. (12 sts)
- Round 3: *Sc in next st, 2 sc in next st* repeat around. (18 sts)
- Round 4: Switch to CC2 (burnt orange). *Sc in next 2 sts, 2 sc in next st* repeat around. (24 sts)
- Round 5: With CC2, *Sc in next 3 sts, 2 sc in next st* repeat around. (30 sts)
Fasten off, leaving a long tail for sewing. Using black yarn and a yarn needle, embroider a small pupil in the center of each eye. Alternatively, sew a black button in the center for a quicker, more dimensional look.
Beak (CC2)
This small piece is worked in the round and then folded to create a diamond shape.
- Round 1: Make a magic ring, work 6 sc into the ring. (6 sts)
- Round 2: *Sc in next st, 2 sc in next st* repeat around. (9 sts)
- Round 3: *Sc in next 2 sts, 2 sc in next st* repeat around. (12 sts)
Fasten off, leaving a long tail for sewing. Fold the circle in half so the edges meet, and sew the two sides together flat. This creates a triangle/diamond shape that will be the beak.
Wings (Make 2, MC)
These are simple flat pieces worked in rows.
- Row 1: Ch 8, sc in 2nd ch from hook and in each ch across. (7 sts)
- Row 2: Ch 1, turn. Sc2tog, sc in next 3 sts, sc2tog. (5 sts)
- Row 3: Ch 1, turn. Sc2tog, sc in next st, sc2tog. (3 sts)
- Row 4: Ch 1, turn. Sc3tog. (1 st)
Fasten off, leaving a long tail for sewing. The wing will have a slight curve, which is perfect for the side of the hat.
Finishing and Assembly
Now for the fun part—bringing your owl to life!
- Position the Eyes: Place the hat with the ear flaps at the bottom. Position the two eyes on the front of the hat, centered above the ear flaps. They should be approximately 2 inches apart. Use the long tails to sew them on securely, weaving in the ends on the inside of the hat.
- Attach the Beak: Position the folded beak between the two eyes, slightly lower. Sew it on securely using its long tail.
- Sew the Wings: Position the wings on the sides of the hat, just below the eyes. Sew them on using their long tails, leaving the curved edge free for a subtle 3D effect.
- Weave in All Ends: Use your yarn needle to weave in any remaining loose ends on the inside of the hat to keep it neat and comfortable.
- Optional Pom-Pom: For extra charm, create a pom-pom using MC or CC2 yarn and attach it to the very top of the hat. This is a great way to use up leftover yarn!
Your Whimsical Woodland Hoot Owl Hat is complete! This cozy creation is perfect for crisp autumn walks, snowy adventures, or simply snuggling up with a good book. The combination of warm taupe, cream, and burnt orange makes it a versatile accessory that pairs beautifully with any winter wardrobe. Enjoy your handmade forest friend, and happy crocheting!


