Whispering Willow Twisted Headband Free Pattern – Textured Knit with Leaf Motif
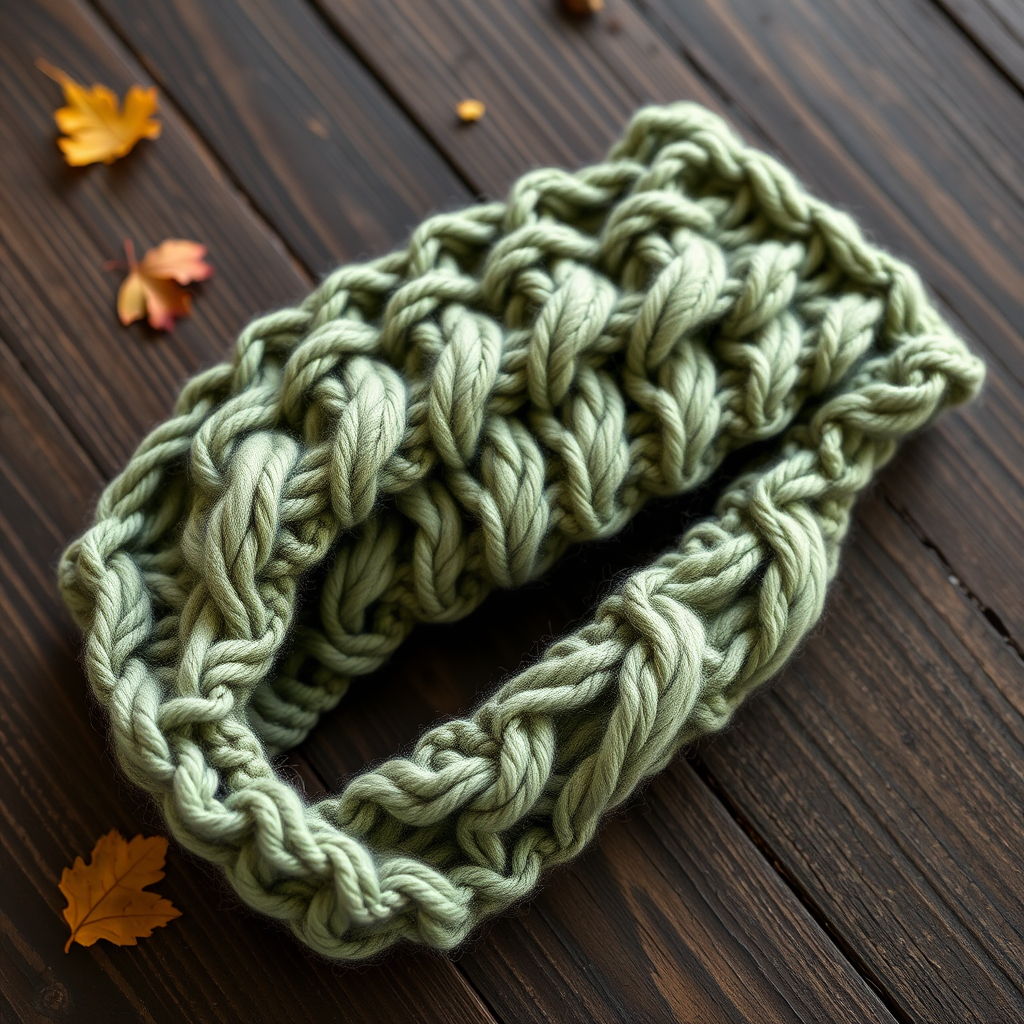
Whispering Willow Twisted Headband: A Nature-Inspired Knitting Project
Wrap yourself in the gentle embrace of nature with this uniquely twisted headband, featuring an intricate leaf cable that winds gracefully around your crown. Knitted in a soft, heathered sage, it's the perfect accessory for crisp autumn strolls or cozy winter evenings. This free knitting pattern is designed for adventurous beginners and intermediate knitters alike, offering a satisfying cable project that works up quickly and makes a thoughtful handmade gift.
The Whispering Willow headband is more than just a practical accessory—it's a wearable piece of art. The twisted seam creates a stunning infinity-style loop that sits elegantly on your head, while the leaf cable motif adds organic texture that evokes images of willow branches swaying in a gentle breeze. Whether you're new to cabling or a seasoned knitter looking for a quick weekend project, this pattern delivers beautiful results.
Materials Needed
Before you begin, gather the following supplies to ensure a smooth knitting experience:
- Yarn: Worsted weight yarn in heathered sage green (approximately 120 yards). Look for a soft, plush yarn with good stitch definition to showcase the cable pattern. A wool blend or superwash merino works beautifully.
- Needles: US 7 (4.5 mm) knitting needles. Straight needles are fine, but circular needles can also be used for comfort.
- Cable Needle: A small cable needle or double-pointed needle for the C4F and C4B maneuvers.
- Stitch Markers: Optional but helpful for keeping track of pattern repeats.
- Tapestry Needle: For weaving in ends and seaming.
- Measuring Tape: To check your gauge and finished measurements.
Gauge: 20 stitches and 28 rows = 4 inches in stockinette stitch. Always knit a gauge swatch to ensure your finished headband fits as intended. Adjust needle size if necessary to match gauge.
Understanding the Pattern
This headband features a beautiful leaf cable pattern framed by simple ribbing. The cable section consists of 12 stitches that are manipulated using C4F (cable 4 front) and C4B (cable 4 back) techniques. Don't be intimidated if you're new to cabling—the pattern is repetitive and easy to memorize after a few repeats.
Finished Measurements: Approximately 18 inches circumference (stretches to 22 inches) and 4 inches wide. The natural stretch of the cable pattern and yarn allows for a comfortable fit on most head sizes.
Abbreviations
Familiarize yourself with these abbreviations before starting:
- CO: Cast on
- K: Knit
- P: Purl
- K2tog: Knit two together (decrease)
- SSK: Slip, slip, knit (decrease)
- C4F: Cable 4 front (slip 2 stitches to cable needle, hold in front, knit 2, then knit 2 from cable needle)
- C4B: Cable 4 back (slip 2 stitches to cable needle, hold in back, knit 2, then knit 2 from cable needle)
- Yo: Yarn over
- PM: Place marker
- RM: Remove marker
Step-by-Step Instructions
Section 1: Cast On and Setup
Begin your Whispering Willow headband by casting on 20 stitches using your preferred method. A long-tail cast-on works well for this project as it provides a neat, stretchy edge.
Row 1 (WS): Purl all stitches. This establishes the wrong side of your work.
Row 2 (RS): Knit all stitches. This is the right side of your work.
Rows 3-4: Repeat Rows 1-2 once more. You should now have 4 rows of stockinette stitch completed. This creates a clean foundation for your cable pattern.
Section 2: Leaf Cable Pattern
Now you'll begin the beautiful leaf cable pattern that gives this headband its distinctive character. The pattern is worked over 12 stitches in the center, framed by 2 knit and 2 purl stitches on each side.
Row 5 (RS): K2, P2, K12 (cable section), P2, K2. This sets up the pattern structure with the cable stitches in the center.
Row 6 (WS): P2, K2, P12, K2, P2. Remember that on wrong side rows, you knit the purl stitches and purl the knit stitches from the previous row.
Row 7 (RS): K2, P2, C4F, C4B, C4F, P2, K2. This is where the magic happens! Work the first C4F by slipping 2 stitches to your cable needle and holding it in front, knit the next 2 stitches, then knit the 2 stitches from the cable needle. Then work C4B by slipping 2 stitches to the cable needle and holding it in back, knit the next 2 stitches, then knit the 2 stitches from the cable needle. Finish with another C4F.
Row 8 (WS): P2, K2, P12, K2, P2. Work this row as established.
Row 9 (RS): K2, P2, K12, P2, K2. Knit all stitches in the cable section.
Row 10 (WS): P2, K2, P12, K2, P2. Continue as established.
Row 11 (RS): K2, P2, C4B, C4F, C4B, P2, K2. Notice how the cables now twist in the opposite direction, creating the leaf-like intertwining effect. Work C4B first, then C4F, then C4B again.
Row 12 (WS): P2, K2, P12, K2, P2. Complete this repeat.
Repeat Rows 5-12 until the piece measures approximately 16 inches from the cast-on edge, ending with a Row 12 (WS). This creates the beautiful repeating leaf cable pattern that flows along the entire length of the headband.
Section 3: Twisted Seam
This is the signature step that transforms your flat knitted piece into the twisted headband. Follow these instructions carefully:
1. Place the piece flat with the right side facing up. Take a moment to admire your beautiful cable work!
2. Take the left end of your work and give it a half-twist (180 degrees) so the right side faces up again but the ends are now reversed. This twist creates the infinity-loop effect that makes this headband so special.
3. With the right sides together, use the Kitchener stitch or a three-needle bind-off to join the two ends. This creates a seamless twisted loop that looks professional and polished.
For the Kitchener Stitch: Thread a tapestry needle with yarn and work the graft by alternating between the front and back needles, creating a seamless join that mimics knit stitches. This is the preferred method for a truly invisible seam.
For the Three-Needle Bind-Off: Place the stitches from both ends on separate needles, hold them parallel with right sides together, and use a third needle to knit two stitches together (one from each needle), then bind off as usual. This creates a sturdy, visible seam that works well if you plan to add decorative elements.
4. Weave in all loose ends using your tapestry needle. Be sure to weave securely to prevent unraveling with wear.
Section 4: Finishing
Complete your Whispering Willow headband with these final touches:
Blocking: Block the headband gently to even out the cable stitches and enhance the leaf motif. Wet block by soaking in lukewarm water with a mild wool wash, gently squeeze out excess water (never wring), and lay flat to dry, shaping to the correct dimensions. This step is crucial for showcasing the beautiful cable definition.
Optional Embellishment: Add a small button or a knitted flower at the seam for extra charm. However, the twisted design is beautiful on its own and needs no additional adornment. If you choose to embellish, consider a wooden button in a natural tone or a small felted flower in a complementary color.
Wear and Care: Your headband is now ready to wear! Hand wash in cold water with mild detergent and lay flat to dry to maintain its shape and beauty. Store folded flat to prevent stretching.
Tips for Success
To ensure your Whispering Willow headband turns out perfectly, keep these tips in mind:
- Count your stitches after each cable row to catch mistakes early. The pattern is forgiving, but accuracy ensures the leaf motif stays crisp.
- Use stitch markers to separate the cable section from the border stitches if you find it helpful. Place markers after the first 4 stitches and before the last 4 stitches.
- Keep your tension consistent throughout the project. Cables naturally pull in, so don't be alarmed if your work looks narrower than expected—blocking will even everything out.
- Practice the cable techniques on a swatch if you're new to cabling. The C4F and C4B are simple maneuvers that become second nature quickly.
Why You'll Love This Pattern
The Whispering Willow Twisted Headband is a versatile accessory that works for any season. The heathered sage green complements autumn wardrobes beautifully, but you can easily customize the color to match your personal style—try a rich burgundy for winter, a soft cream for spring, or a dusty blue for summer evenings.
This pattern is also an excellent introduction to cable knitting. The repetitive nature of the 8-row repeat allows you to memorize the pattern quickly, making it perfect for knitting while watching TV or during social gatherings. The finished piece makes a wonderful gift for friends and family, and the twisted design ensures it looks professionally made.
Whether you're a seasoned knitter looking for a quick project or a beginner ready to tackle your first cables, the Whispering Willow headband delivers satisfaction from cast-on to bind-off. The combination of texture, function, and natural beauty makes this a pattern you'll return to again and again.
Happy knitting, and may your days be filled with the gentle whisper of willow leaves!


