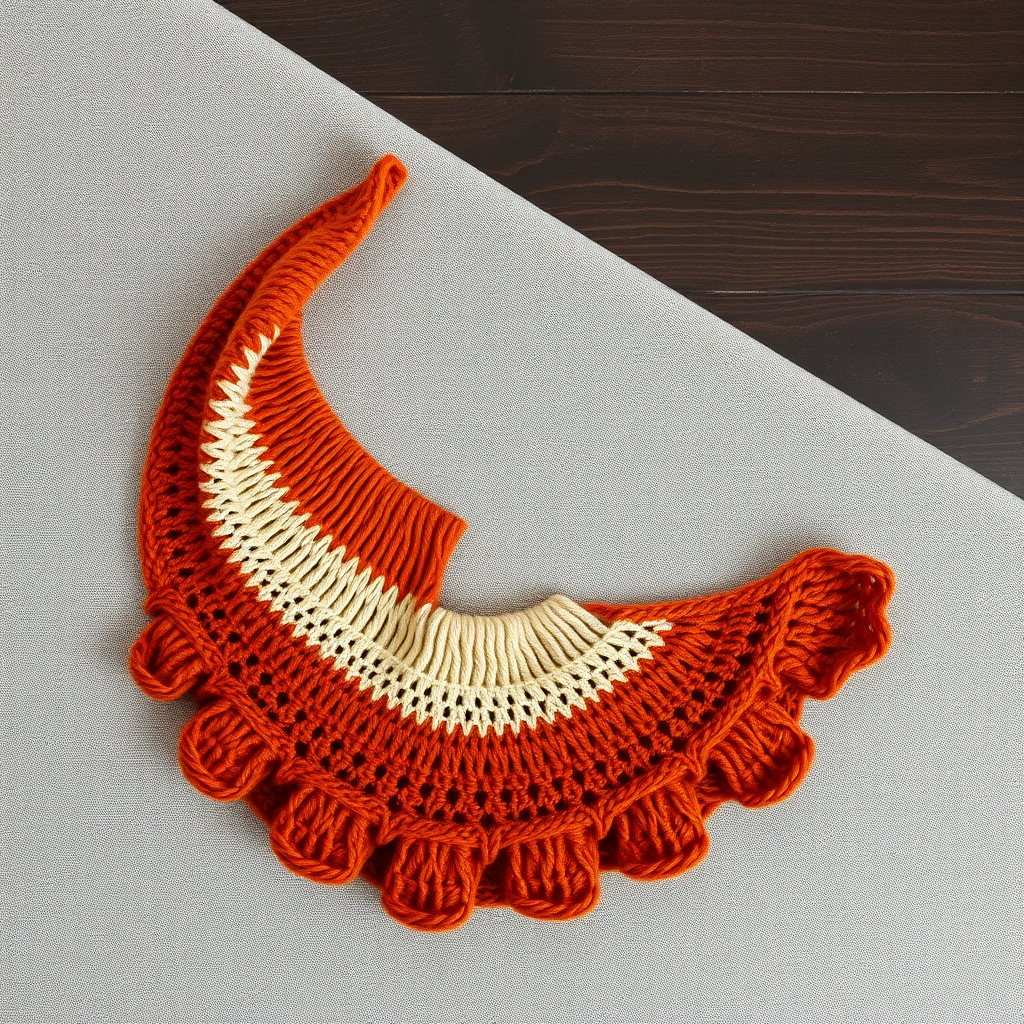
Aurora Borealis Driftwood Shawl Free Pattern – A Gradient Knit Wrap

Aurora Borealis Driftwood Shawl: A Free Gradient Knit Wrap Pattern
Imagine wrapping yourself in the ethereal dance of the northern lights—swirling teals melting into soft lavender, then warming to pale gold. The Aurora Borealis Driftwood Shawl captures that magic in a crescent-shaped knit wrap with a delicate lace edge and a cloud-soft halo. This free pattern is perfect for intermediate knitters (or ambitious beginners) seeking a meditative, beautiful project that rewards patience with a stunning, wearable piece of art.
Knit from the top center down, this shawl grows organically as you work, making it a portable and satisfying project. The gradient yarn does the heavy lifting for color, while the simple lace repeats keep your hands busy without overwhelming your mind. Whether you're a seasoned knitter or ready to level up your skills, this pattern will guide you stitch by stitch to a breathtaking finished piece.
Materials Needed
Before you begin, gather these supplies to ensure a smooth knitting experience:
- Yarn: Fingering weight yarn in 3 gradient shades (e.g., deep teal, soft lavender, pale gold) – approximately 400g total (or 1200m). Choose a yarn with a slight halo for that cozy, cloud-like texture.
- Needle: US 6 (4.0mm) circular knitting needle with a 32-inch cable. The long cable is essential to accommodate the growing number of stitches as the shawl expands.
- Gauge: 20 stitches and 28 rows = 4 inches in stockinette stitch (blocked). Gauge is important for achieving the correct drape and size, so take a moment to swatch!
- Notions: Stitch markers (at least 2), tapestry needle for weaving in ends, blocking mats and pins, and a spray bottle or basin for wet blocking.
Step-by-Step Instructions
This shawl is knit from the top center down, increasing gradually to form a crescent shape. Use a long circular needle to accommodate the growing number of stitches. Follow these detailed instructions carefully, and you'll be amazed at the result.
Abbreviations
k = knit, p = purl, yo = yarn over, k2tog = knit two together, ssk = slip slip knit, pm = place marker, sm = slip marker, RS = right side, WS = wrong side.
Setup
Cast on 5 stitches. Knit 6 rows (garter stitch). Now, pick up and knit 3 stitches along the edge of this garter strip, then 5 stitches from the cast-on edge. You should now have a total of 13 stitches on your needle.
Place markers as follows: pm after stitch 1, pm after stitch 6, pm after stitch 12. This creates your structure: 1 edge stitch, 5 stitches, 1 center stitch, 5 stitches, 1 edge stitch. The edge stitches will always be knit, and the center stitch will be knit on RS rows and purled on WS rows.
Body Section (Stockinette Increases)
Now we'll establish the increase rhythm that shapes the crescent.
Row 1 (RS): k1, yo, k to marker, yo, sm, k1 (center), yo, k to marker, yo, sm, k to last stitch, yo, k1. (4 increases made)
Row 2 (WS): k1, p to last stitch, k1. (Edge stitches are always knit.)
Row 3 (RS): k1, yo, k to marker, yo, sm, k1, yo, k to marker, yo, sm, k to last stitch, yo, k1.
Row 4 (WS): k1, p to last stitch, k1.
Repeat Rows 3-4 until you have 45 stitches total (or desired width for the top edge). End with a WS row. This creates a smooth stockinette body with a garter edge and a subtle center line.
Begin Lace Section
Now we introduce the delicate lace pattern on the outer sections, while maintaining the edge stitches and center stitch as established. The lace naturally shifts outward as you increase.
Row 1 (RS): k1, yo, k1, *yo, ssk, k3, k2tog, yo, k1* repeat from * to * until 2 stitches before marker, yo, ssk, sm, k1 (center), ssk, yo, repeat from * to * until 2 stitches before marker, k1, yo, k1, yo, k1. (Note: increases at edges and center continue.)
Row 2 (WS): k1, p all stitches to last stitch, k1.
Row 3 (RS): k1, yo, k2, *yo, ssk, k1, k2tog, yo, k3* repeat from * to * until 2 stitches before marker, yo, ssk, sm, k1, ssk, yo, repeat from * to * until 2 stitches before marker, k2, yo, k1.
Row 4 (WS): k1, p all stitches to last stitch, k1.
Row 5 (RS): k1, yo, k3, *yo, ssk, k1, k2tog, yo, k3* repeat from * to * until 2 stitches before marker, yo, ssk, sm, k1, ssk, yo, repeat from * to * until 2 stitches before marker, k3, yo, k1.
Row 6 (WS): k1, p all stitches to last stitch, k1.
Row 7 (RS): k1, yo, k4, *yo, ssk, k1, k2tog, yo, k3* repeat from * to * until 2 stitches before marker, yo, ssk, sm, k1, ssk, yo, repeat from * to * until 2 stitches before marker, k4, yo, k1.
Row 8 (WS): k1, p all stitches to last stitch, k1.
Repeat Rows 5-8, continuing to increase at the edges and center (the lace pattern naturally shifts outward). Work until the shawl measures approximately 24 inches from the center cast-on edge, or desired length. End with a WS row.
Edging
This simple picot-like edging adds a refined finish.
Row 1 (RS): k1, *yo, k2tog* repeat to last stitch, k1.
Row 2 (WS): k1, p all stitches to last stitch, k1.
Row 3 (RS): Bind off loosely knitwise. Weave in all ends with your tapestry needle.
Blocking
Blocking is crucial for this shawl—it opens up the lace and enhances the gradient. Soak the shawl in lukewarm water with a drop of wool wash for 20 minutes. Gently squeeze out excess water (do not wring). Lay flat on a blocking mat, pin out the edges to form a crescent shape, and allow to dry completely. This transforms your knitting into the flowing, ethereal wrap you envisioned.
Once dry, your Aurora Borealis Driftwood Shawl is ready to wear or gift. The gradient colors will shift beautifully as you move, and the soft halo will keep you cozy. Enjoy the process, and don't forget to share your finished shawl with the knitting community—this pattern is a joy to see in different colorways!